
Branch Manager
Specially designed for those who own multiple stores (5 or more).Manage and control multiple store locations via one account (global service, resource and customer management). To be fully informed and able to take decisive actions. This powerful management tool provides insights, reduces admin tasks, and allows actions to be implemented consistently at a global level and across a whole network.

Manage and steer all your locations globally from one account
- Open the Branch Manager (BM) via https://id.zeiss.com/ or https://branch-manager.timify.com
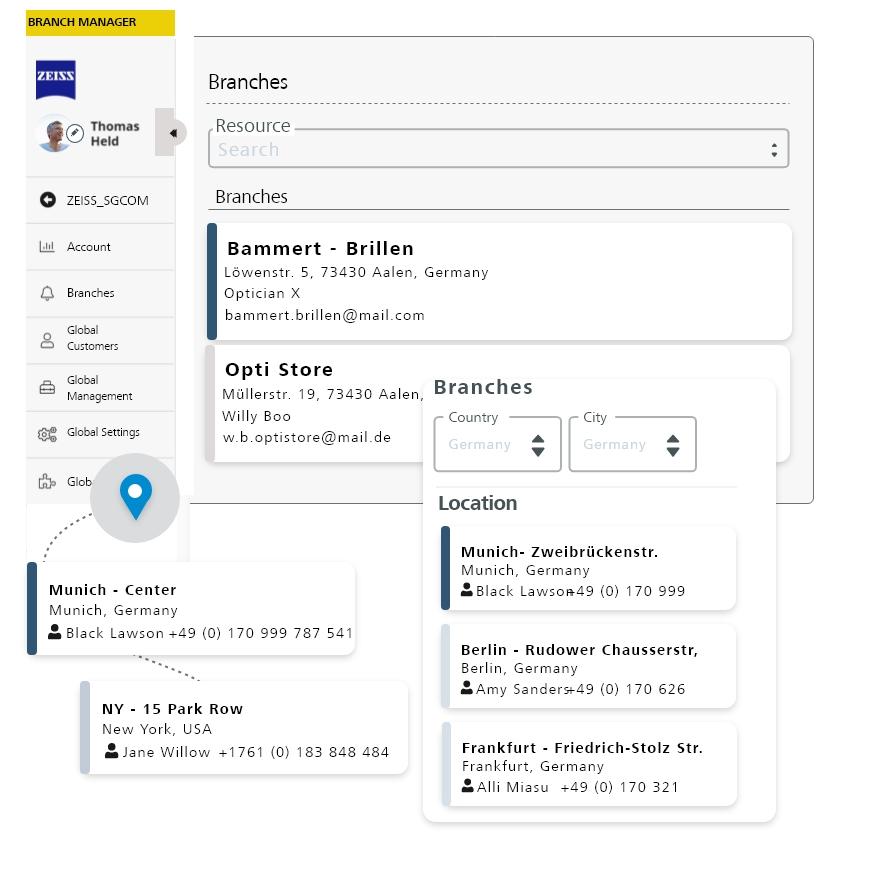
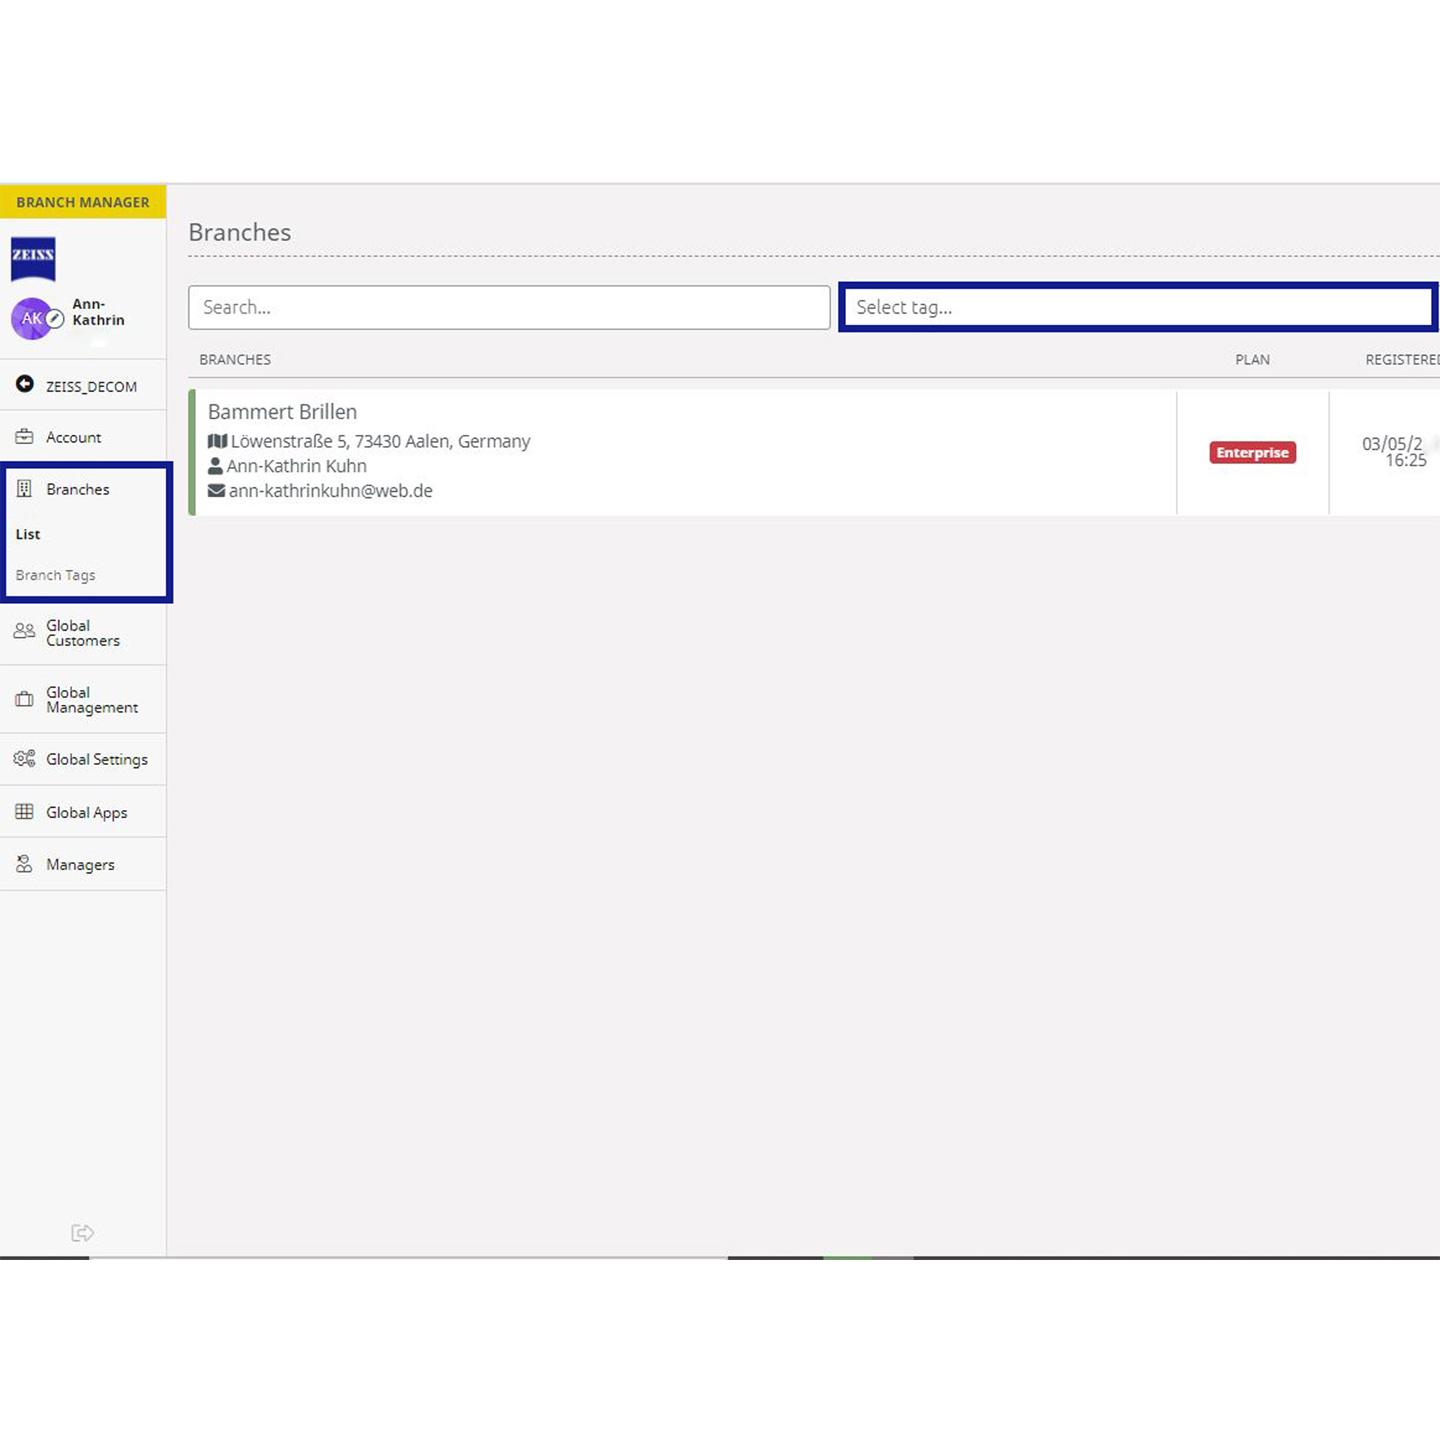
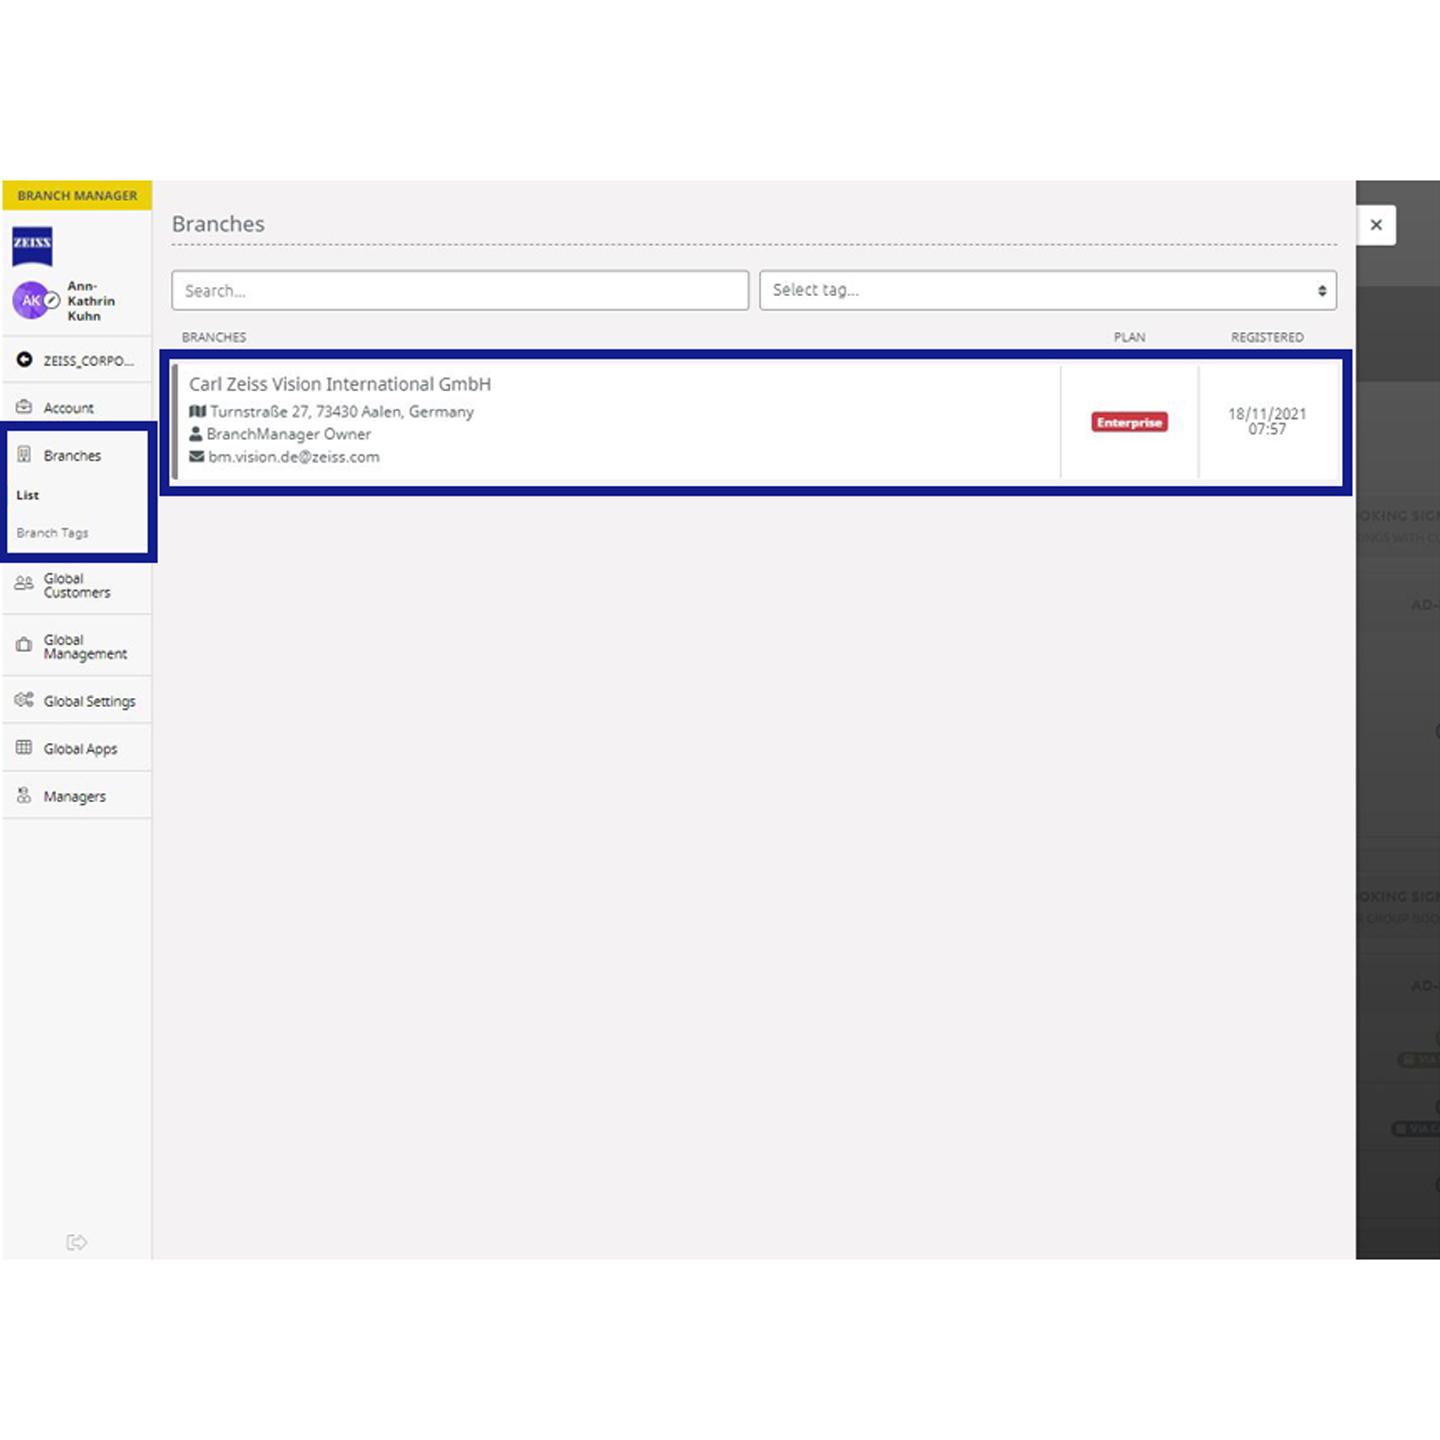
- The Branch Manager gives you an overview and one-click access to each of your locations. From the sidebar navigation "Branches", you'll find all accounts assigned to your company. For each branch, the following information is listed: Branch name, Branch address, Branch contact details, Account owner name, Plan and registration date. Also included are the total number of employees, and total number of bookings.
- Use the filter function to search for a specific branch or group of branches. Search for a specific branch name, location or a specific tag that you have assigned to the location.

ZEISS A.R.M. Platform Branch Manager
Account management
Does a specific store need help with the daily management of its appointment management or want to make changes to its local calendar settings? Would you like to view detailed live data of the respective store directly in the local calendar? Then just send an access request to the store owner. After the store owner has accepted it, you will automatically receive authorisation.
Account details
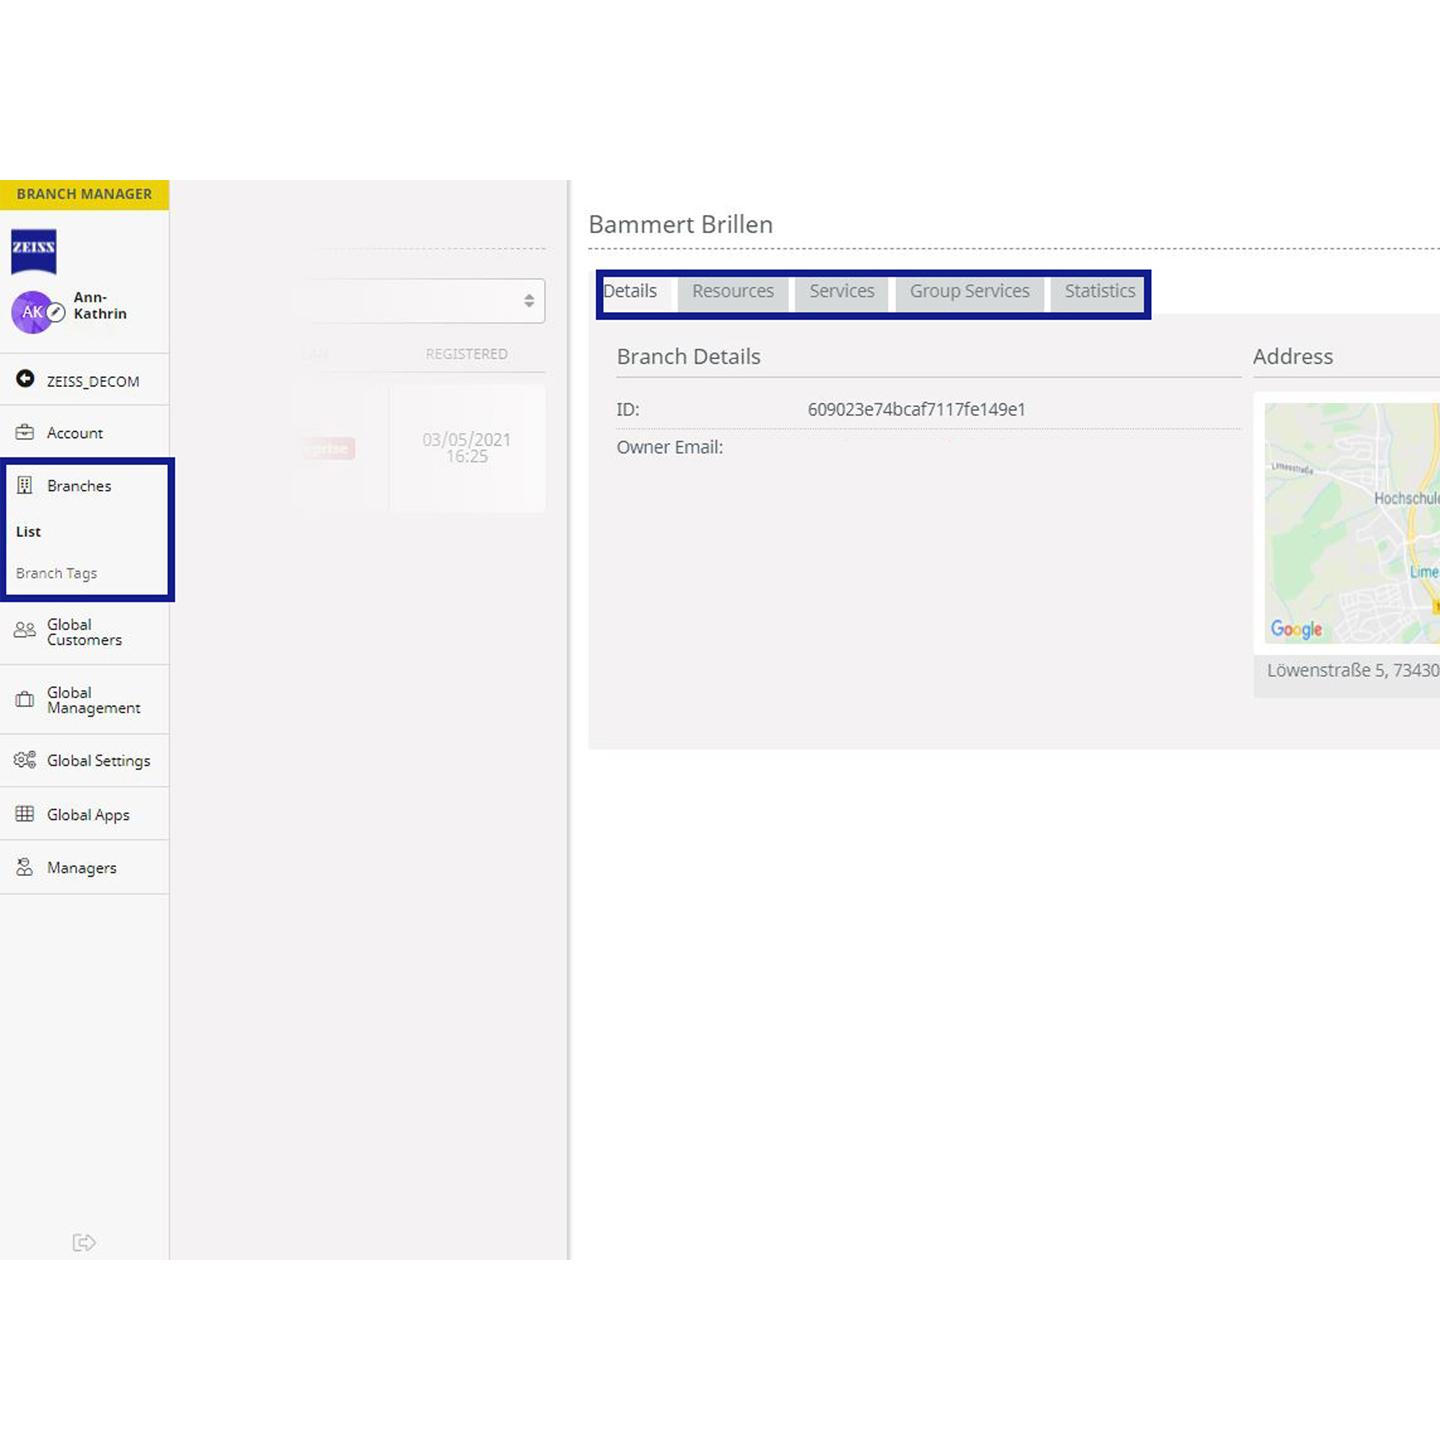
As soon as you want to have a closer look at a particular store, click on it within the overview list to get to the detailed store view. Here you can see and/or edit the contents for the respective location. In the detail view of the respective store, you can view all core information about your store (account ID, external ID, owner email, account address and assigned store address) and your account owner, which you defined when creating the account. If you want to change certain details such as the plan, description and tag you can edit them by clicking on the "pen" button.
IMPORTANT! Never change the BranchID. For all further details you need to log into the respective account directly and make the changes within this account. An update and synchronisation with the Branch Manager is carried out in real time.
Resources
You can directly see which resources are already created in the respective account, whether the respective resource can be booked online and how many bookings have been booked already for each of them.
Note: We as ZEISS cannot do this, if a customer gets a Branch Manager account, all this must be defined.
Services & groups
You can see at a glance which services are already created in the respective account and whether the respective services are online bookable. Without having to log into the local calendar directly, you can make changes for the respective services via the Branch Manager. Change service name, description, duration or colour in real time. Activate online payment, set the services to on-/offline or assign new resources to this service. If the service is no longer relevant, it can be deleted at any time.
Note: We as ZEISS can not do this, only if customers have an own Branch Manager account.
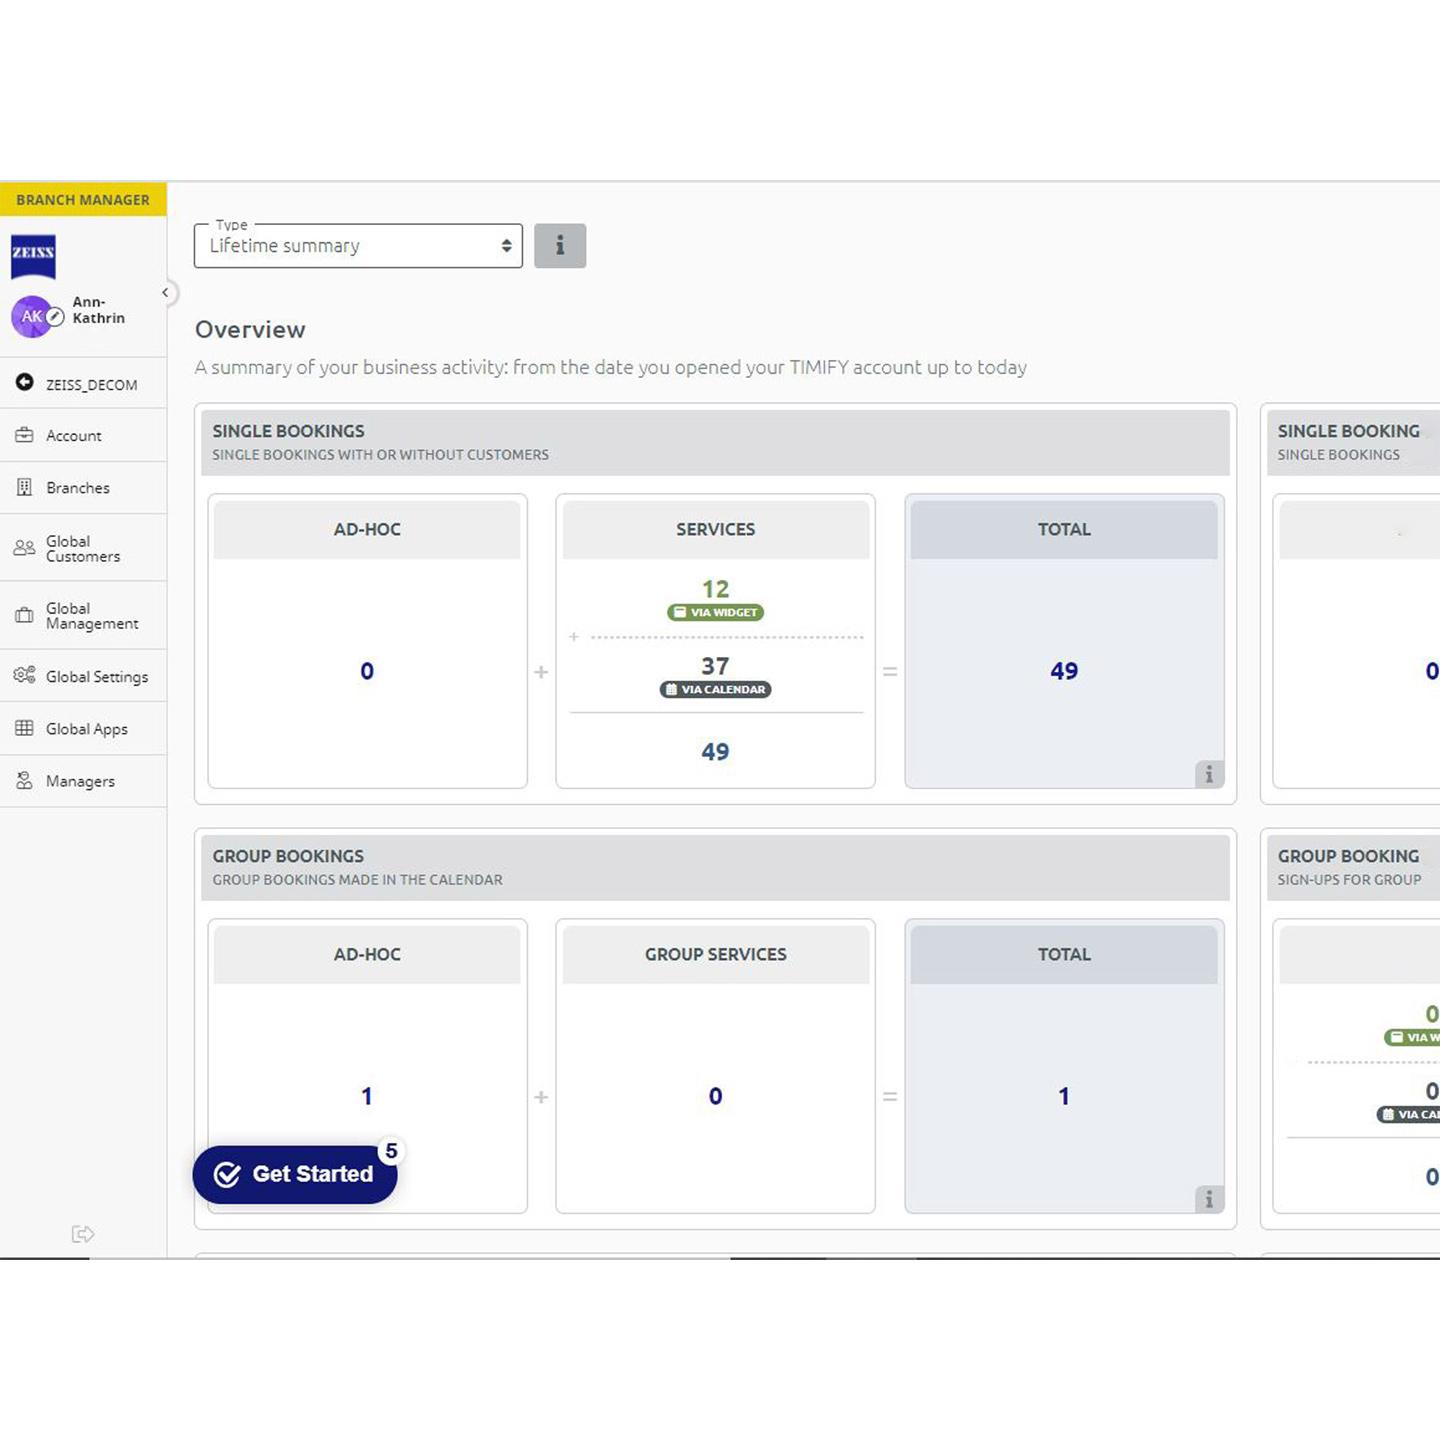
Statistics
For each store, you have real-time access to all relevant statistics. Either on a "lifetime" basis (= all statistics since day one the account was created) or monthly (= calculation is done overnight, always based on the previous weekday), you will always have an overview of e.g. the most on-/offline booked appointments, appointment changes and cancellations, top 10 services and resources, etc.

Global Branch Management
Manage and access your stores- The Branch Manager allows a centralised administration of all your locations via only one account. Avoid time-consuming manual administration of each location individually and save time and resources by managing them centrally via the Branch Manager.
- If you have no Branch Manager account, contact your local customer care centre so they can change it in the ZEISS ID Management Portal. Afterwards you can edit or delete information (address, e-mail, contact details) of the account owner, your resources and (group) services via the Branch Manager, and keep track of all activities within your locations.
- If one of your locations requires it, then simply log into the individual ZEISS A.R.M. Platform account of the location via the Branch Manager and support your location directly within the account.

Statistics – Monitor, analyse, and evaluate your business performance
- Our Statistics dashboards display all statistics relevant to your business, at-a-glance. Note: All the assigned branches are displayed in your statistics that belong to this Branch Manager account. If you want to get store specific statistics, have a look in the single store.
- The Business lifetime dashboard tracks performance across all locations for the entire lifetime of your business ("lifetime" = from the day on the Branch Manager was created for your company); while the Monthly dashboard allows you to look in more depth at your global performance month-by-month.
- With insights that track all core business measurables, such as number of bookings; how bookings were scheduled; the most popular booking slot times and days; revenue generated for services; resource activity; cancelation rates and plenty more.
- Easily switch from your Statistics dashboard to the statistics feed for any branches. In-depth data is available in tabs.
- All statistics data is updated daily, so you always have the latest numbers at hand. To get more details about a single store go to "Branch" >> "List" choose a store and click on the tab "Statistics". Note: If a customer does not come to your store on day one, the "no-show" will be displayed on the next day in the statistics.
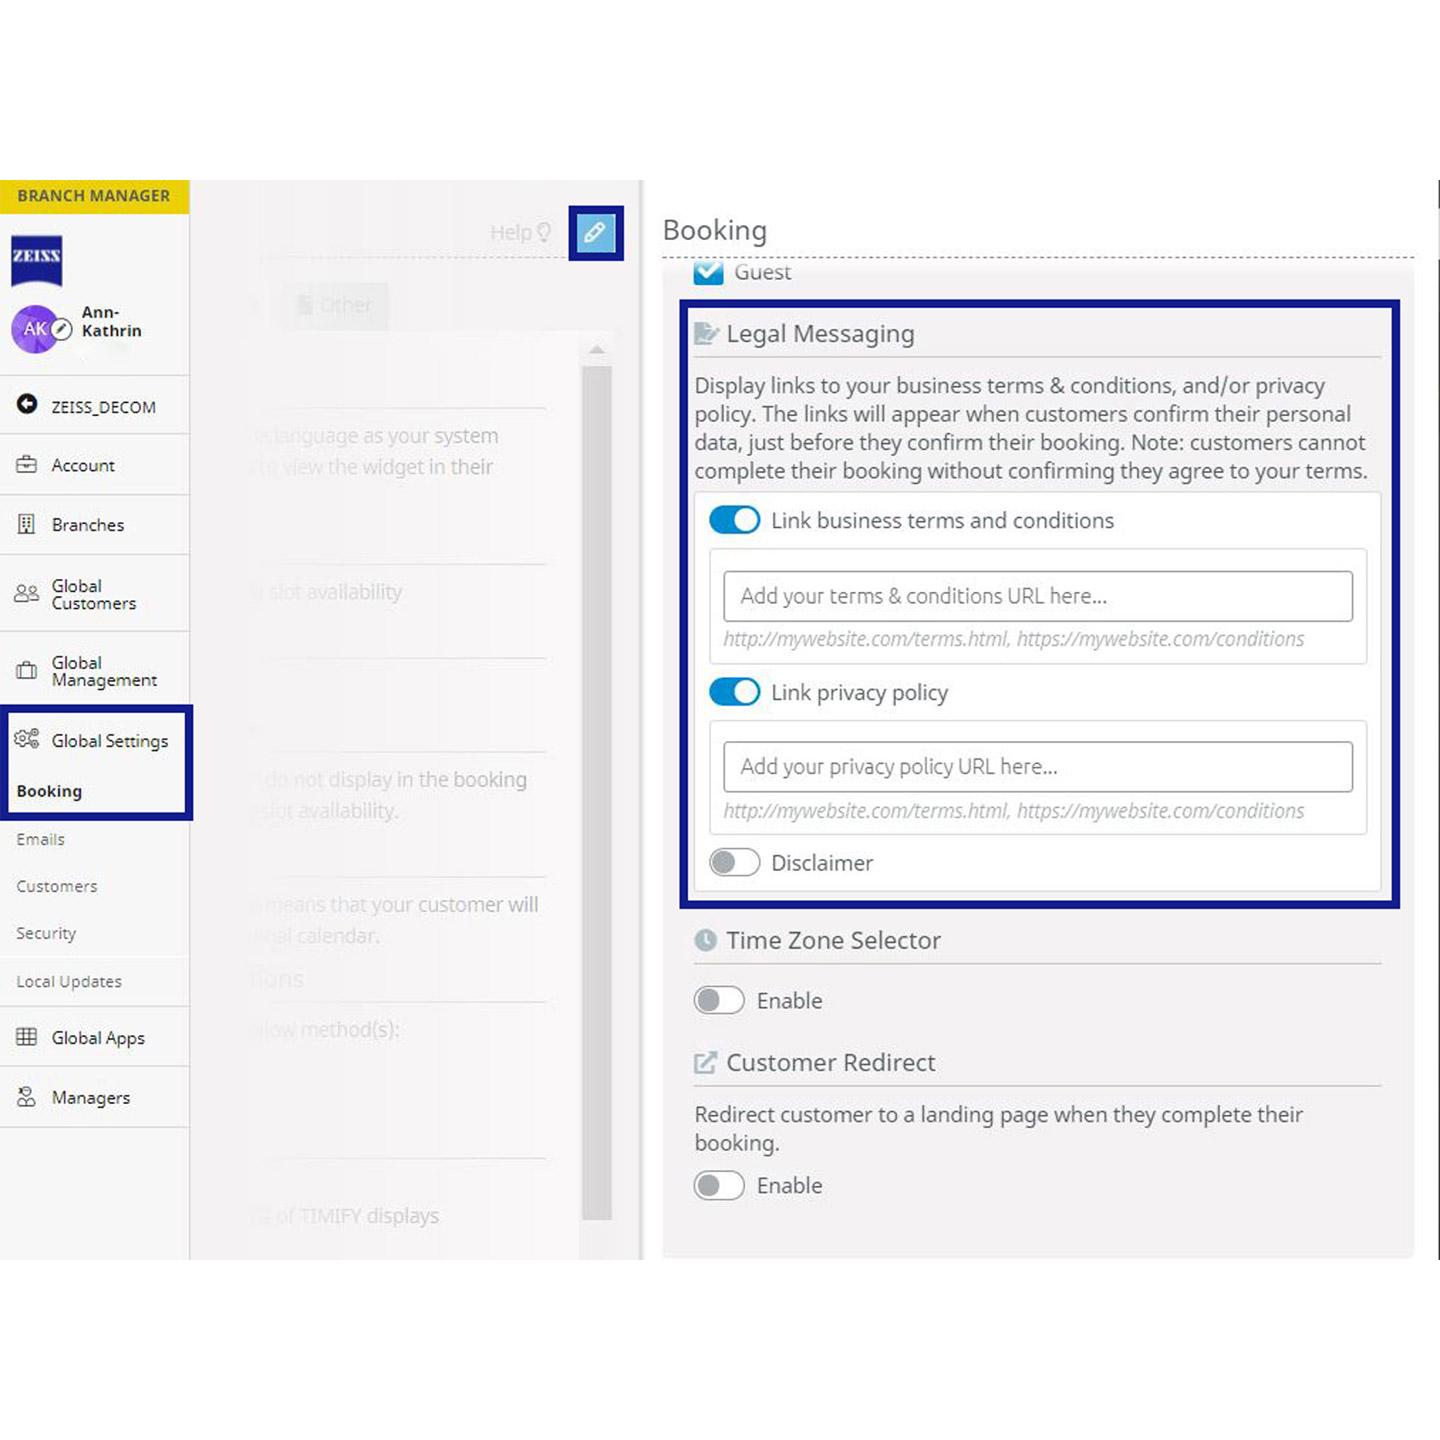

How to implement the T&C and Data Privacy on a BM level
Data Privacy and Terms & Conditions (T&C)
- Legal requirements: T&C need to be set up locally.
- Your legal department should be able to properly support you with this. If you have questions on this topic, please reach out to your local support contact.
- To add your T&C and Data Policy go to "Settings" >> "Bookings" >> "Widget" >> "(Edit mode)" >> "Individual Terms and Conditions, and Privacy Policy".
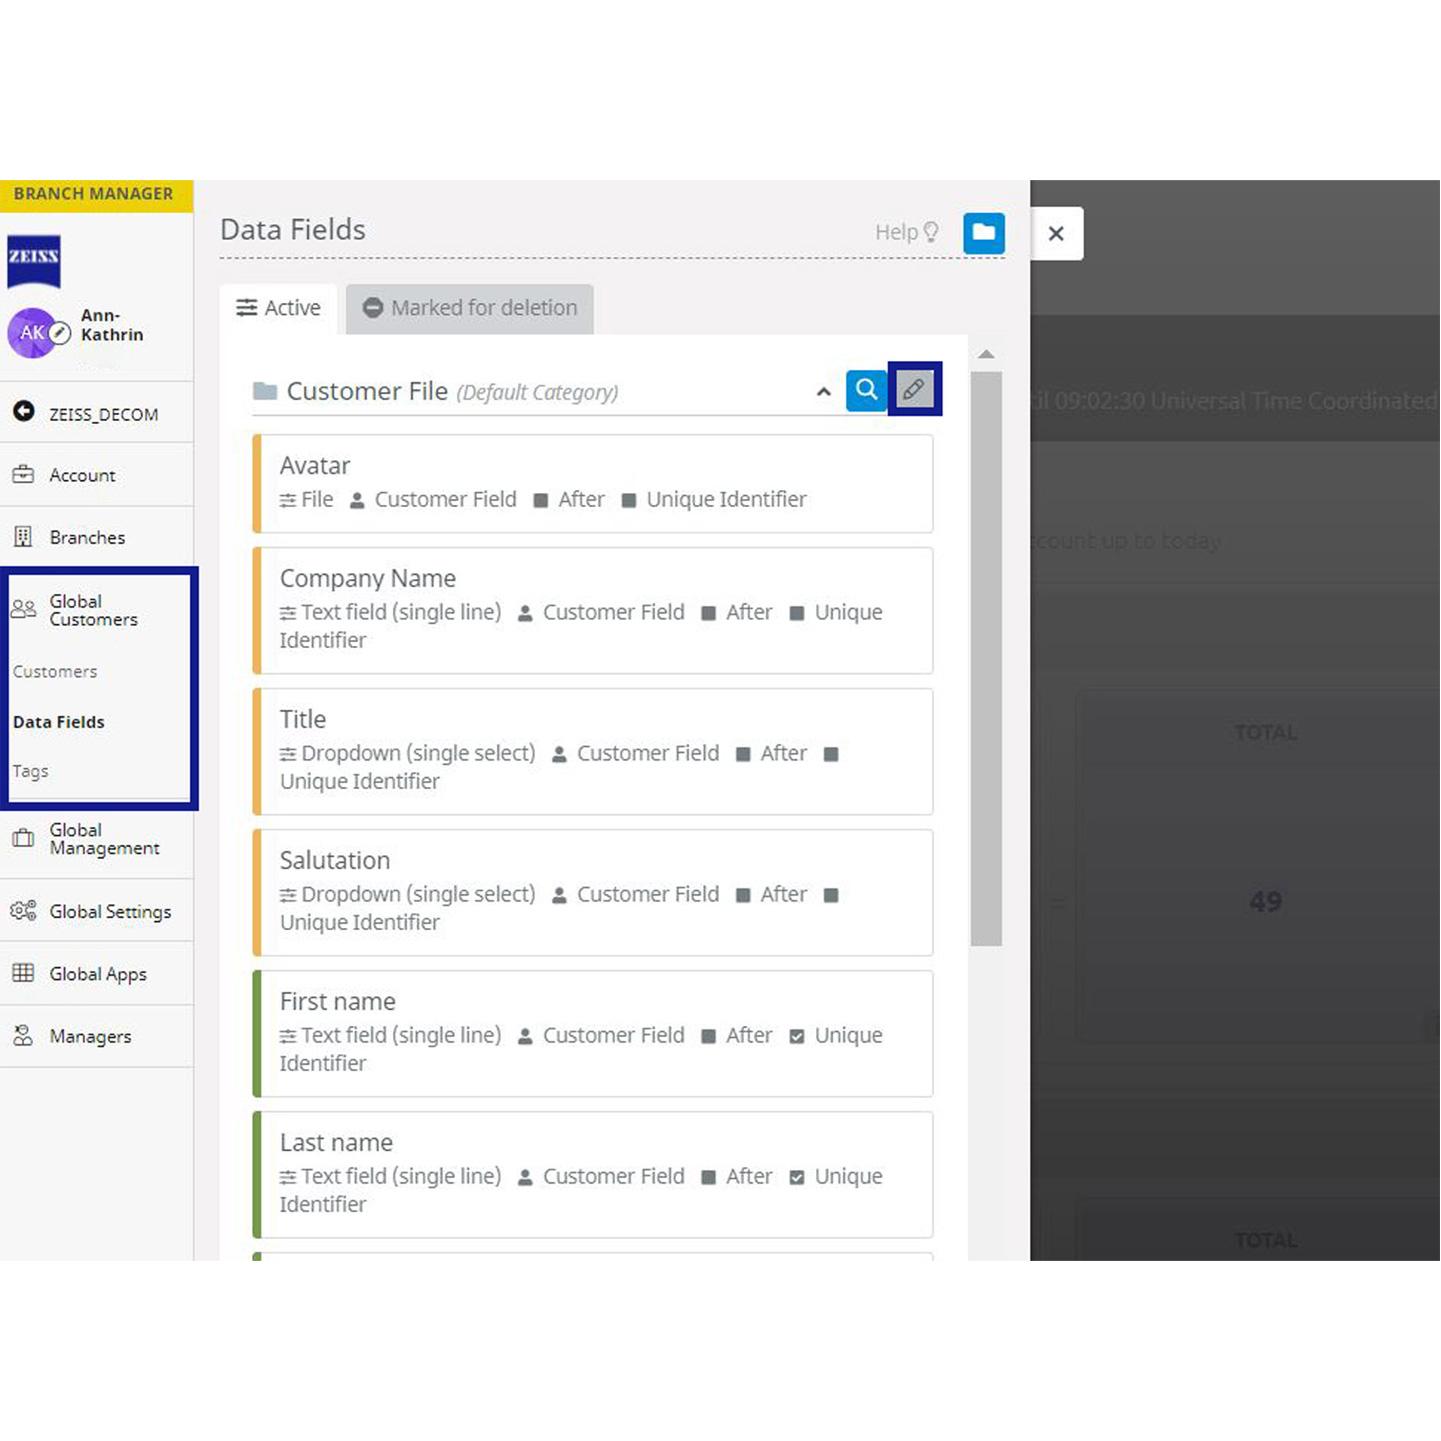

Global data fields
- Define global Data Fields for all your locations to ensure all locations are capturing the same data, whether optional or mandatory, as part of the booking process – both when entering a new customer file manually, as well as when a customer self-schedules a service online, using your booking widget.
- Go to "Global Customer" >> "Data Fields"
- With Global Data Fields you can adapt the ZEISS A.R.M Platform even better to the needs of a company and all assigned locations in order to create the best booking journey possible that fits perfectly to your company's and customers' requirements. Use predefined data fields such as phone number, first and last name or create individual data fields to collect more specific information during the booking journey which are relevant for you to prepare yourself for the actual appointment or to understand your customers even better.
IMPORTANT!: Please note that you must include all the additional Data fields that you create in your own data privacy policy and link them to your booking settings in order to be data compliant! Please be very careful with additional data that you collect for other reasons than the booking process.


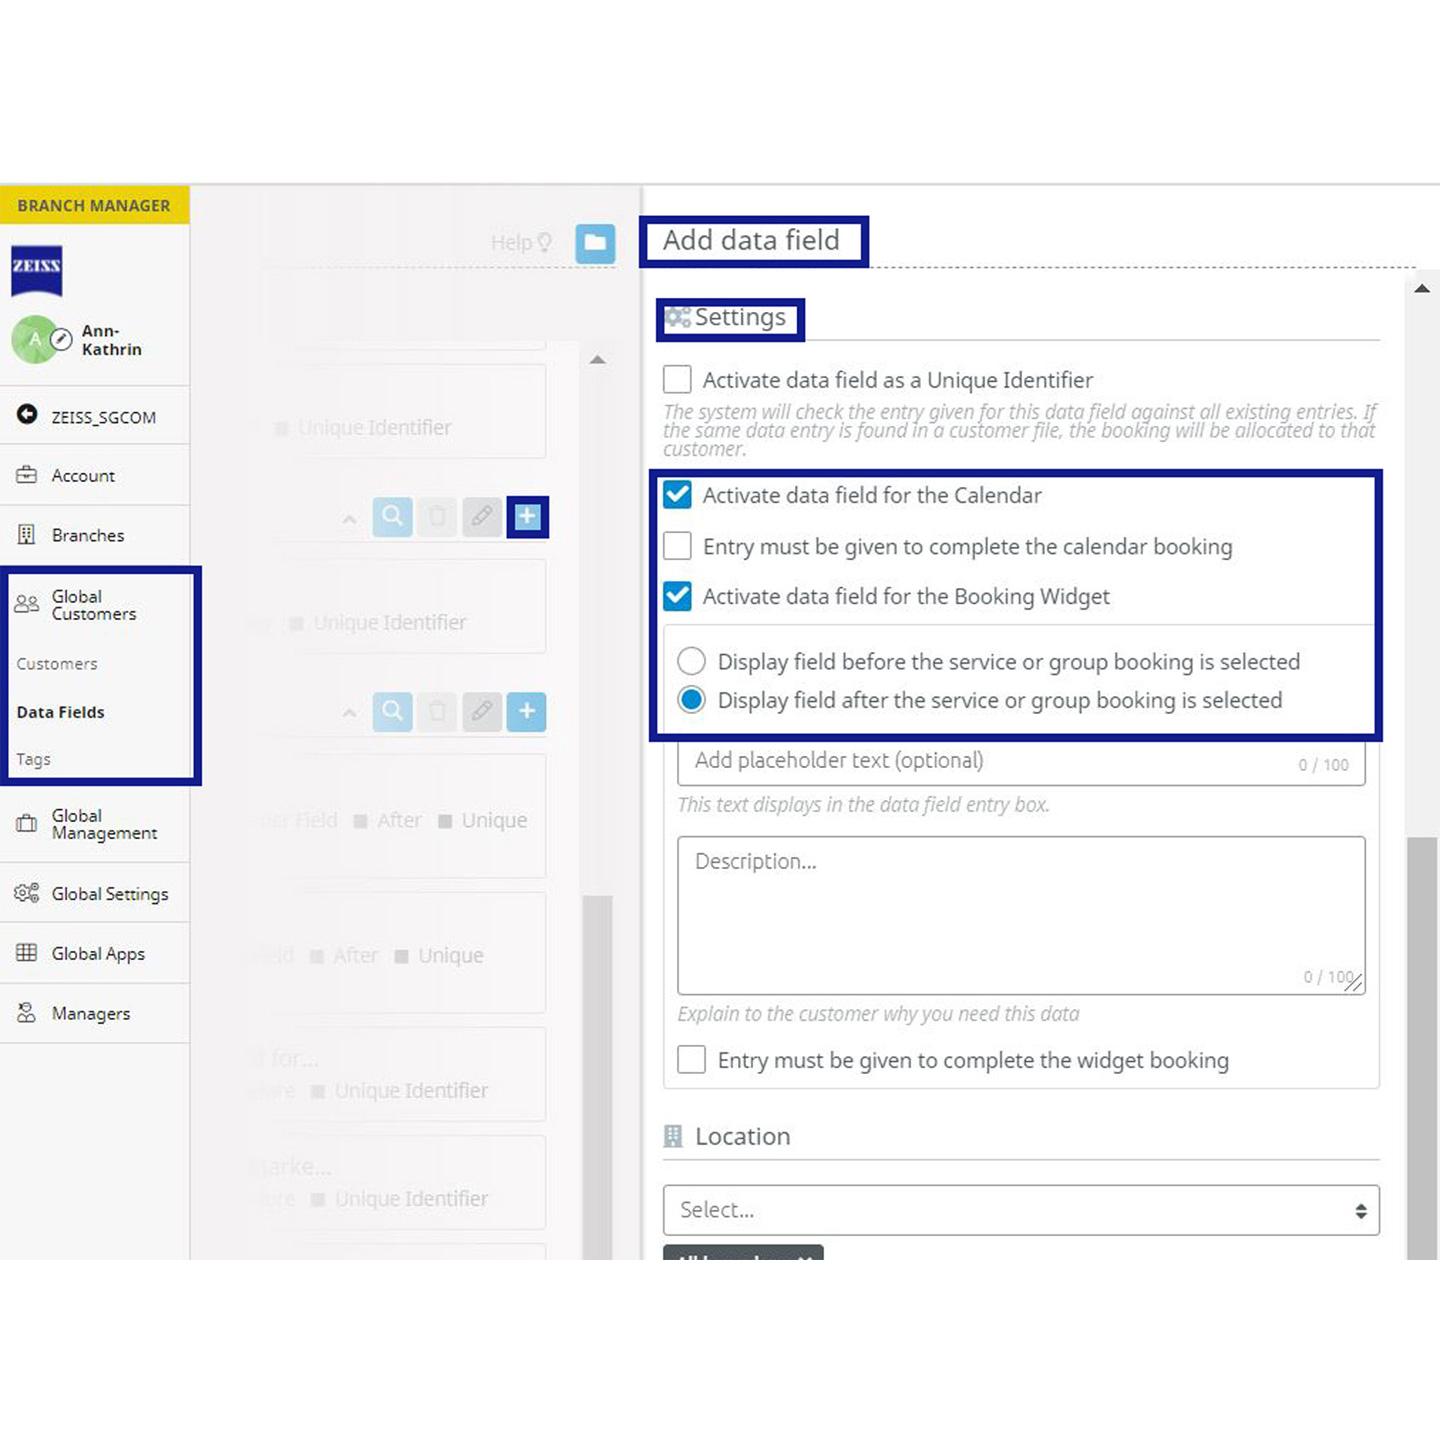
How do I create a new data field?
In order to add a new data field, first select the category in which your data field is to be added and click the ("+") button. When creating a new data field, first select a name and the category of the field. If you want your customer to enter information in the data field in a certain format, you can specify this with the option "Field type". You can choose between the following field types:
Address, Email, Phone number, Check box, Date, Multiple entries, Text field (single or multiple line), Time zone
Furthermore, you can define for which assigned locations you want to add additional data fields – either to all your locations or only to some specific ones.
Depending on what information is requested, it is important to see all previous customer entries in a history or to be able to display only the most recent entry. You can now either save all data, e.g. for a booking history ("Keep copies of the data") or display and save only the latest entry ("Overwrite data").
IMPORTANT!: Please note that you must include all the additional Data fields that you create in your own data privacy policy and link them to your booking settings in order to be data compliant! Please be very careful with additional data that you collect for other reasons than the booking process.
When you have to assign a global (group) service to the data field, you also have the option to select "All" services.
IMPORTANT!: Global data fields can only be assigned to global services. So before being able to assign data fields to a specific service you need to create global (group) services via the BM.

Additional data field settings
Finally, you can activate the data field so that it appears in the customer database and can be filled out. In this section, you can further specify whether the customer field is mandatory or optional to be filled out – either internally and/or by your customers when activating it for online booking, so that your customer canalready enter data online during the booking process. If you activate the field for online booking, you can now choose whether the field should be displayed before or after the customer has submitted his data or logged in.
Check the box "Mandatory booking field" if you need the customer to fill in this field to finish his booking.
Don't forget to save all entries at the end below.
IMPORTANT!: Please note that you must include all the additional Data Fields that you create in your own data privacy policy and link them to your booking settings in order to be data compliance! Please be very careful with additional data that you collect for other reasons then the booking process.


Status of data fields
You can see the status of the data field from the colours on the left side of each field.
GREY - the data field is neither published in the customer database nor activated for online booking.
YELLOW - the data field is available in the customer database, but not activated for online booking.
GREEN - the data field is activated in the customer database as well as available for online booking.
IMPORTANT!: Please note that you must include all the additional data fields that you create in your own data privacy policy and link them to your booking settings in order to be data compliant! Please be very careful with additional data that you collect for reasons other than the booking process.
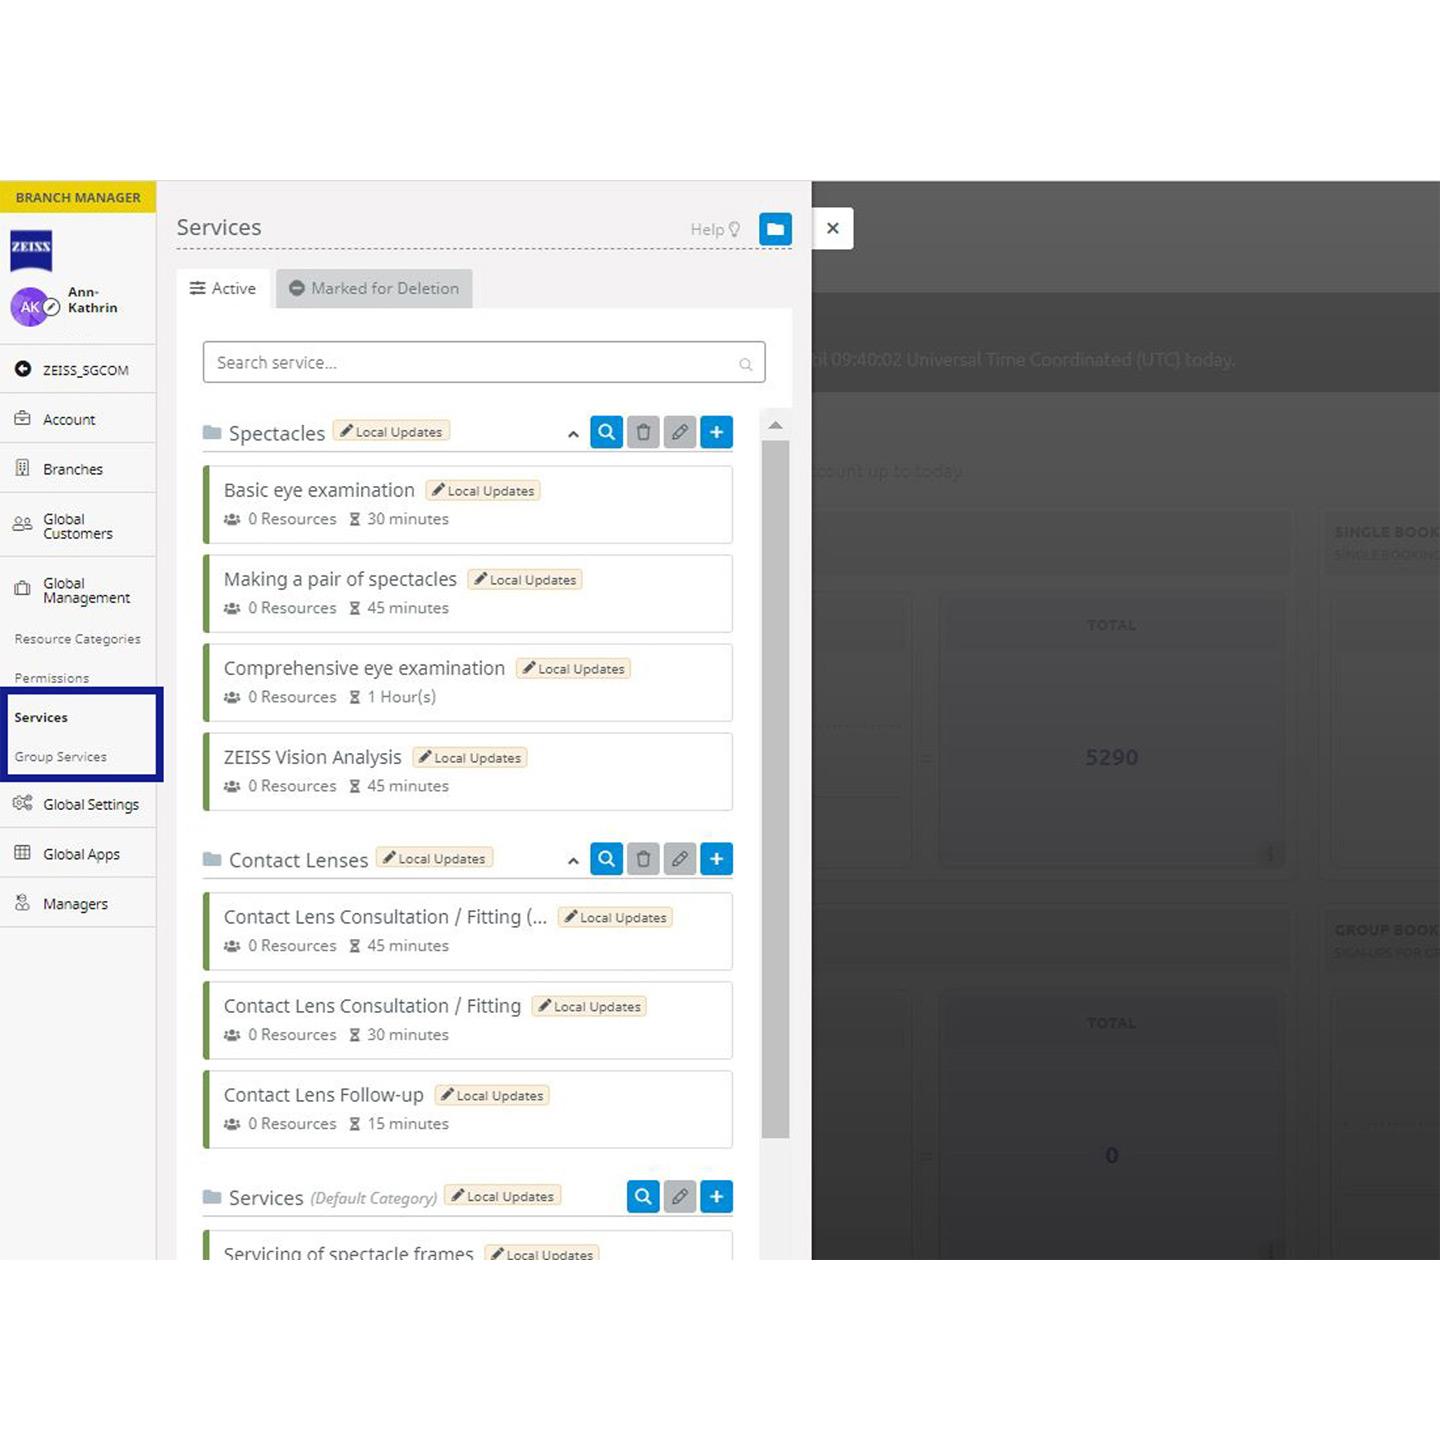

Global Services
- Once you've defined your services and specified the customer data you want to store, you can roll out these services and customer data fields for all your locations in a few clicks. This saves you time because you don’t have to set up each location individually, and you have peace of mind knowing that each of your locations are set up exactly how you want them to be. Maybe some of your locations offer additional or different services, or you need more specific customer data - this can be managed locally, for any given branch.
- Go to "Global Management" >> "Service".
- Populate your services globally across all your locations, to guarantee all your locations have the same platform of bookable services.
- With the help of Global Services, you can ensure that all connected locations offer the same portfolio of services and that these are online bookable. Via the Branch Manager you will always have full control of all services.
- Note: When updating existing Global Services, these changes will also be transferred to the branches that belong to the B.M. Account.
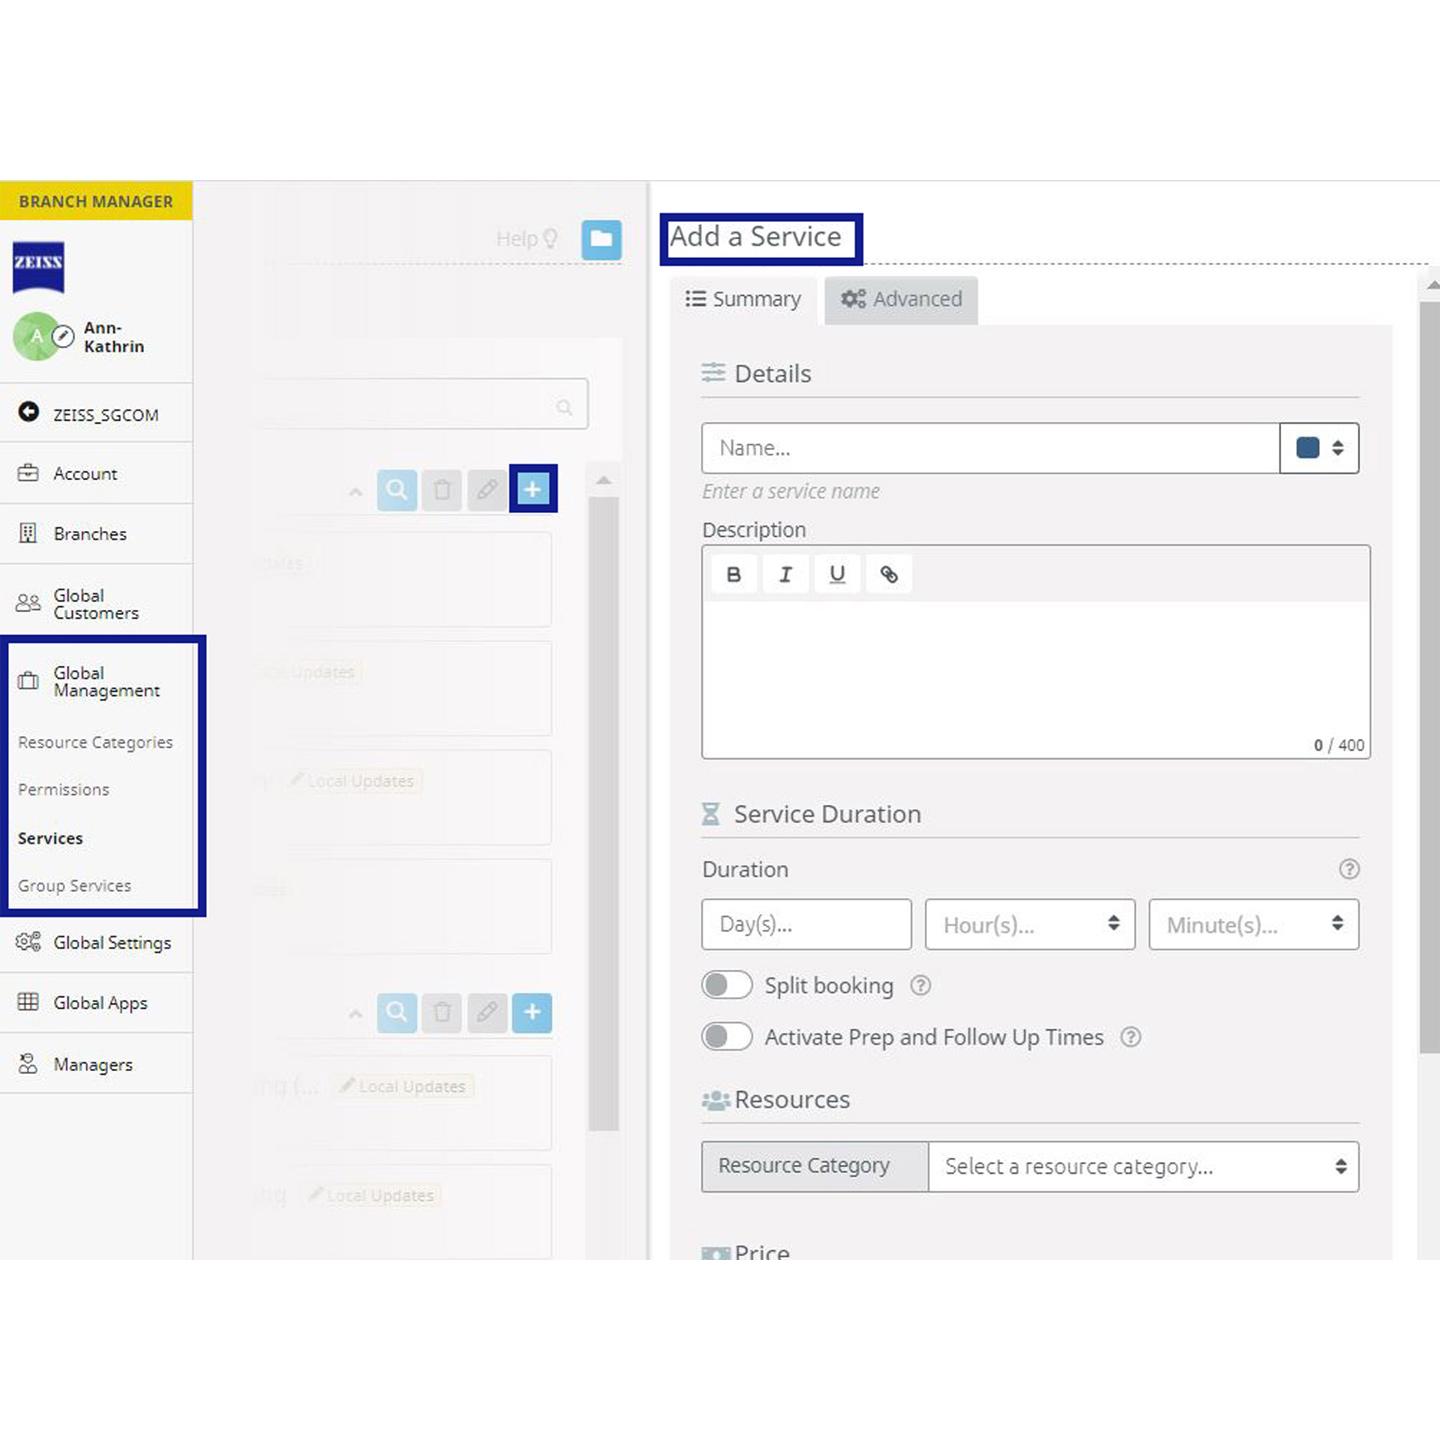

Add new services
Quickly and easily add new Global Services to your company and assign them to all or selected branches.
Use the ("+") button to add your specific services.
Define standardised pricing (if you want to activate online payment). Globally assign all resources and define, depending on the service type, whether the service should be online bookable or not. For more information, reach out to your local support contact.
By assigning the specific service to all or some selected branches, the service is automatically saved in the calendar of the local branches and displayed in the calendar and/or booking widget.
After saving all (newly) added Global Services can be seen in the "Active services" overview.
If you want to make multiple services online bookable, you can also categorise individual services and automatically adopt these categories for all locations.


Edit services
Before you edit a service, you must first define who is allowed to make changes to the services. By activating this in the Global Settings, you can ensure that the local branch is not allowed to make any changes to the services.
Within the respective online calendars of the local branches, a service (category) created via the Branch Manager is marked as "Global".
Changes to a Global Services can ONLY be made via the Branch Manager. If a branch changes a service in the local online calendar, this change is ONLY applied to the respective location, but not globally to all other assigned locations.


Delete services
Similar to creating a new service, you can delete specific services via the Branch Manager, so that the respective service is no longer visible for specific branches.
All changes made to the Global Service but locally in one of the connected branches are listed in the "Changed locally" tab.
If a service is still connected to a resource, an appointment is booked for it or is otherwise still being used in one of the local calendars. All accounts in which the service could not be deleted are listed here: "Changed locally".
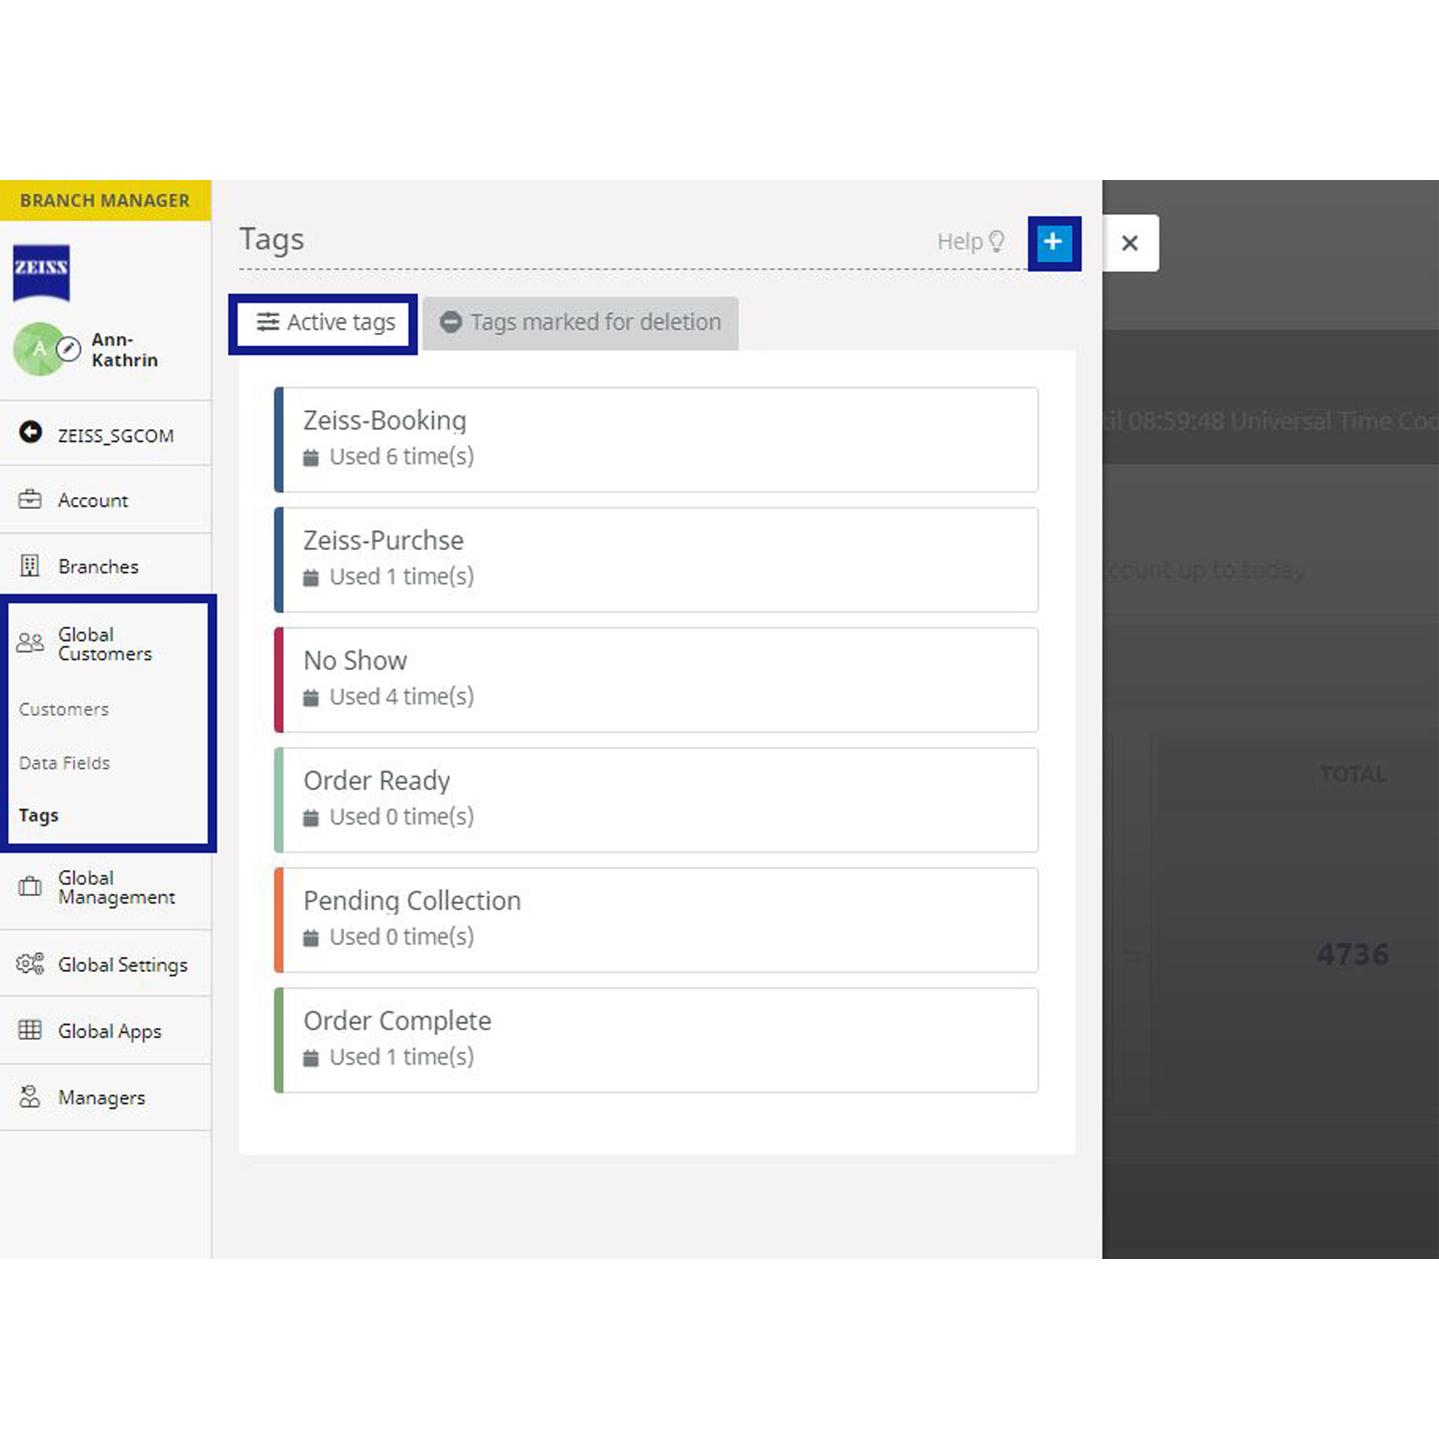

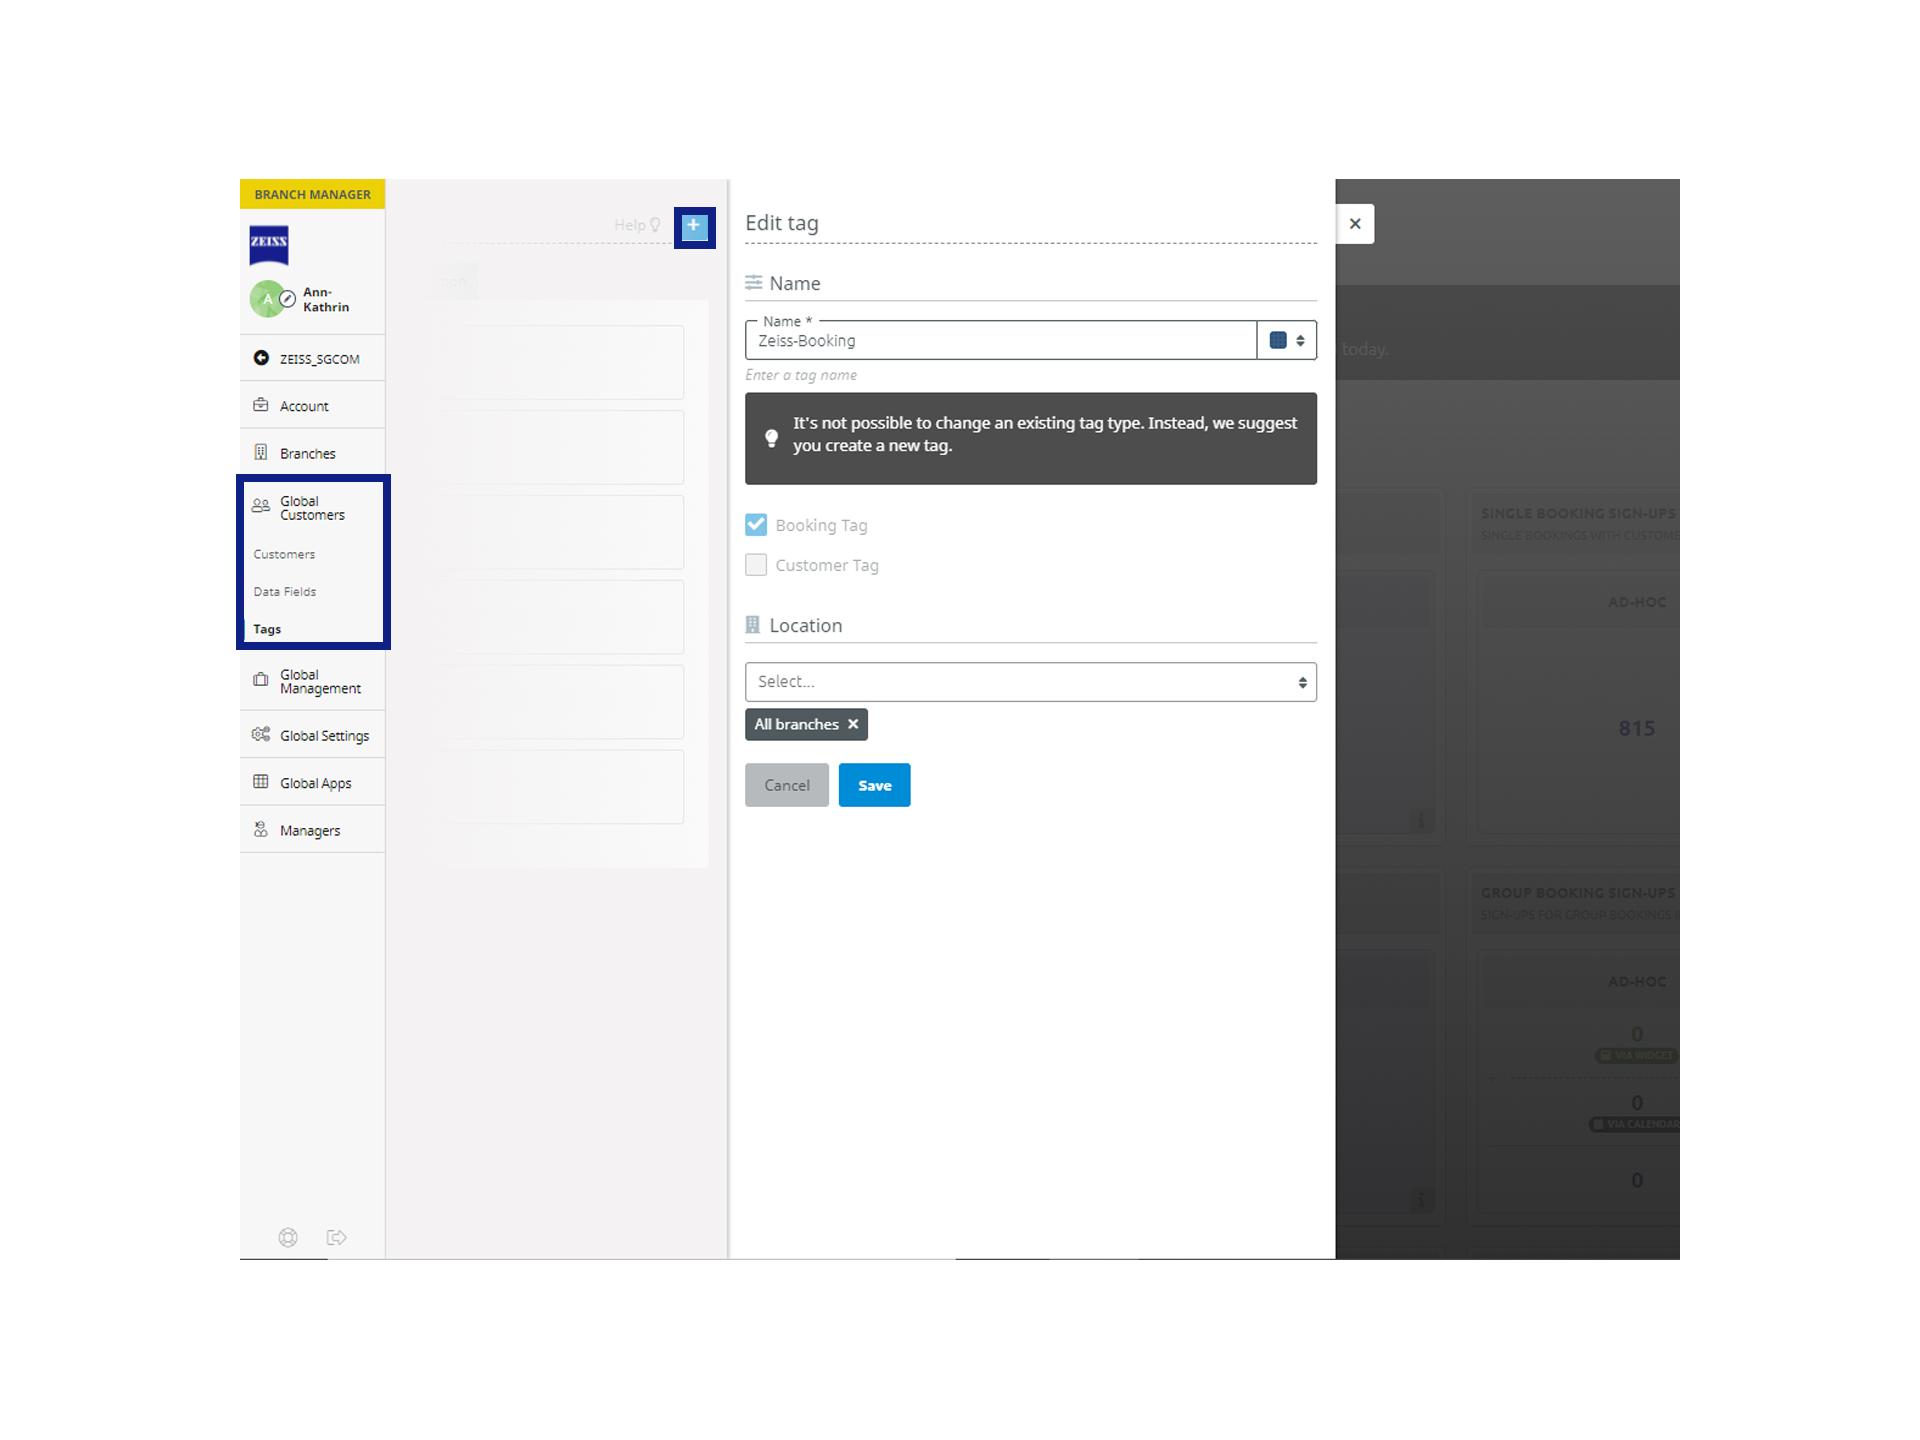
Global Tags
- Define specific tags for all your locations in order to be able to analyses and filter for those specifically. Assign global tags to your global booking or global customers and analyze their activities and performances at all times. You can thereby choose between customer-specific tags and those related and assigned to specific bookings.
- All statistics based on your assign tags will then appear in the statistic dashboard.
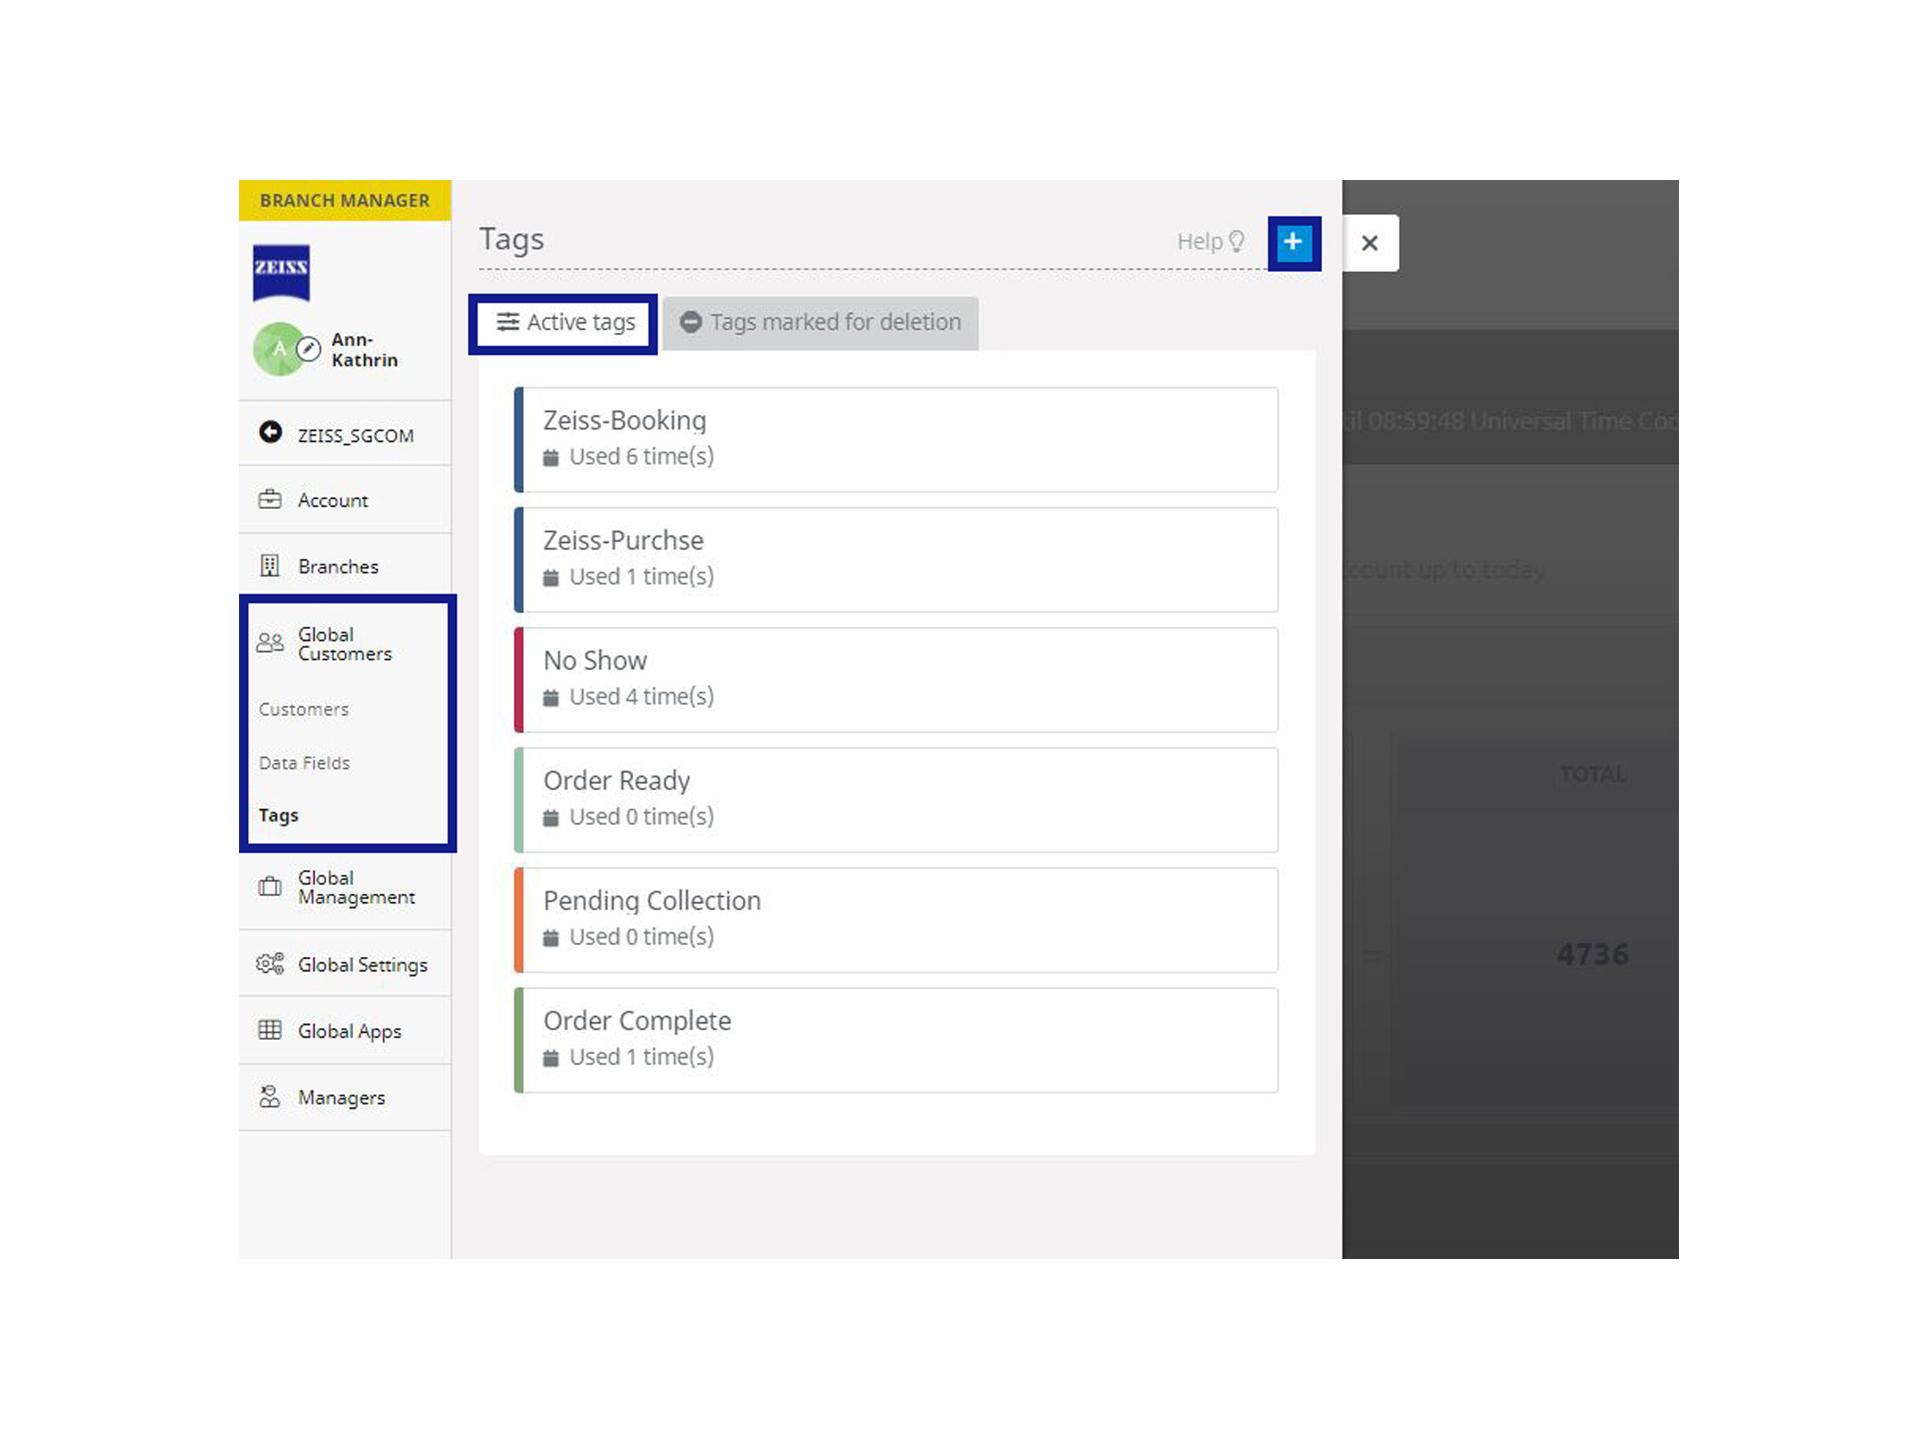

Add new tags
- Quickly and easily add new global tags to your bookings or global services and assign them to all selected branches. Use the ("+") button to add your specific tag:
Define a global name per each tag and if it is a specific tag for bookings or customers. By assigning the specific tag to all or some selected branches, the tag is automatically saved in the calendar of the local branches and displayed within the section ``Customers´´ >> ``Tags´´. - After saving all (newly) added global tags can be seen in the "Active Tags" overview.

Edit tags
- Before you edit a tag, you must first define who is allowed to make changes to the tag. By activating this in the global settings, you can ensure that the local branch is not allowed to make any changes to the tags: Go to ``Global Settings´´ >> ``Local Updates´´ and switch to the Edit Mode with the pen button
- Within the respective online calendars of the local branches, a tag created via the branch manager is marked as the following.
- Changes to a global tag can ONLY be made via the Branch Manager. If a branch changes a tag in the local online calendar, this change is ONLY applied to the respective location, but not globally to all other assigned locations.
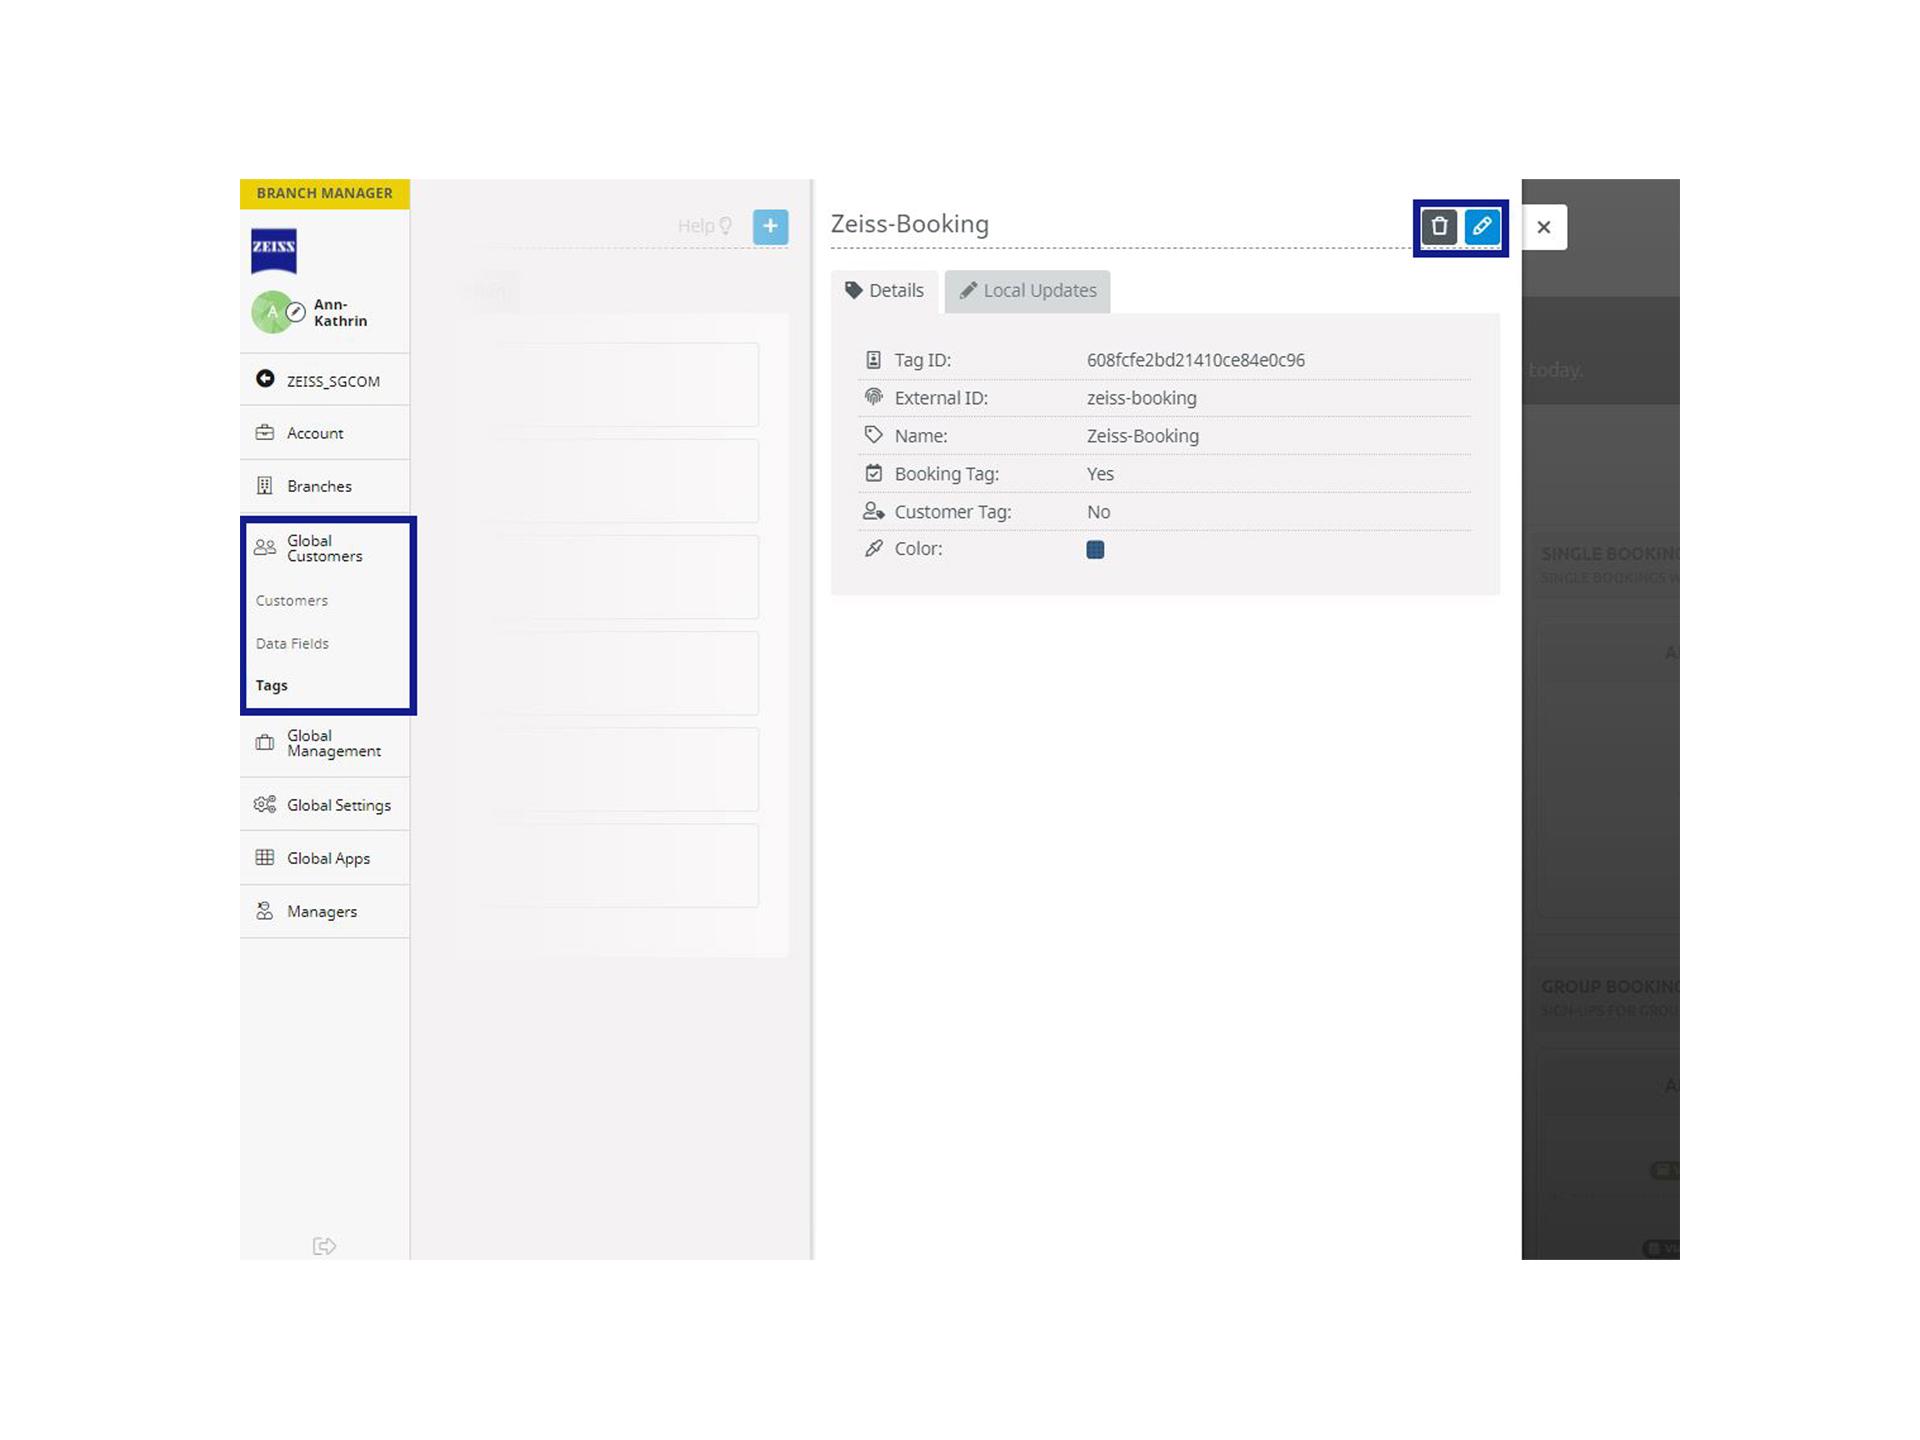

Delete tags
- Similar to creating a new tag, you can delete specific tags via the branch manager, so that the respective tag is no longer visible for specific branches.
- All changes made to the global tag locally in one of the connected branches are listed in the ``Changed locally´´ tab.
- If a tag is still connected to a booking or a customer or is otherwise still being used in one of the local calendars, all accounts in which the service could not be deleted are listed here ``Changed locally´´ .
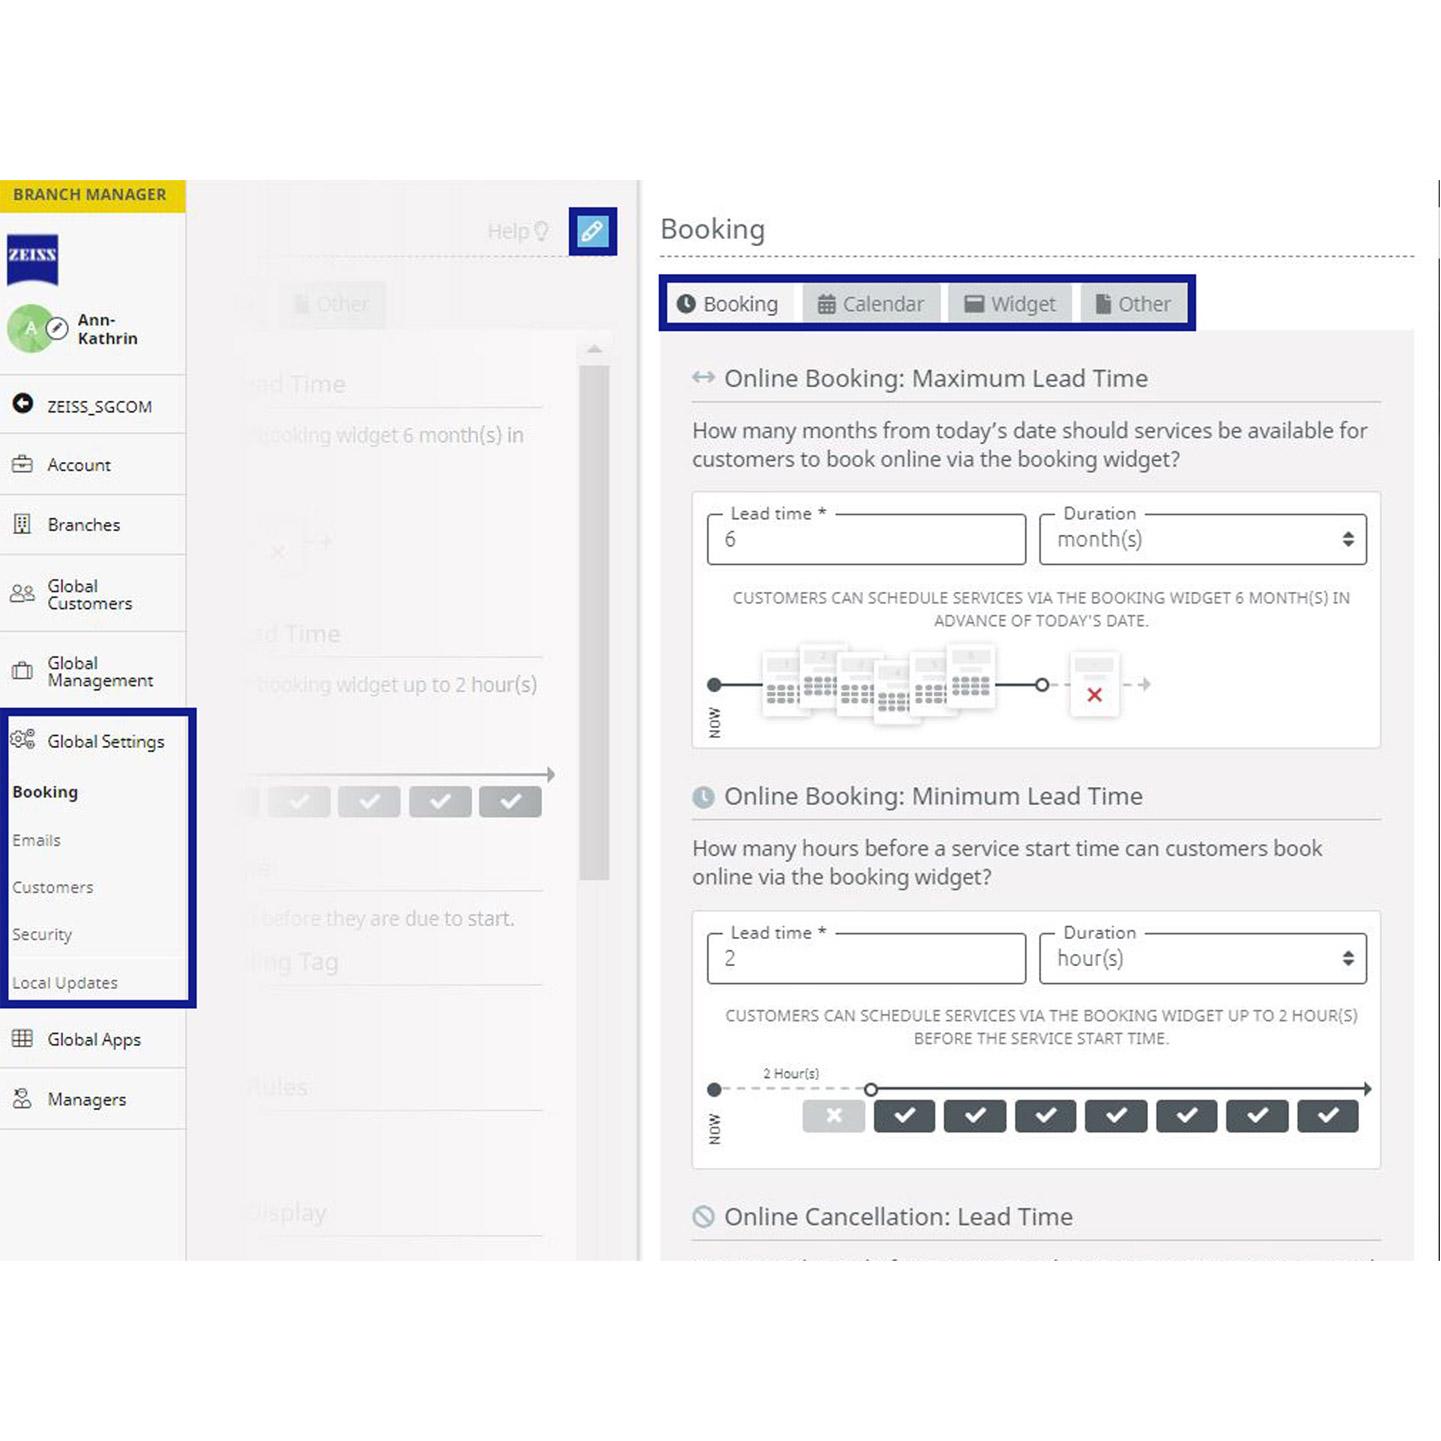

Global Settings
Define settings for all your locations in order to make sure that all accounts are set the same way in order to guarantee a standardized approach to your customers.
- With the help of the global settings, you can ensure that all your assigned locations apply the same settings for your ZEISS A.R.M Platform accounts, booking widgets and other internal default settings. Via the Branch Manager you have full control of the settings at any time and can keep them always up to date!
- Similar to the settings you can make in the individual location calendars, you have the possibility to centrally preset settings for the following areas:
- BOOKING - All settings related to the general booking process of your customers (lead and cancellation time, etc.).
- CALENDAR - All settings related to the local, individual online calendars of your locations (copying bookings, booking rules, etc.).
- WIDGET - All settings related to the local, individual booking widgets of your locations (language selection, date picker, etc.).
- OTHER - Further settings regarding the external ID.
Note: Changes in the Branch Manager should be done with caution and in alignment with the project team.
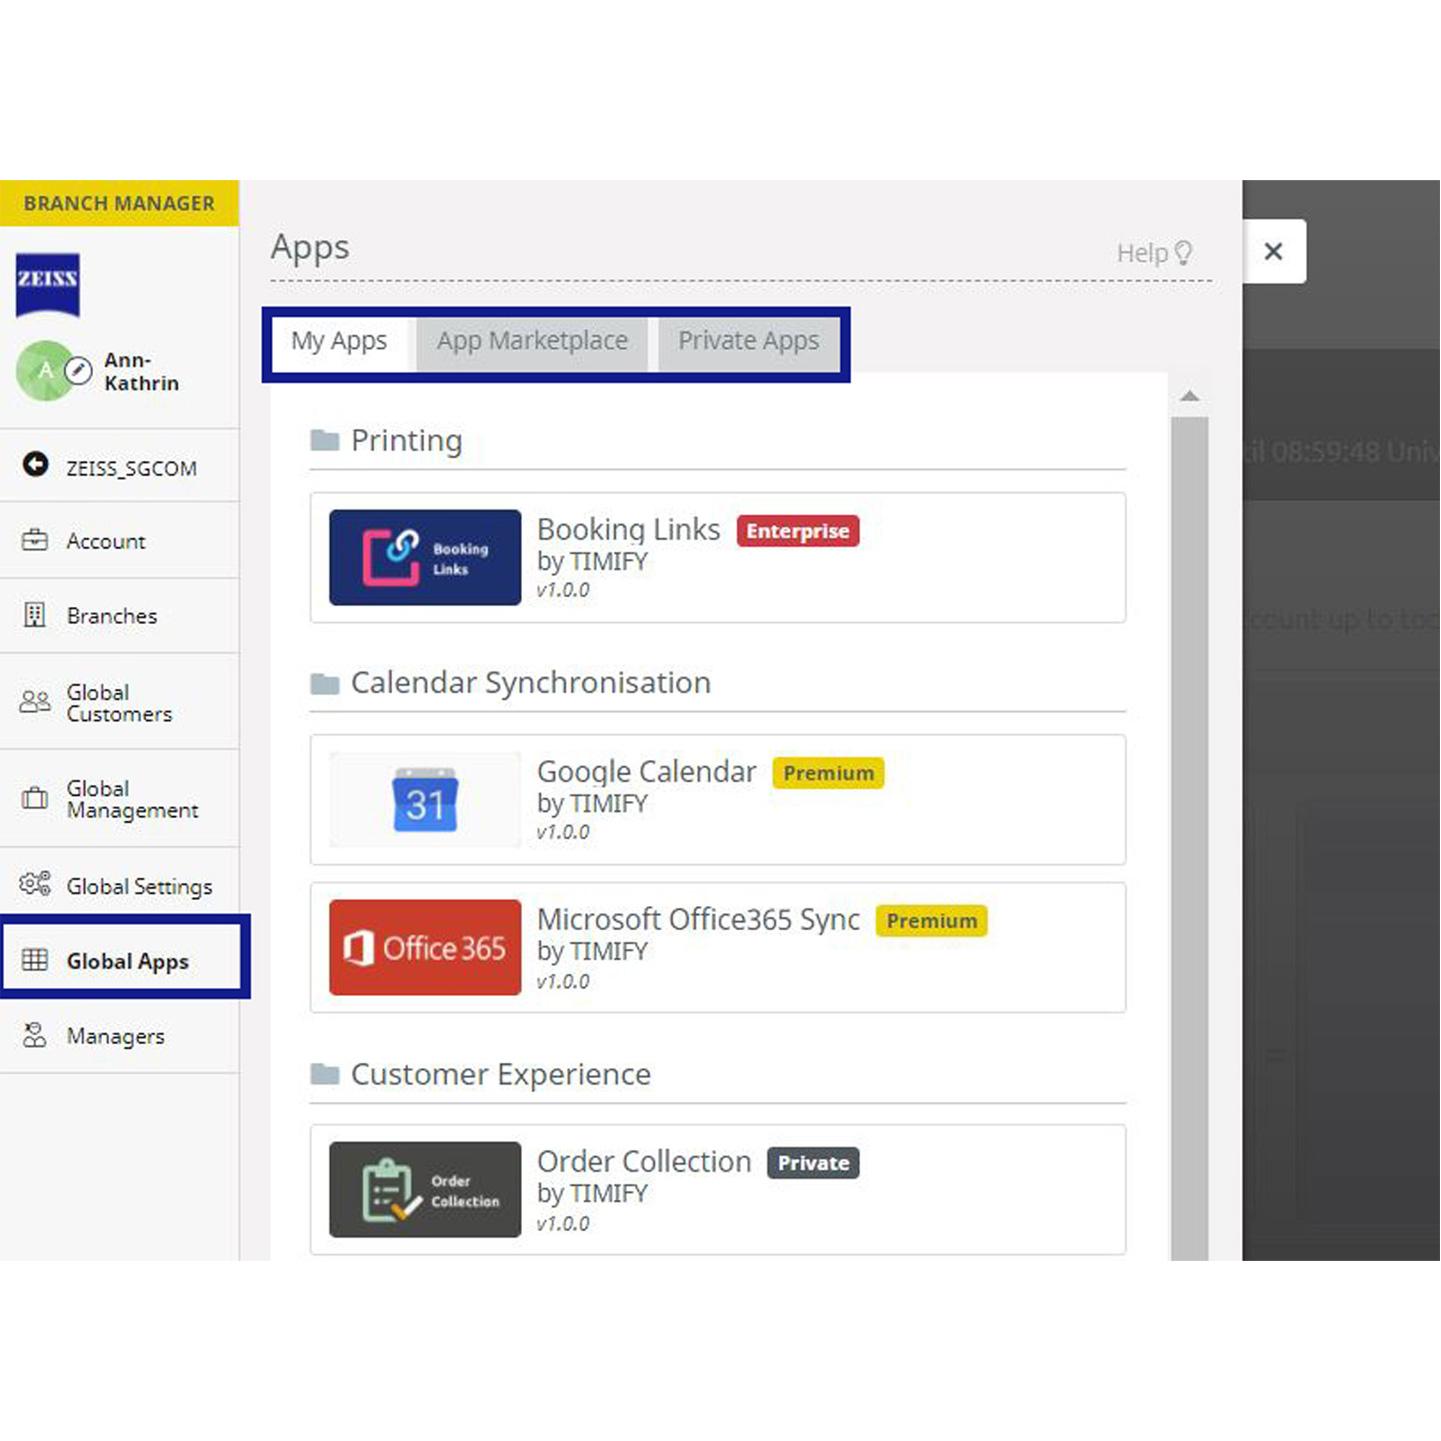

Global Apps
Integrate third party apps for use at all branchesYou can install apps globally for all the locations assigned to your Branch Manager. Upon installation, apps are available to use straightaway. Apps can be set up and managed locally by each branch.
The global team will work directly with the service provider Timify to evaluate and deliver the potential apps to improve your daily business. If you are interested in a specific app that is not listed on the marketplace, please contact your local customer support and let us know.