
Calendar Management
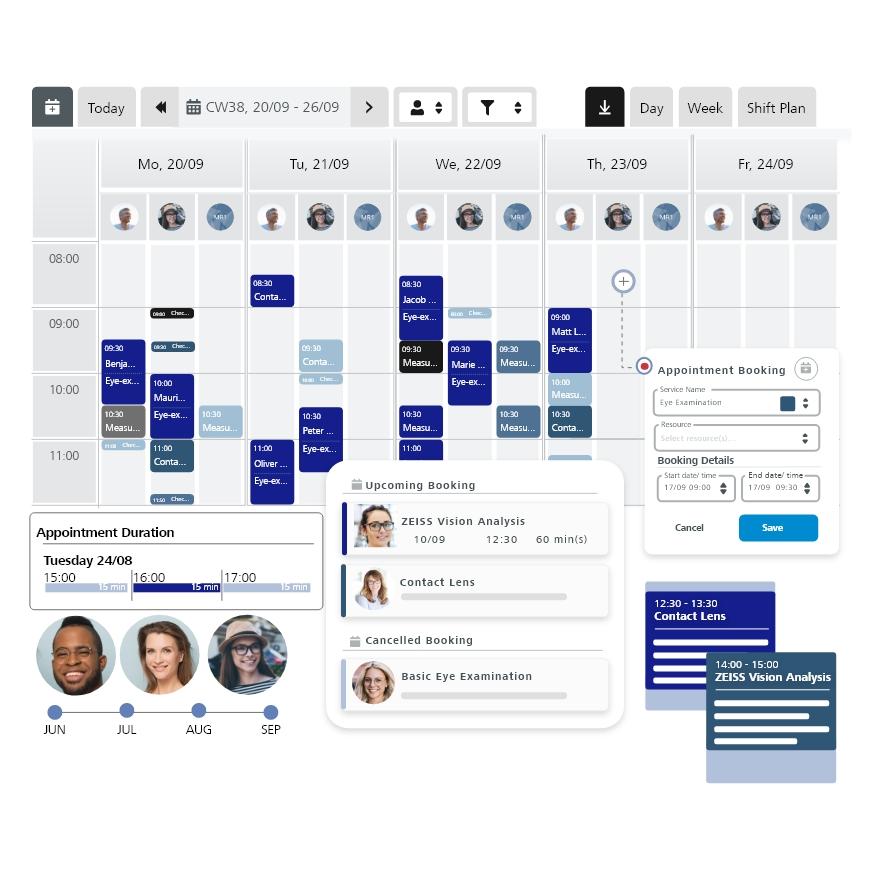
Manage the schedules of your entire team.Track and organize your business schedule and appointments from any device to have the perfect business overview. Use the fast booking widget on the calendar to find availability in booked calendars faster.

Fast Booking Widget
How to find a free slot in the fastest wayOpen the fast booking option on your home screen to quickly find an available time to schedule an appointment.
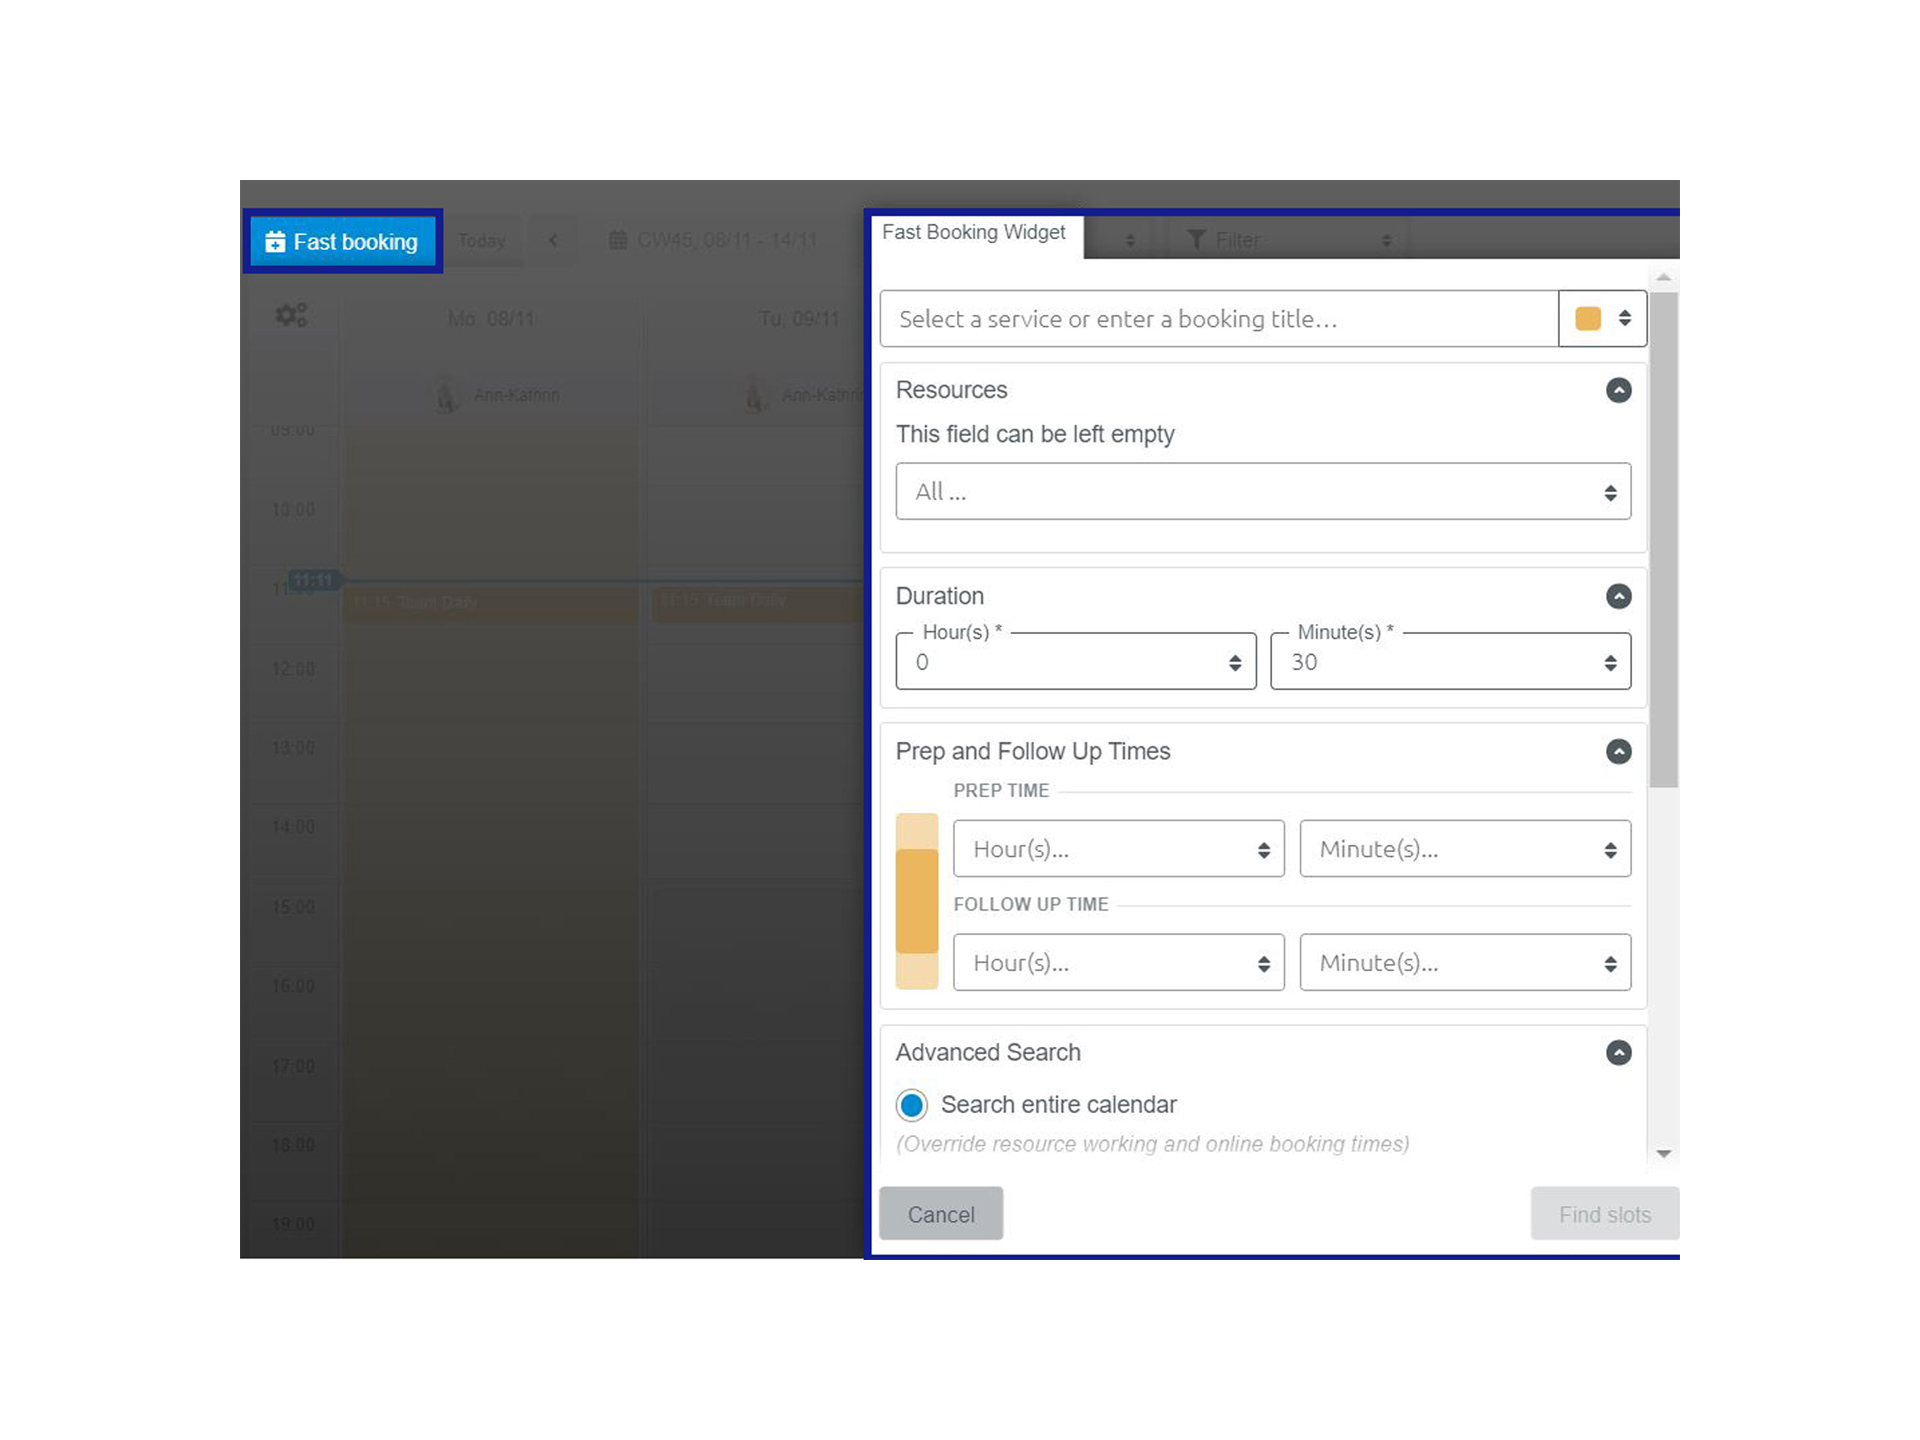

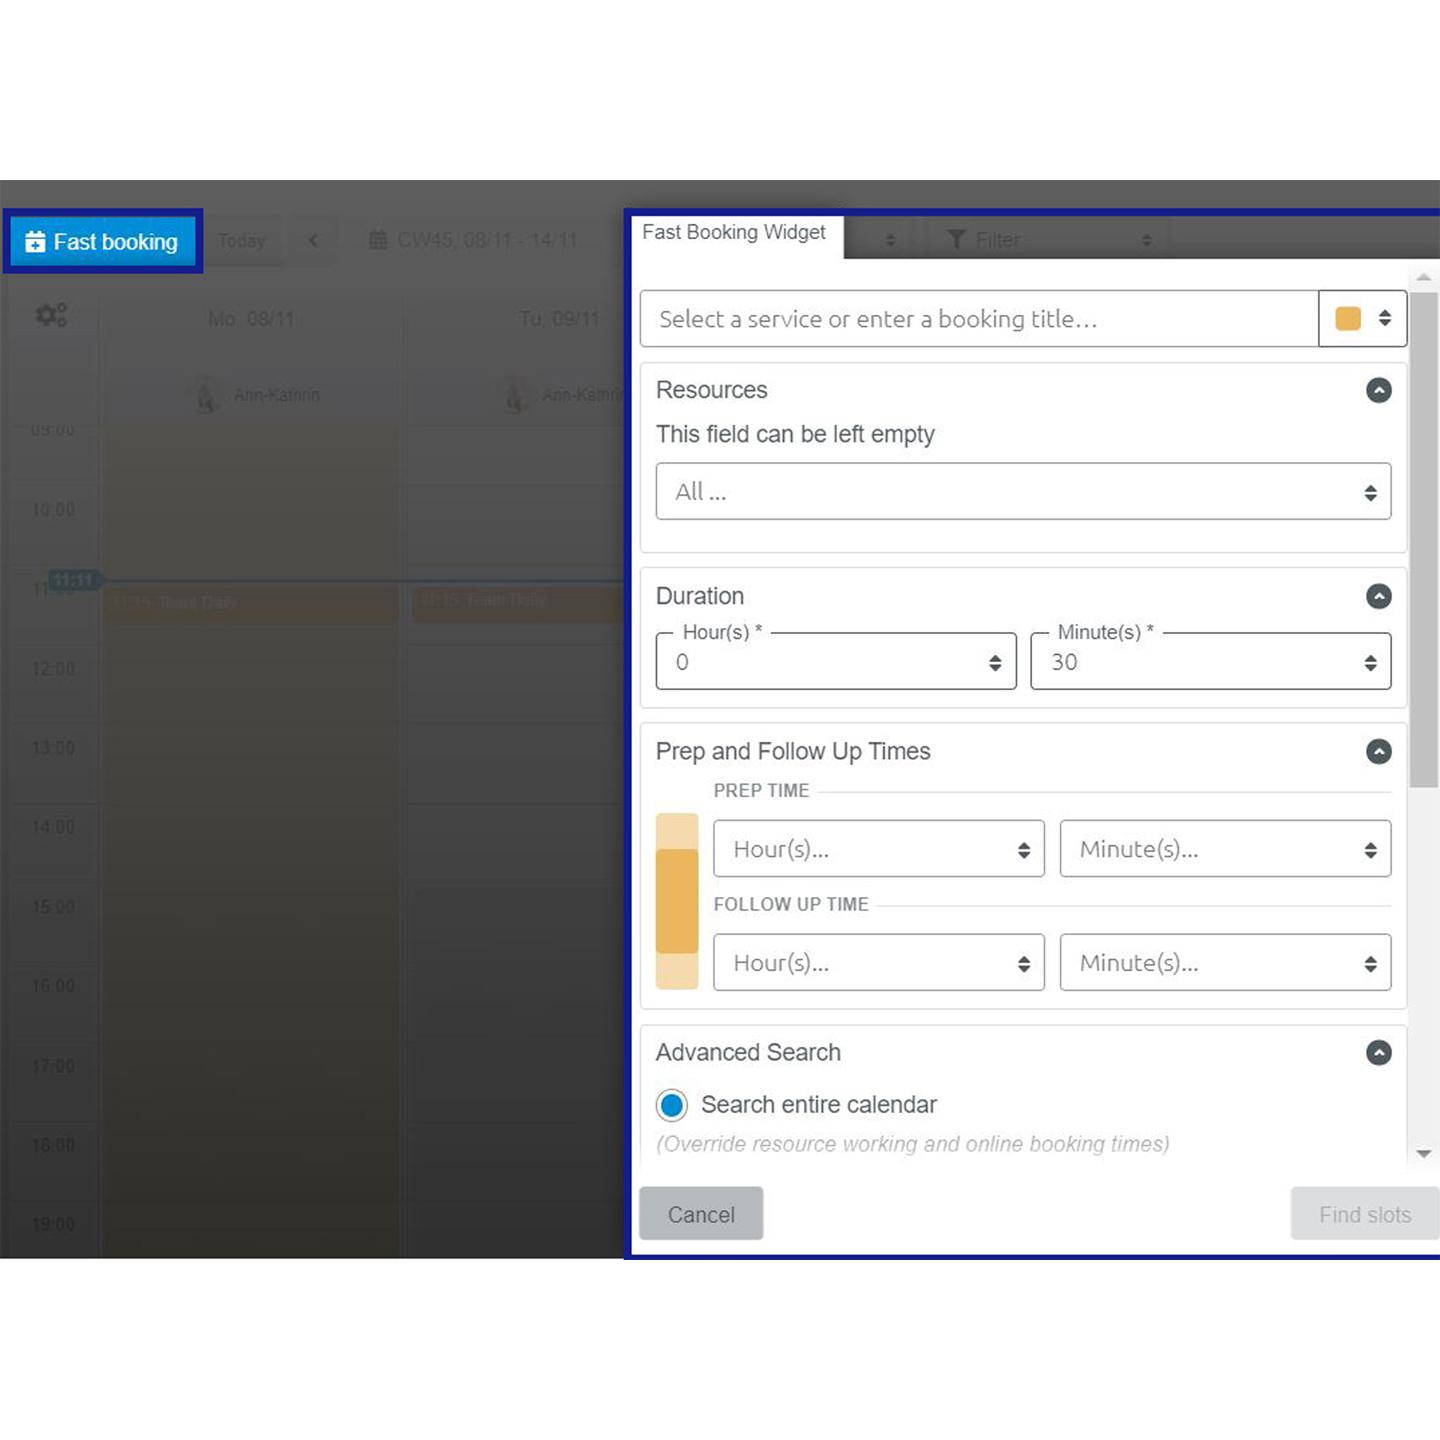
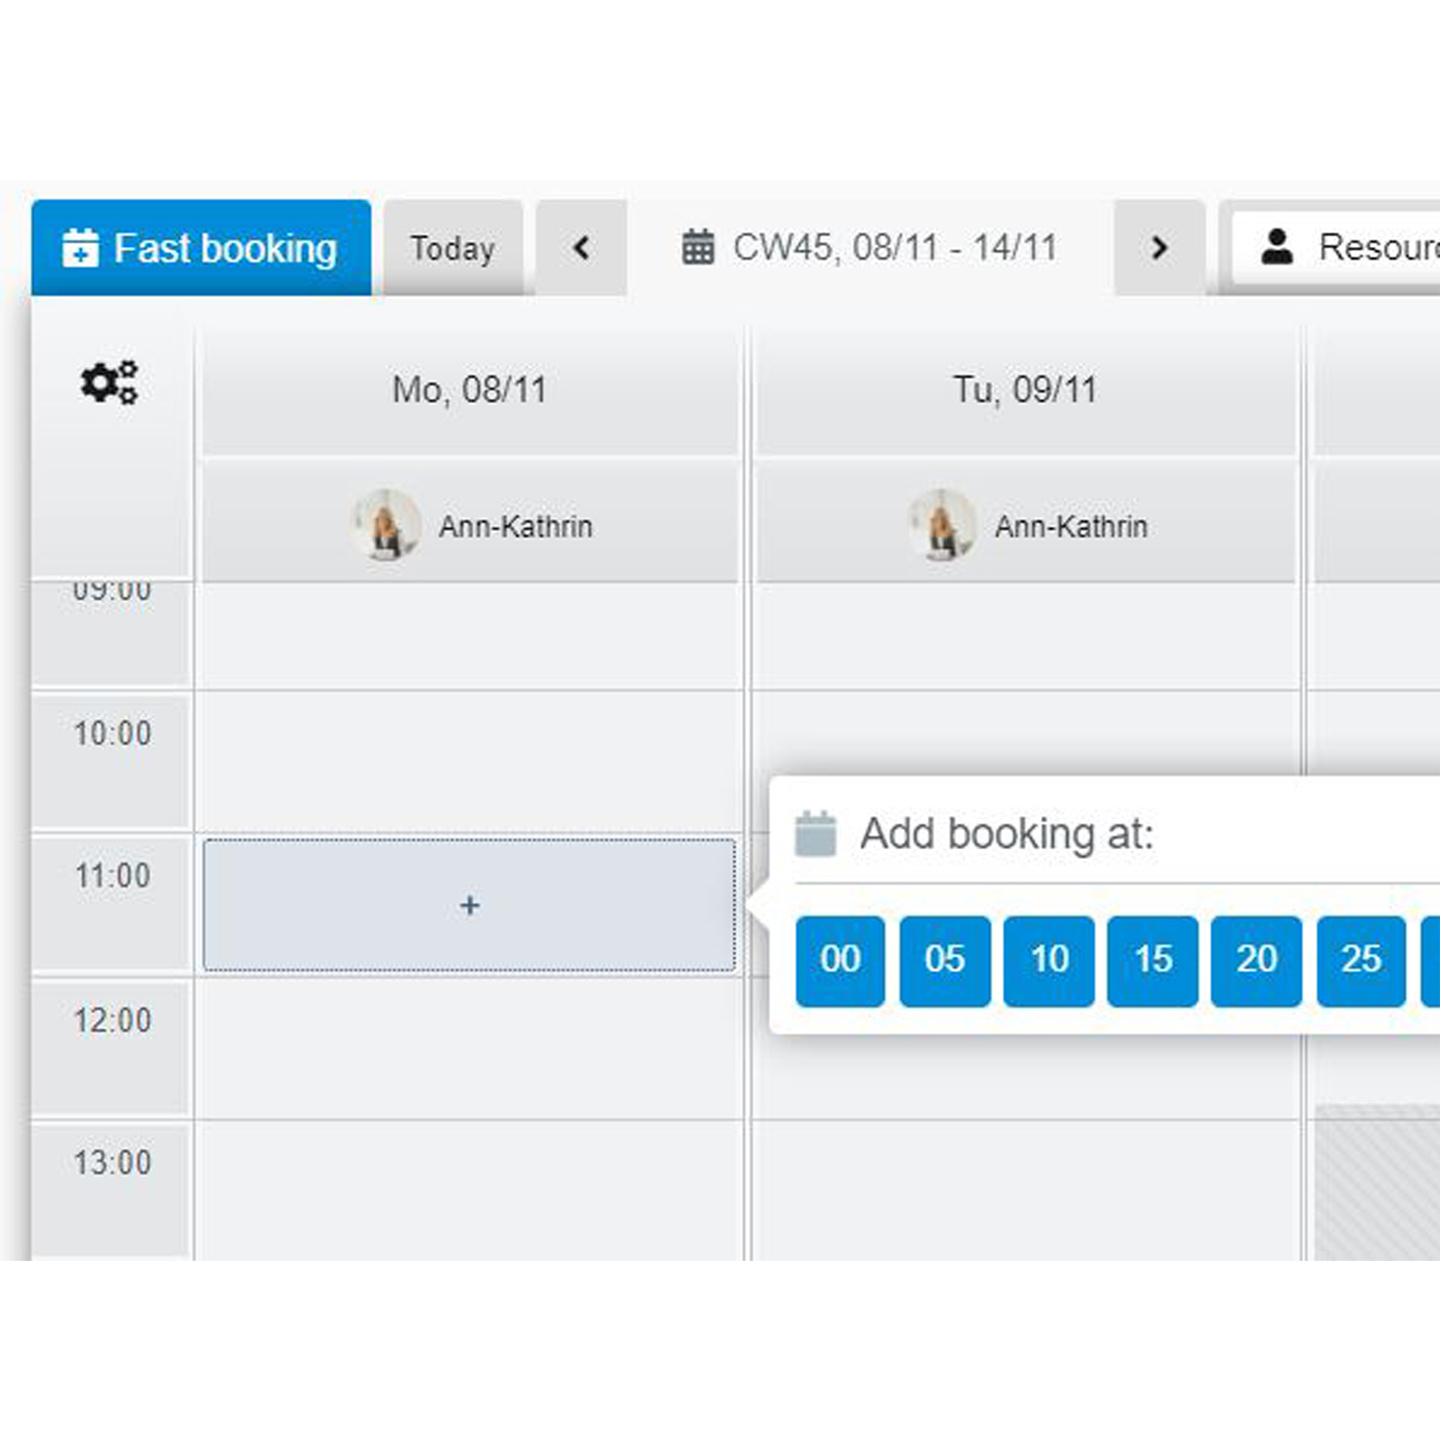
1. How to find a free slot the fastest way
- At the top left of your calendar, you can access the Fast Booking Widget.
- Select the service for which you want to find a slot or enter a title: You only need to enter a service or a title and a duration. All other fields are optional.
- Select specific resources (optional): If you need certain resources for this booking, add them. In addition, you can edit the duration and set prep and follow-up times.
- You can now choose in which time frame to search for free slots and from which date. Finally, you can also narrow down the search by time of day. Then click on "Find slots" to display the free slots. Available dates are displayed by calendar week. When you have found a suitable appointment, click on it. If there is no suitable appointment, return to the top of the page to edit your search criteria.
- After you have selected a slot, you can add a customer. Once you click "save", your client and resource will receive an email confirmation.
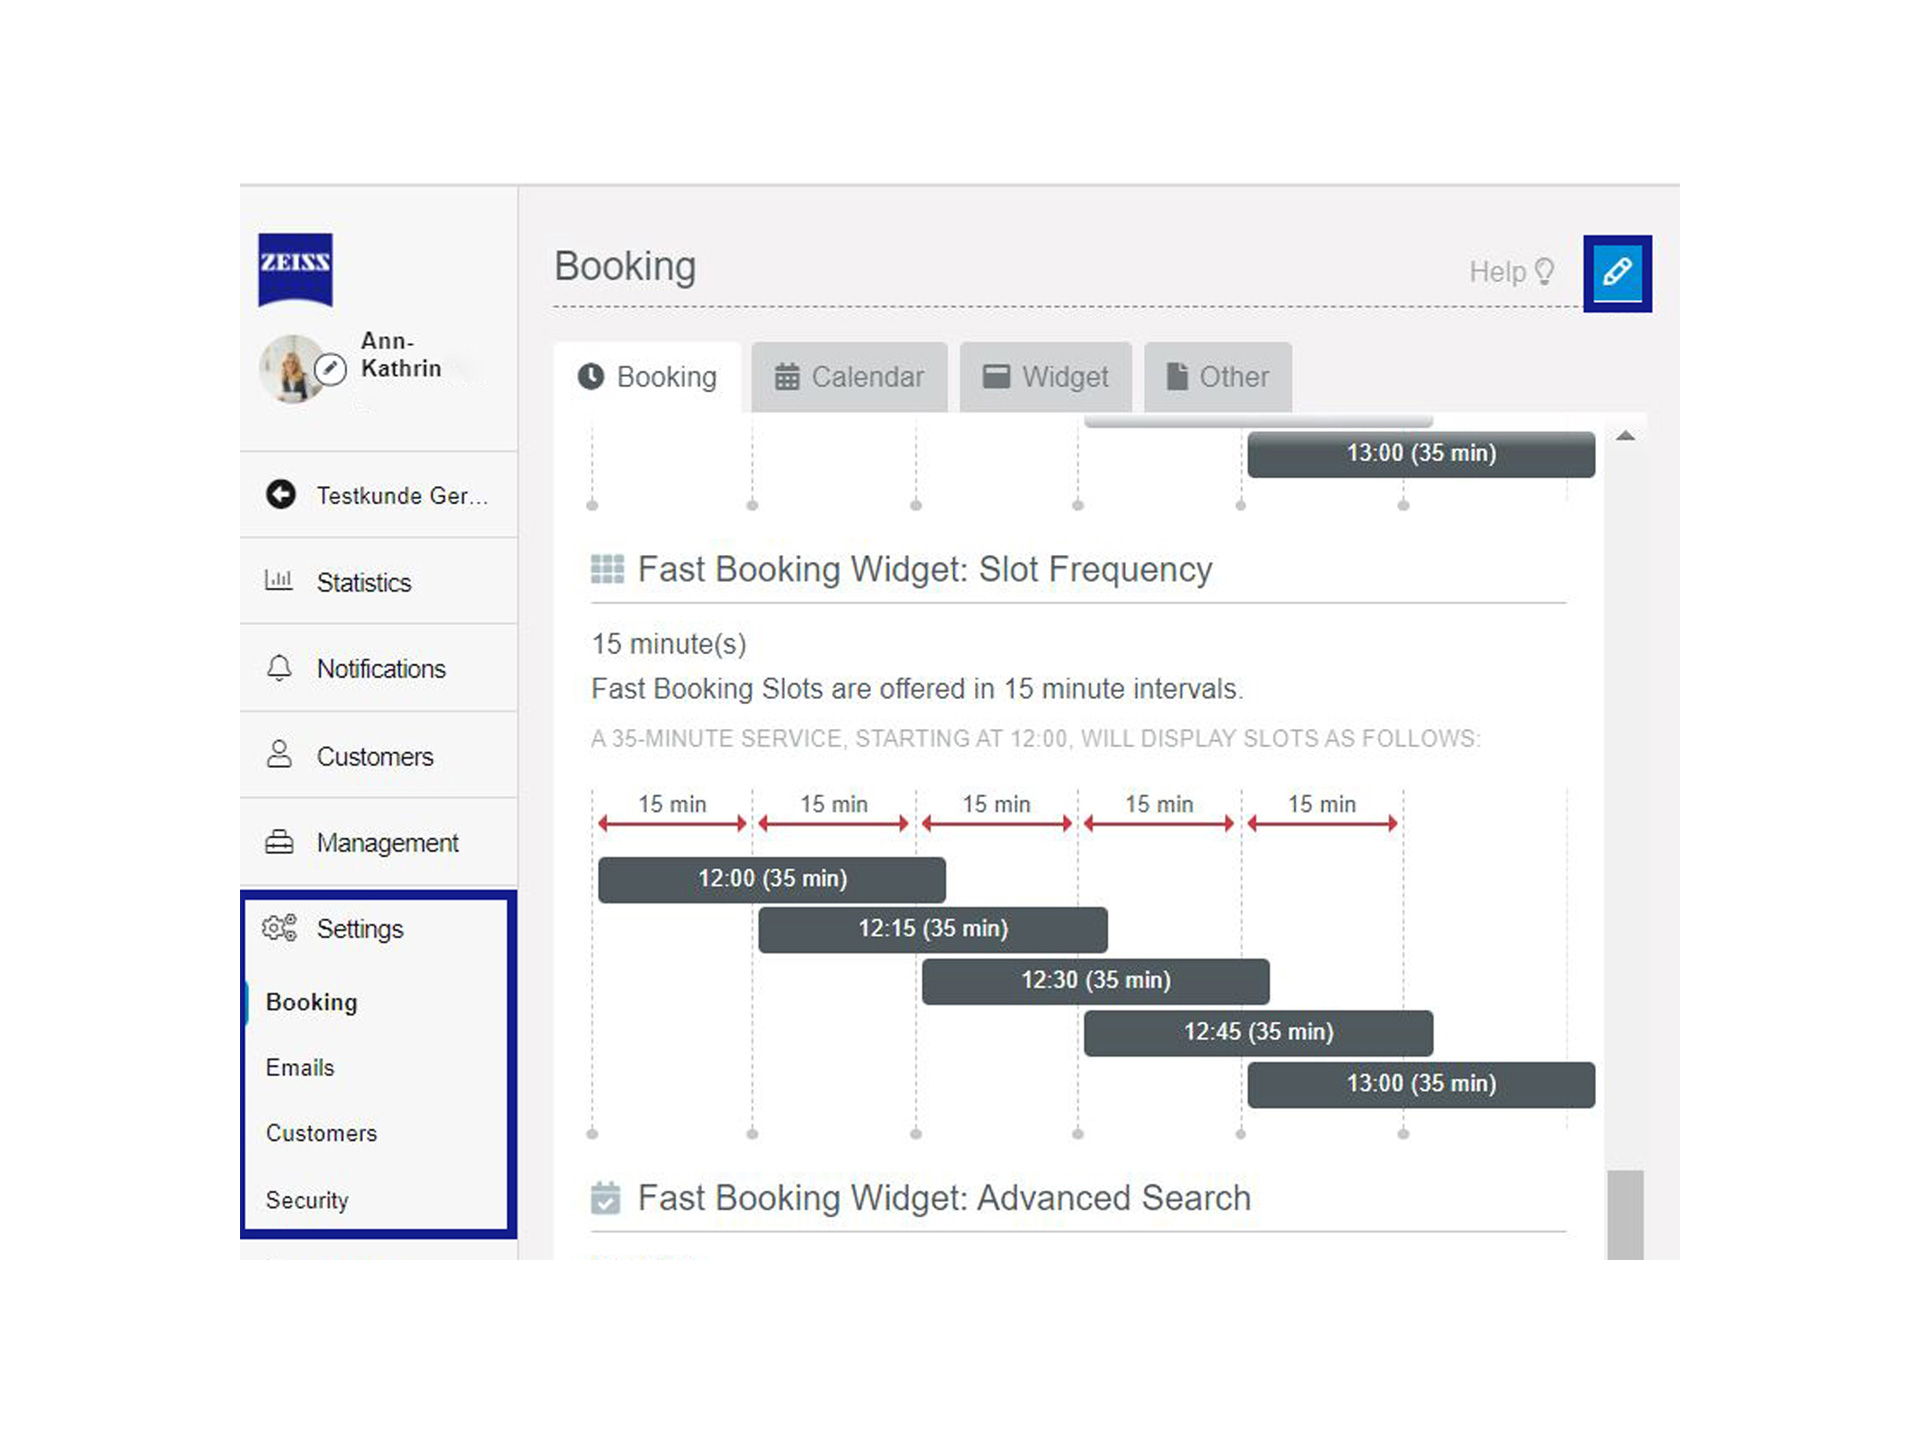

2.Configure the Fast Booking Widget according to your own needs
To customise the Fast Booking Widget (e.g. the booking frequency can be changed), tap "Settings" >>"Bookings".
- Under "Fast Booking Widget: Slot frequency", select the intervals at which the appointments should be displayed when you perform a search.
- In the next point, enable "Advanced search" if you want to search for availabilities outside the -online booking and/or working hours of the resources.
- Tip: If you want to search outside the resources' online booking and/or working hours, make sure you have selected this option under "Internal scheduling rules".

Online calendar settings
Views and calendar settings explainedFind out all about calendar views and other calendar settings.
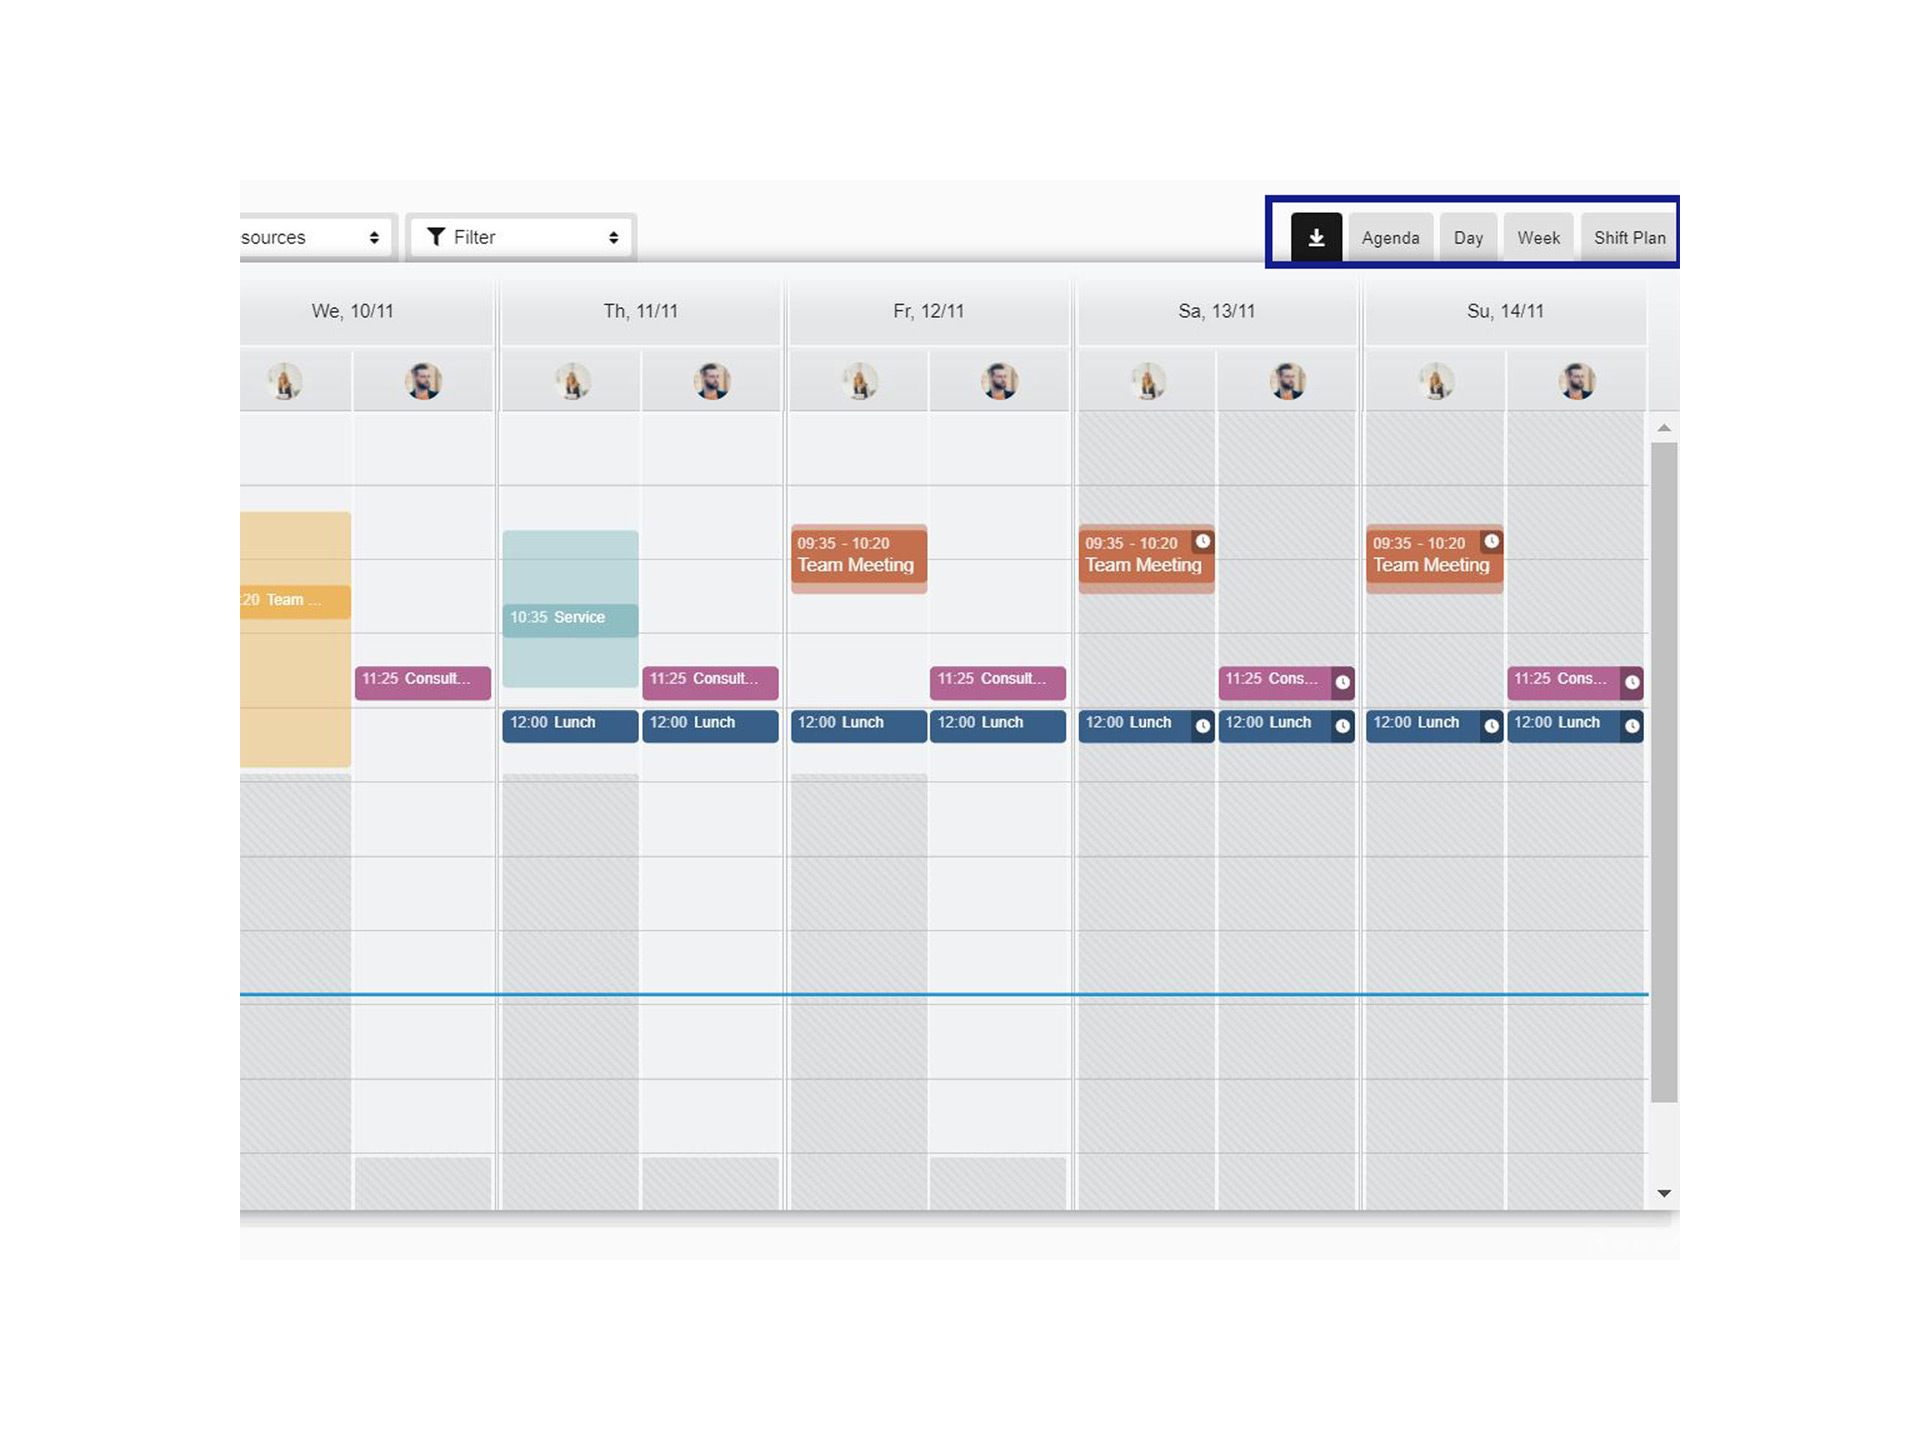

1. Calendar views: Week
- The ZEISS A.R.M calendar offers you two options to get the best view of your own appointments and those of your employees.
- After logging in, you will find yourself in your own week view.
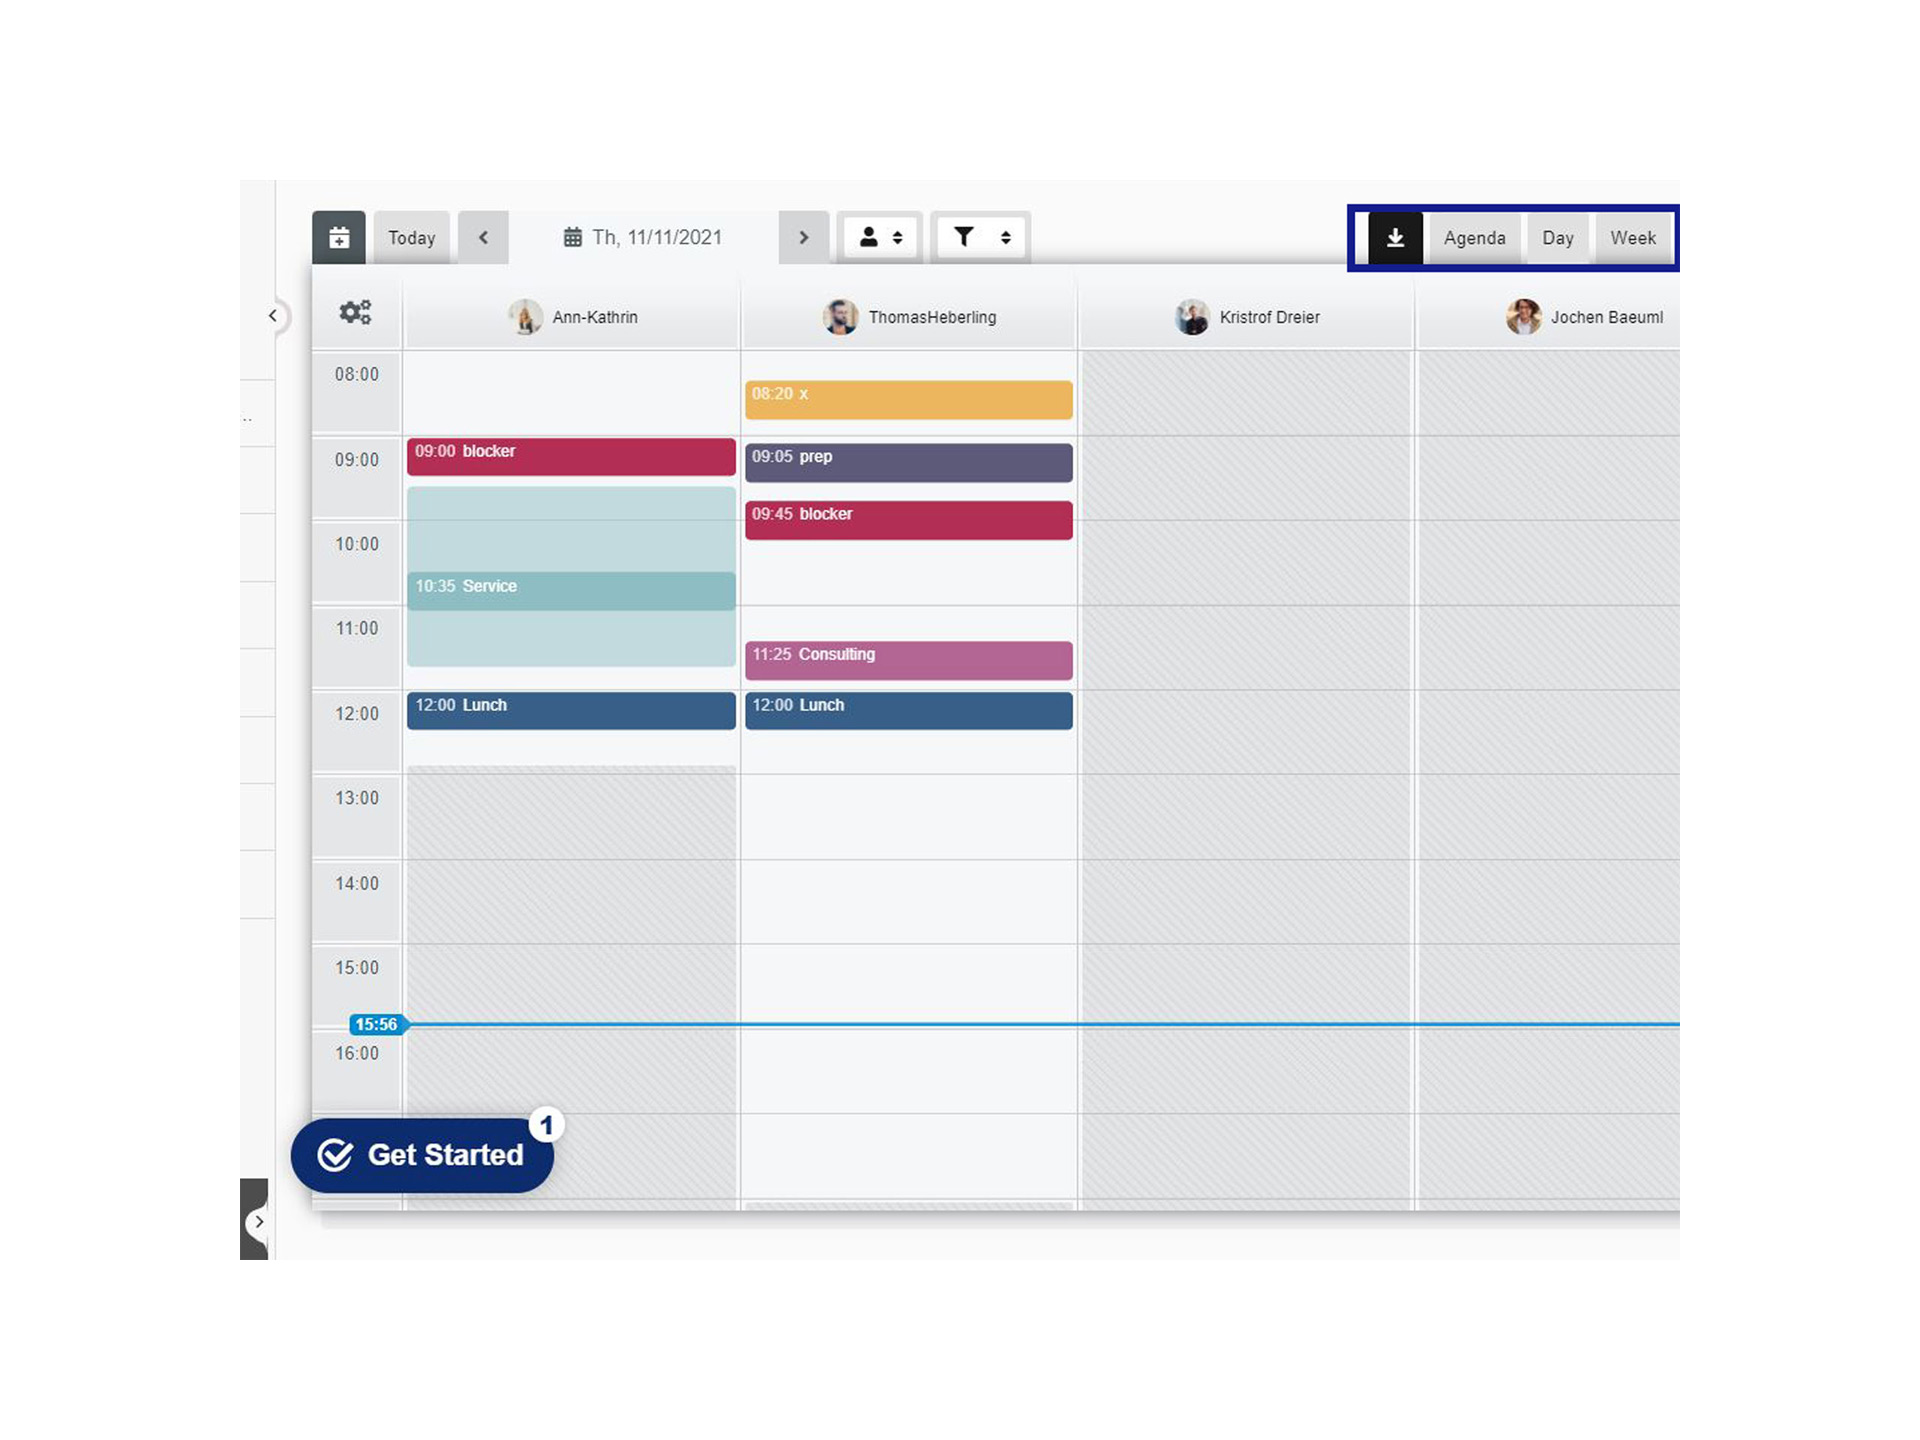

2. Calendar views: Day
- You can also select the day-to-day view in the top right-hand corner of the calendar.
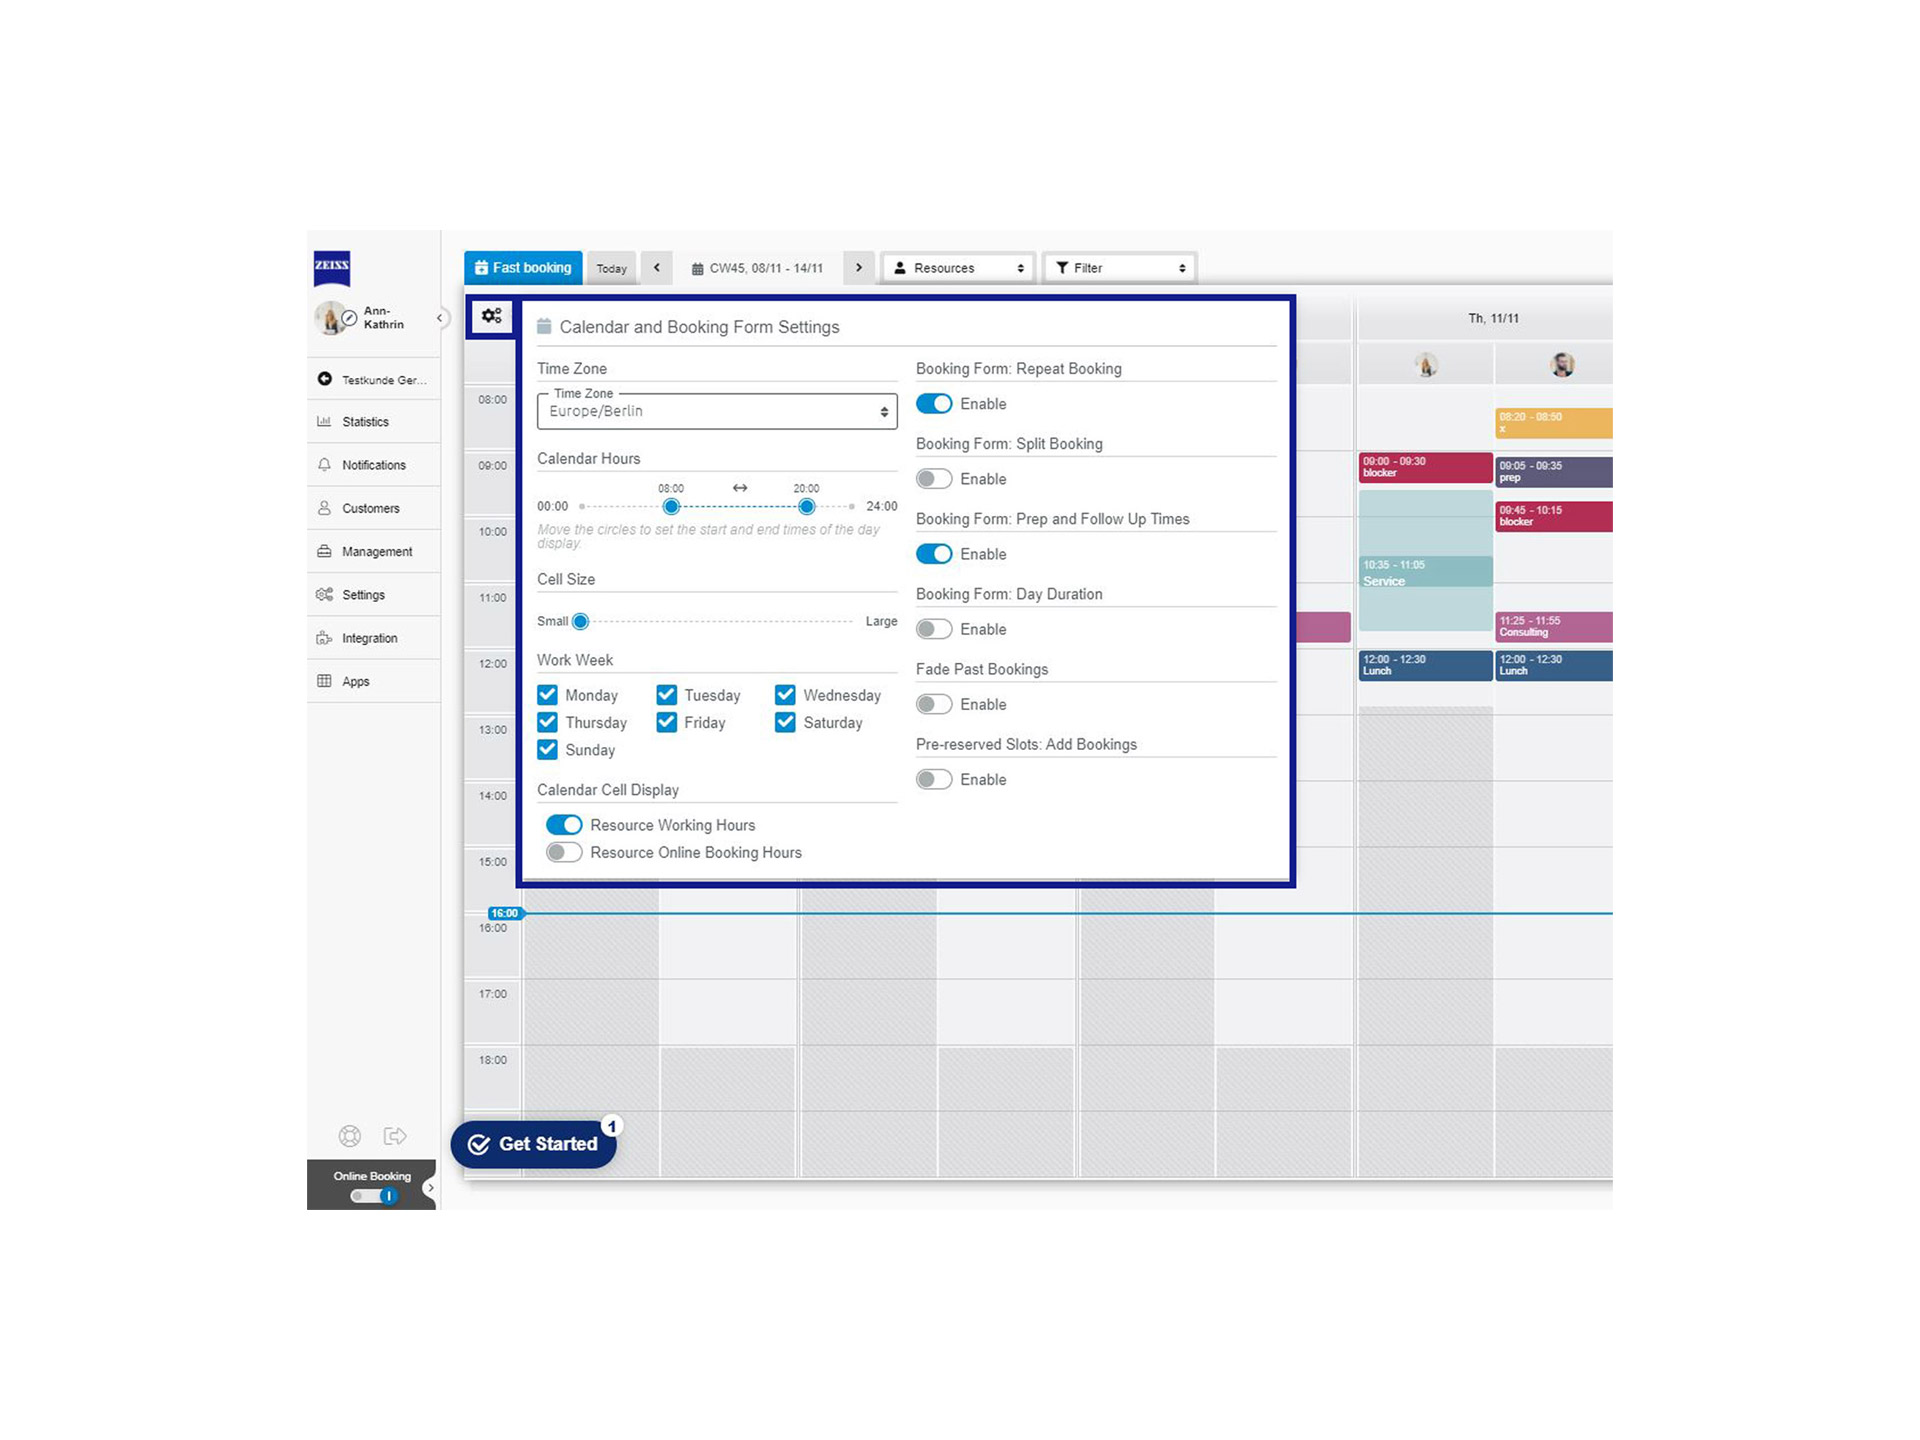

3. Calendar settings explained
- Click the gear button to access the calendar settings. Here you can change the time zone and adjust the time span for viewing your calendar; determine the height of the calendar cells; define which weekdays are to be displayed; and select whether working and/or online booking times are displayed and activate the selection for different appointment types.

How to manually add appointments to your calendar
Step 1: Book Appointment: Open the Calendar view.
Step 2: Choose a preferred timing: Click on the time of day you would like to schedule the appointment.
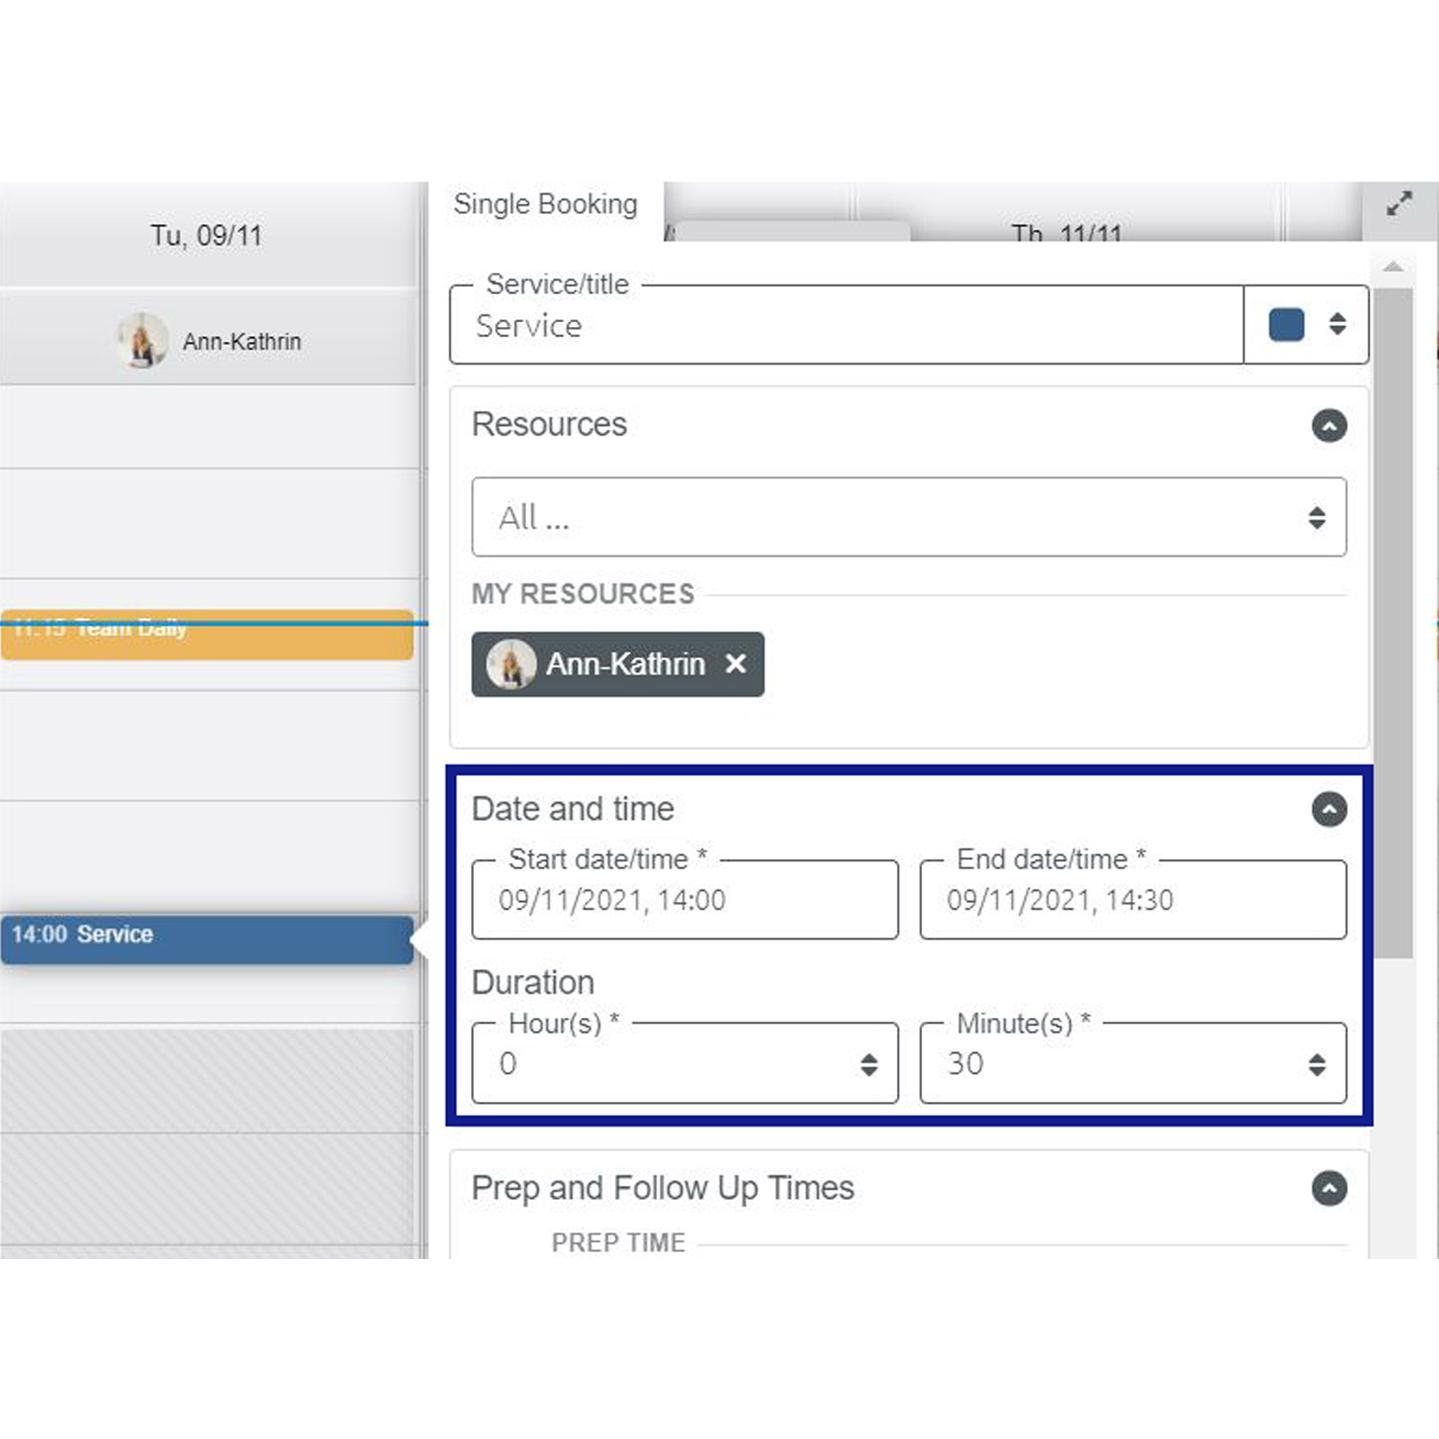
Step 3: Choose the service required: Either enter a name for the appointment on the top or select one of the services you may have already added from the drop-down. If you select a service from the drop-down, the pre-defined service duration and colour is automatically selected.
Step 4: Select an employee (optional): Define which employees and other resources are blocked for the appointment (e.g. rooms & devices which are defined as resources).
Step 5: Define start & end time: By defining the start and end time, the service duration can be adjusted.
Step 6: Add prep & follow up times (optional): In case you need some time to prepare for the appointment, additional time can be reserved for preparation and/or follow up (which will not be visible to the consumer). (Enable this in the calendar settings).
Step 7: Add your customer: Enter the name of the customer. If the customer is already registered, their name will appear as you type the first few letters in the customer field. If the customer does not exist, you can add them as a new customer by clicking on the plus ("+") button. Any additional customer details that you add will be automatically saved to your customer database.
Step 8: Booking completed: Finally, you can choose whether you want to notify your employee and/or customer of the appointment via email. Click on "Save" to add the appointment.

How A.R.M. users can cancel or reschedule appointments
Whatever the reason for having to change appointments, with the ZEISS A.R.M. Platform always react at short notice to reschedule or cancel appointments.

Reschedule appointments
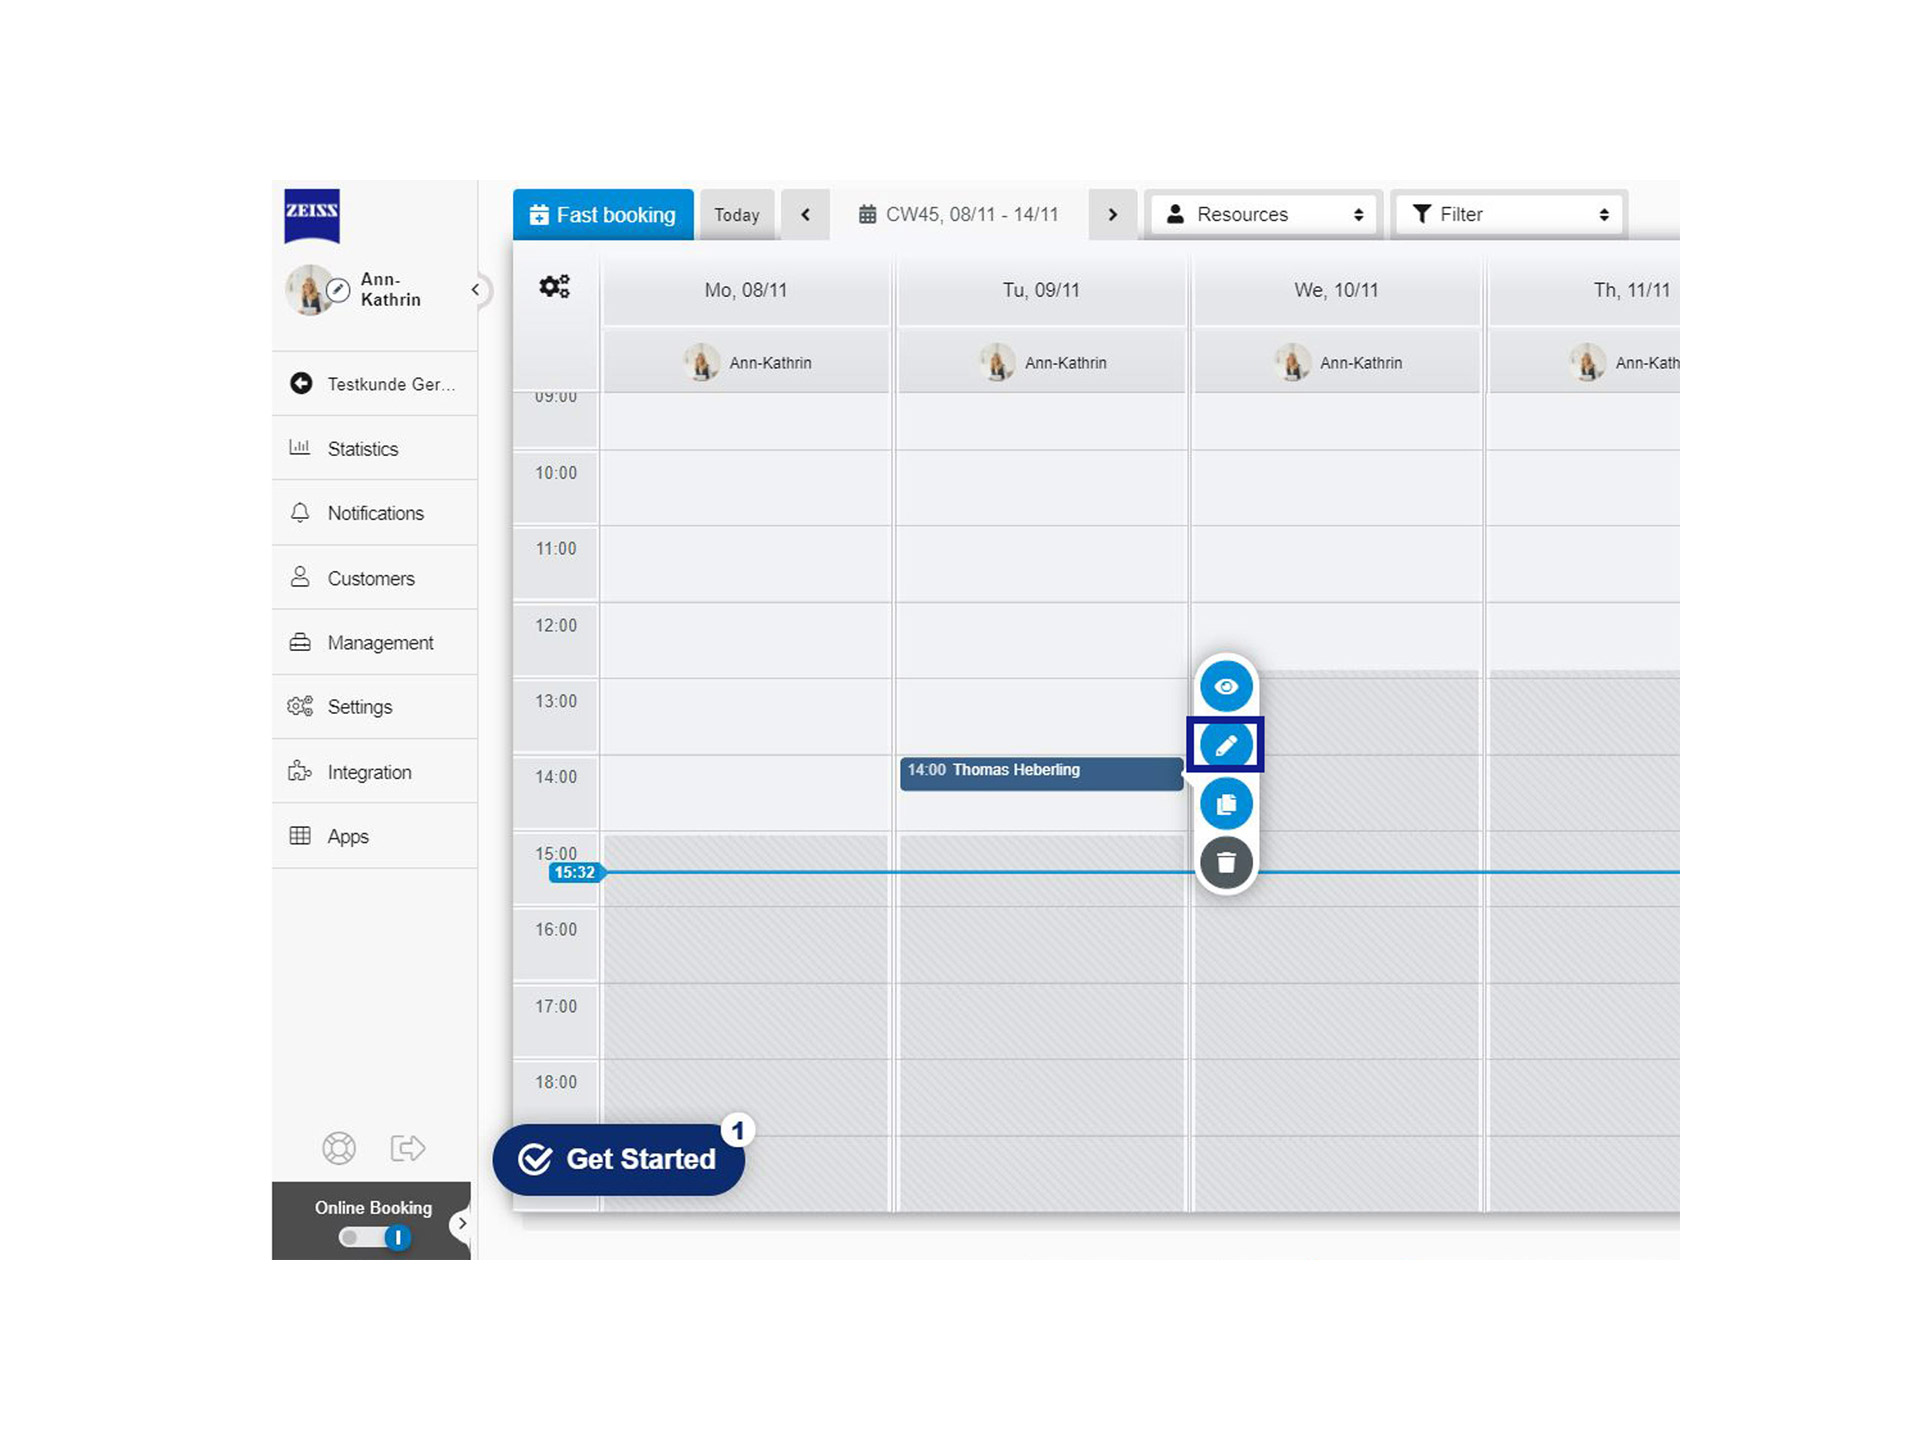
- First click on the appointment to be edited and then on the pen button (Edit booking). A window opens in which you can now make various adjustments. For example, you can assign the appointment to another resource or change the date or time. Finally, you can click on the checkbox to automatically inform the customer about the date change.

Cancel appointments
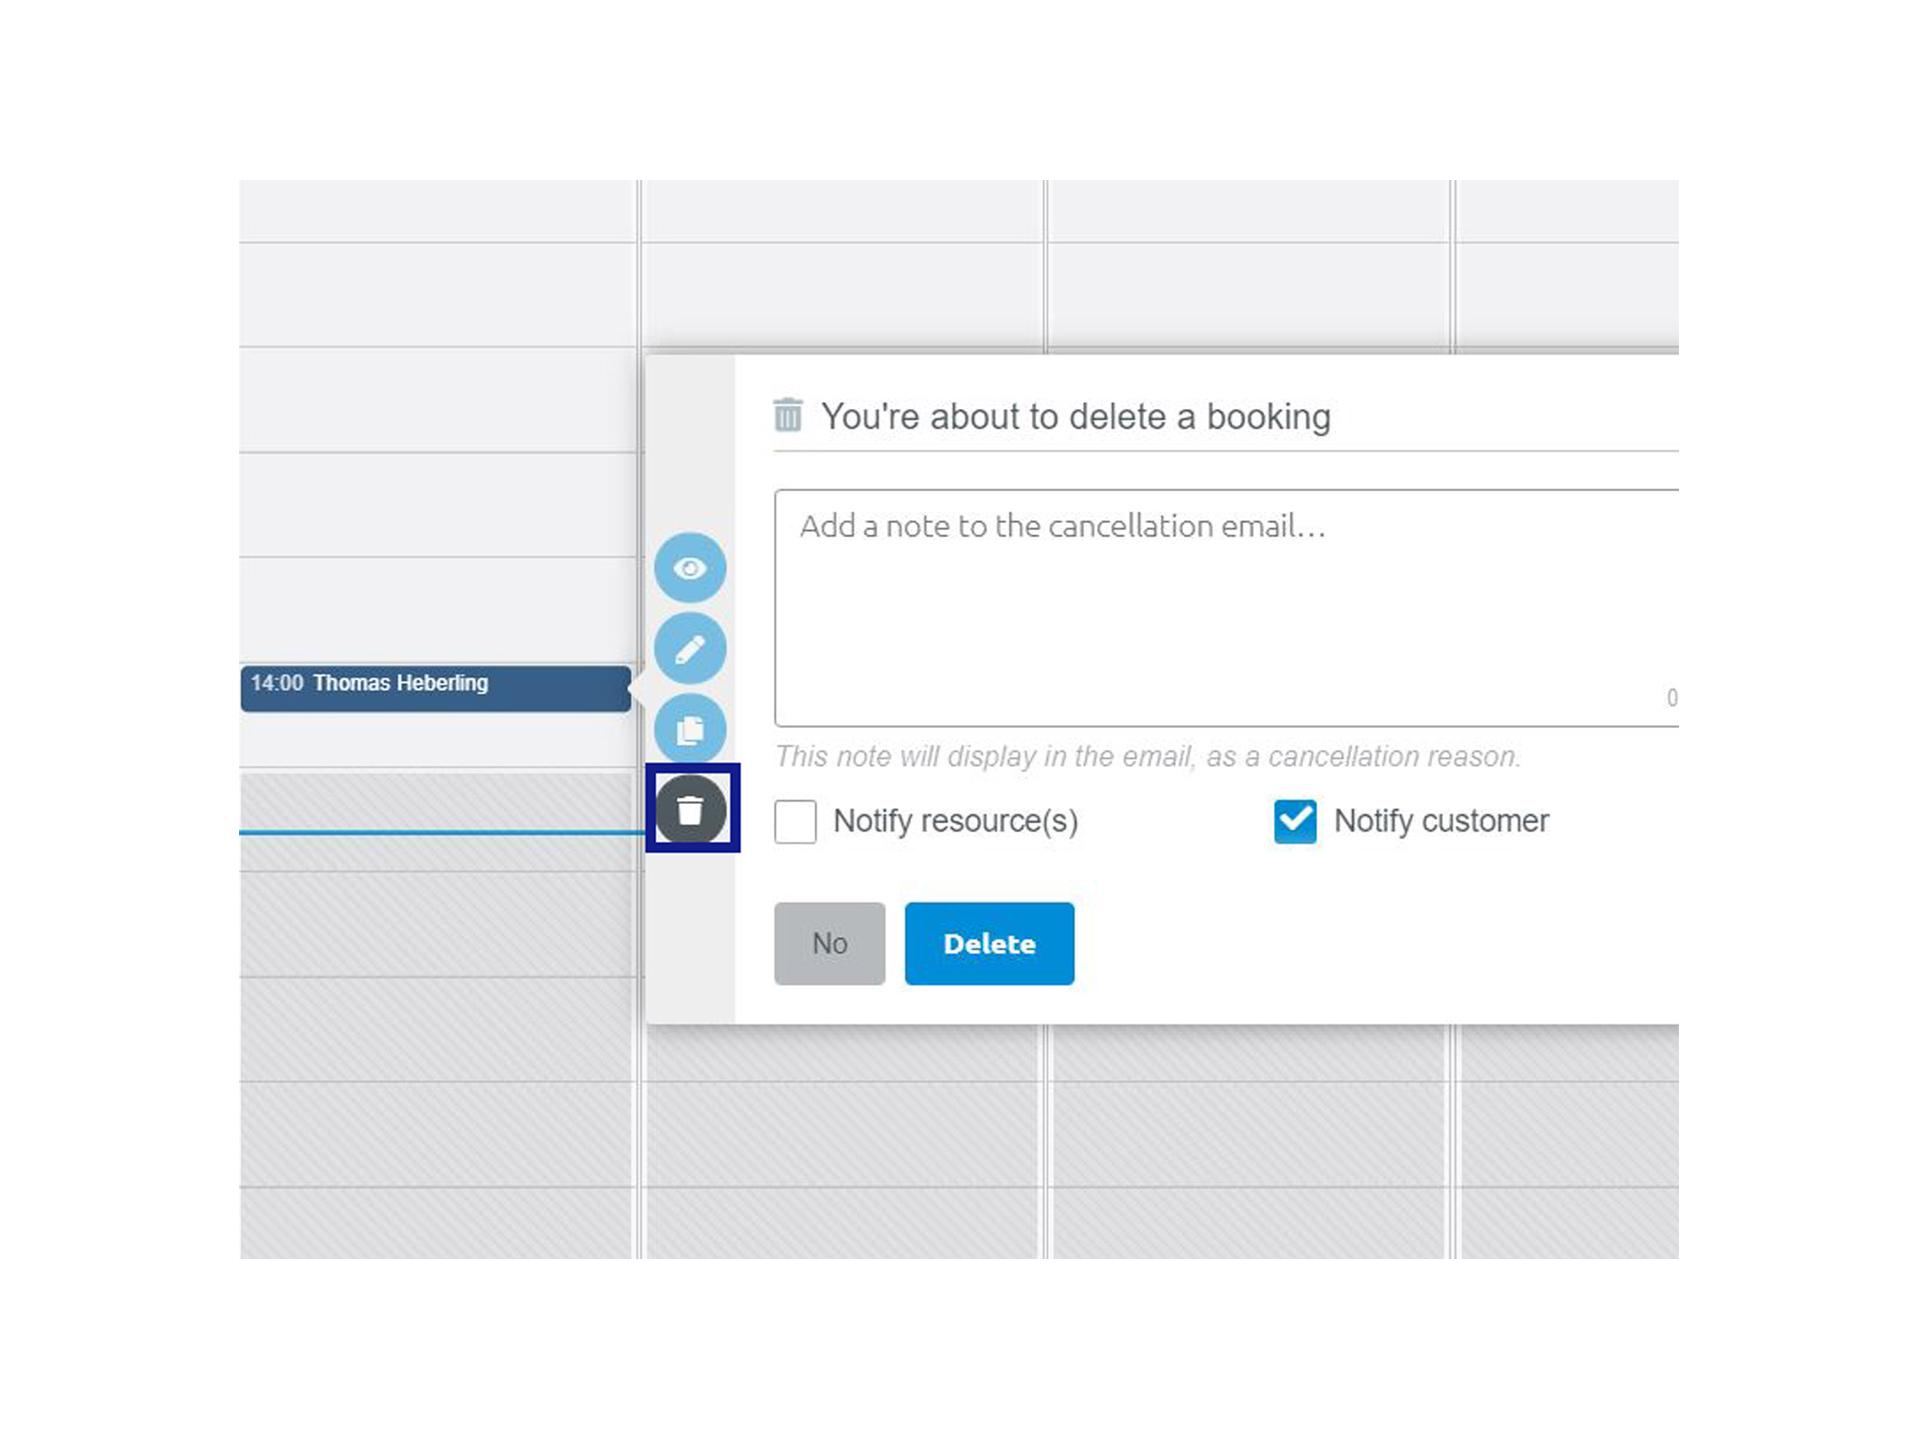
- If you want to cancel an appointment, click on the appointment and then on the trash button. A window will automatically open in which you can write an individual message to the customer or resource to personally inform them about the cancellation. This message will be attached to the cancellation email.
- Choose to notify the customer and the employee about the canceled appointment.
- Please note that customers can only be notified if the customer profile contains an email address.

Google Calendar Synchronization
How to sync. your google calendar with the ZEISS A.R.M. PlatformUse the Google Calendar Sync App on the ZEISS A.R.M. Platform to sync ZEISS A.R.M. Platform bookings to your Google Calendar, and/or Google Calendar events to your ZEISS A.R.M. Platform Calendar: for all your employee resources. It's really handy to have your meetings show in both - plus it stops you from getting double bookings.
ZEISS A.R.M. Platform syncs. with one Google Calendar for any given Google Account. So if you have more than one resource using the same Google Account, only the most recently requested resource sync will take place.
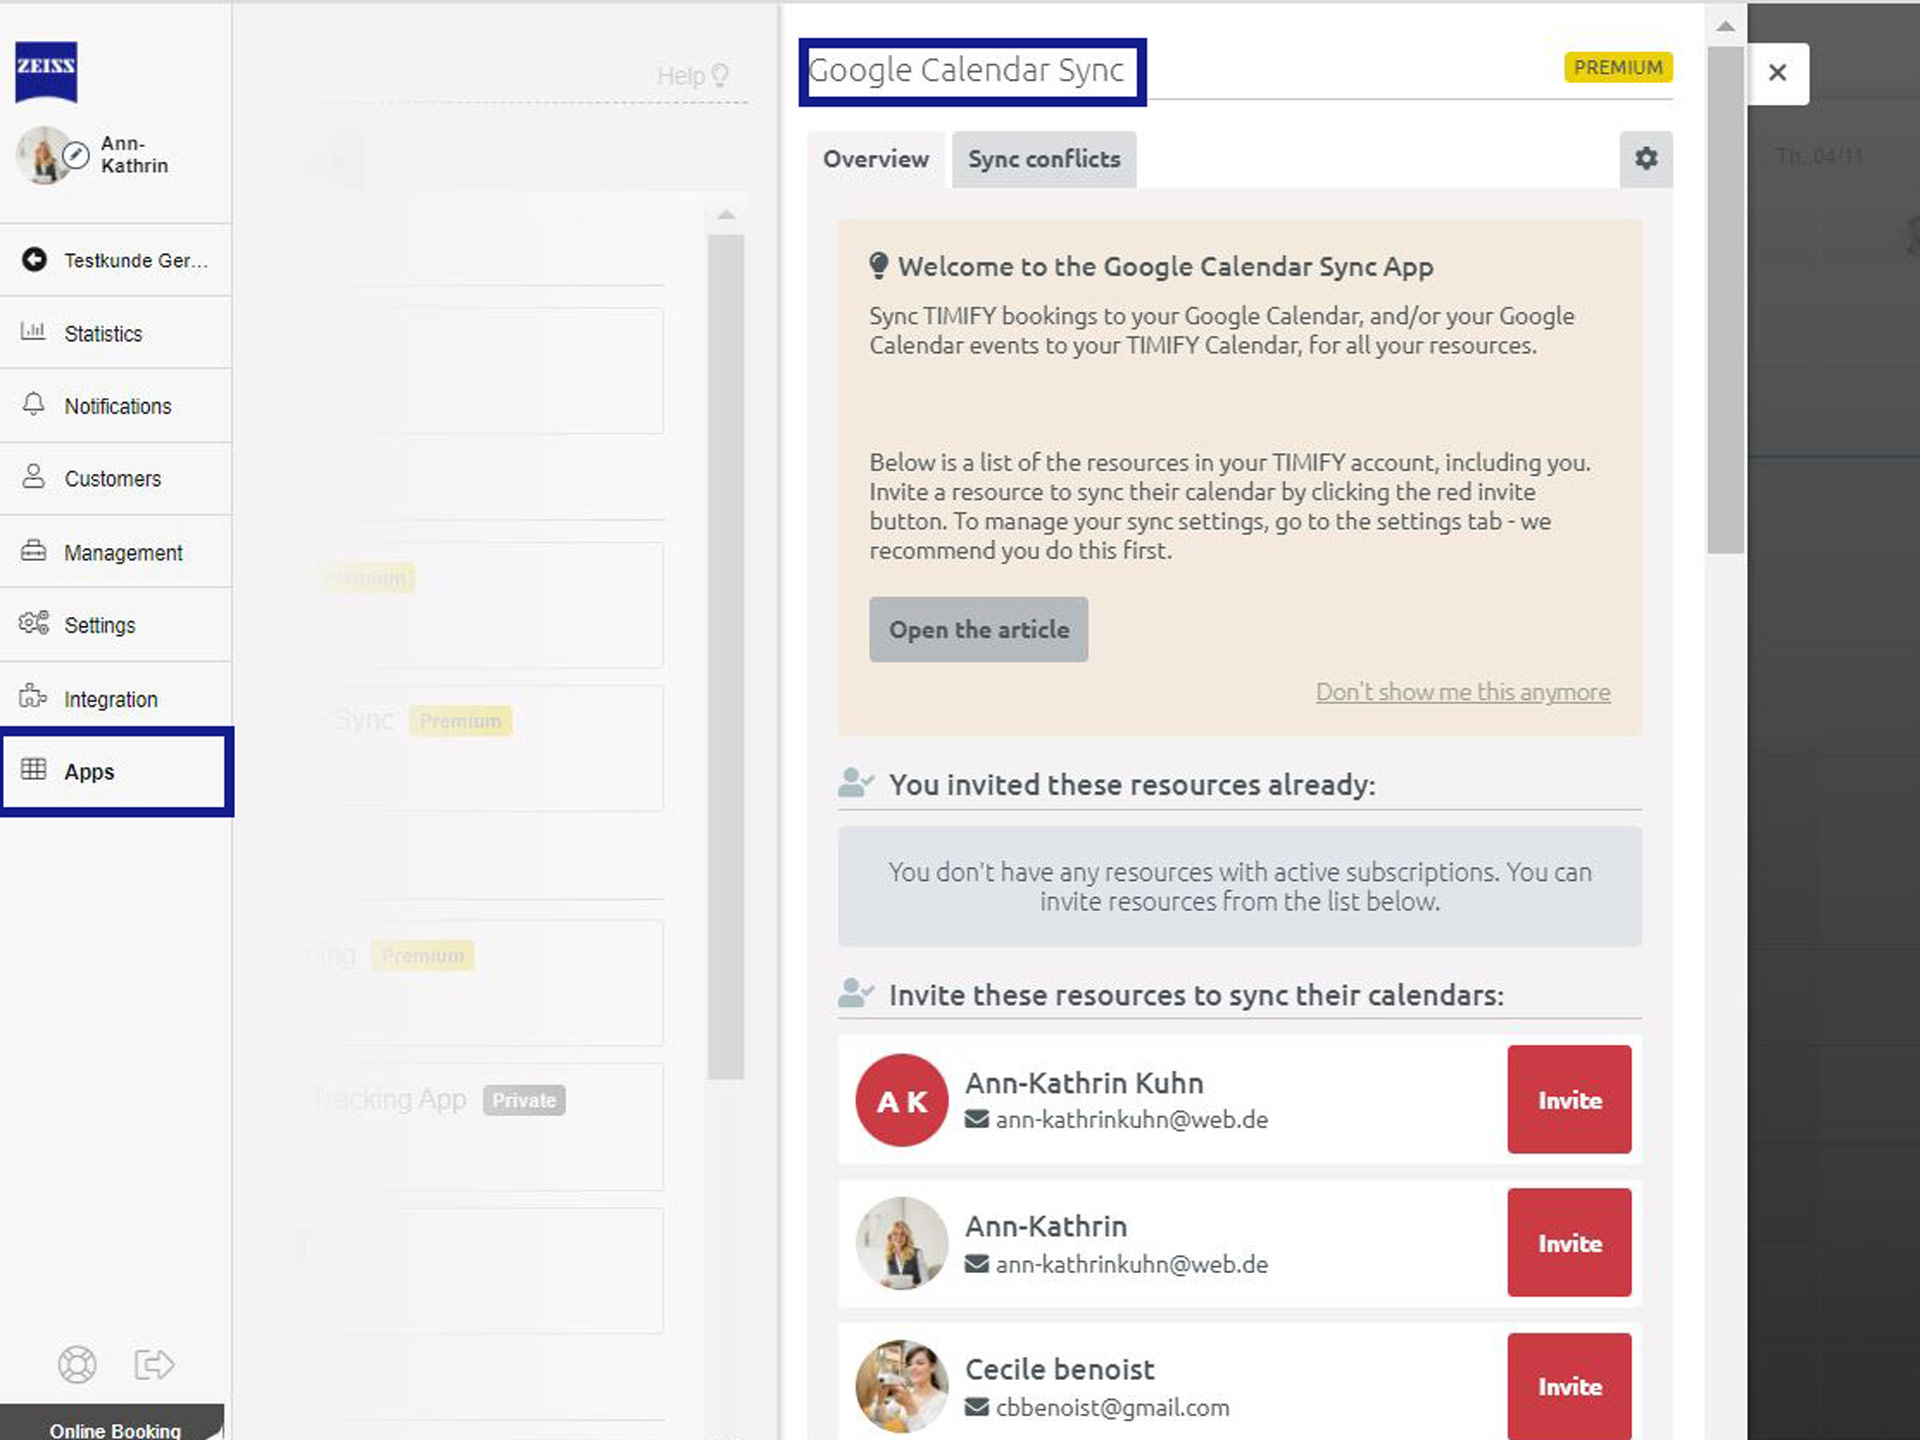

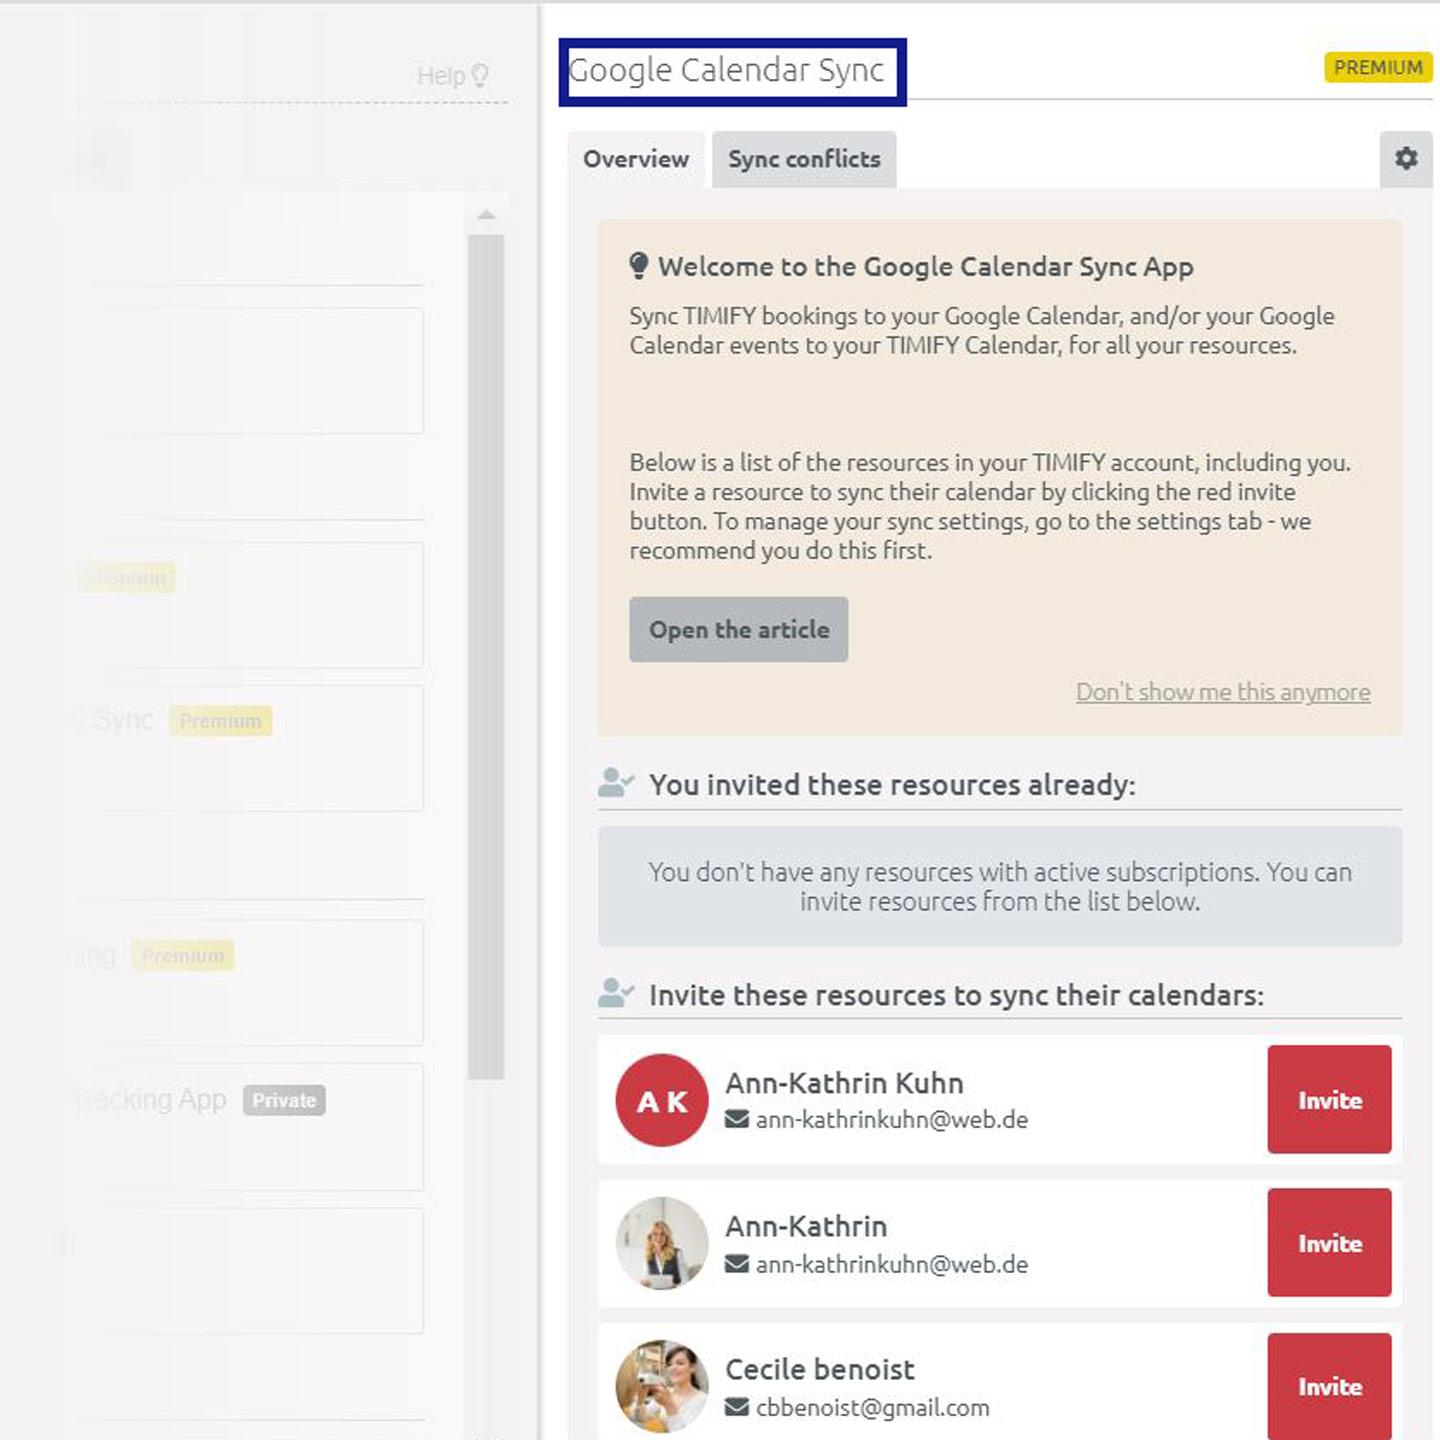
1. How to install the Google Calendar app
Go to the Tab "App" >> "App Marketplace" >> "Calendar synchronisation" >> "Google Calendar"
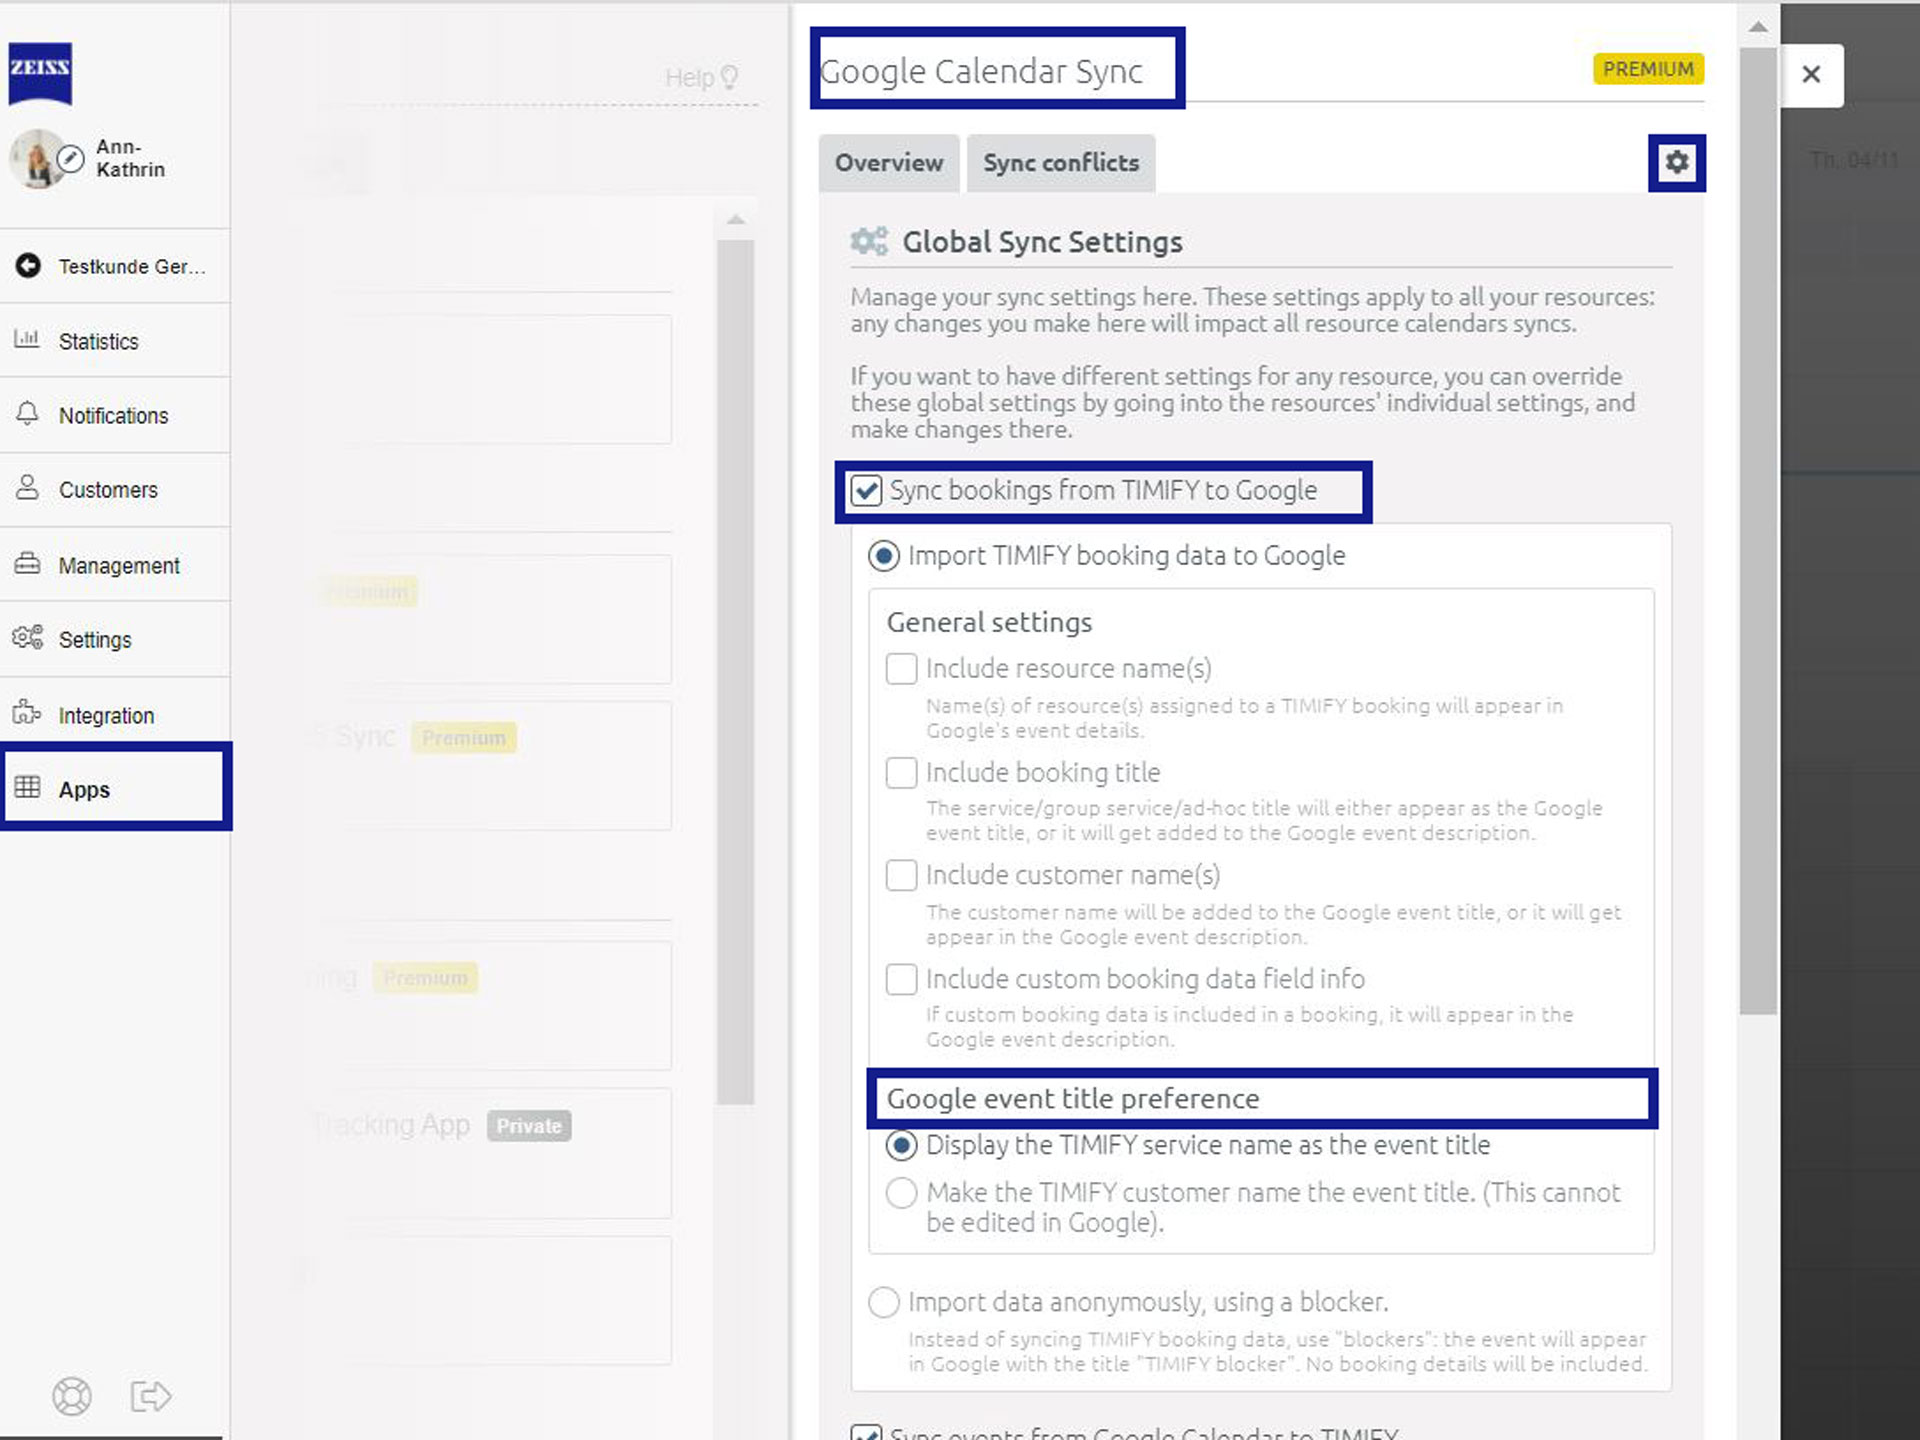

2. How to manage your sync settings
You can manage all your sync options in the settings tab. We recommend you get this set up before you invite resources to sync.
Access the settings by clicking on the settings tab. You can manage options for each sync direction, as highlighted below:
You can also decide whether event/booking data should get imported, or the event/booking should sync anonymously. Anonymous syncing is preferred by a number of our users: It means when your team wants to keep their bookings or events private, no data gets synced other than the booking or event length. For Google → TIMIFY sync, this is the only option available.
Note: any time you make changes to your settings, these changes will be applied to all future appointments only.
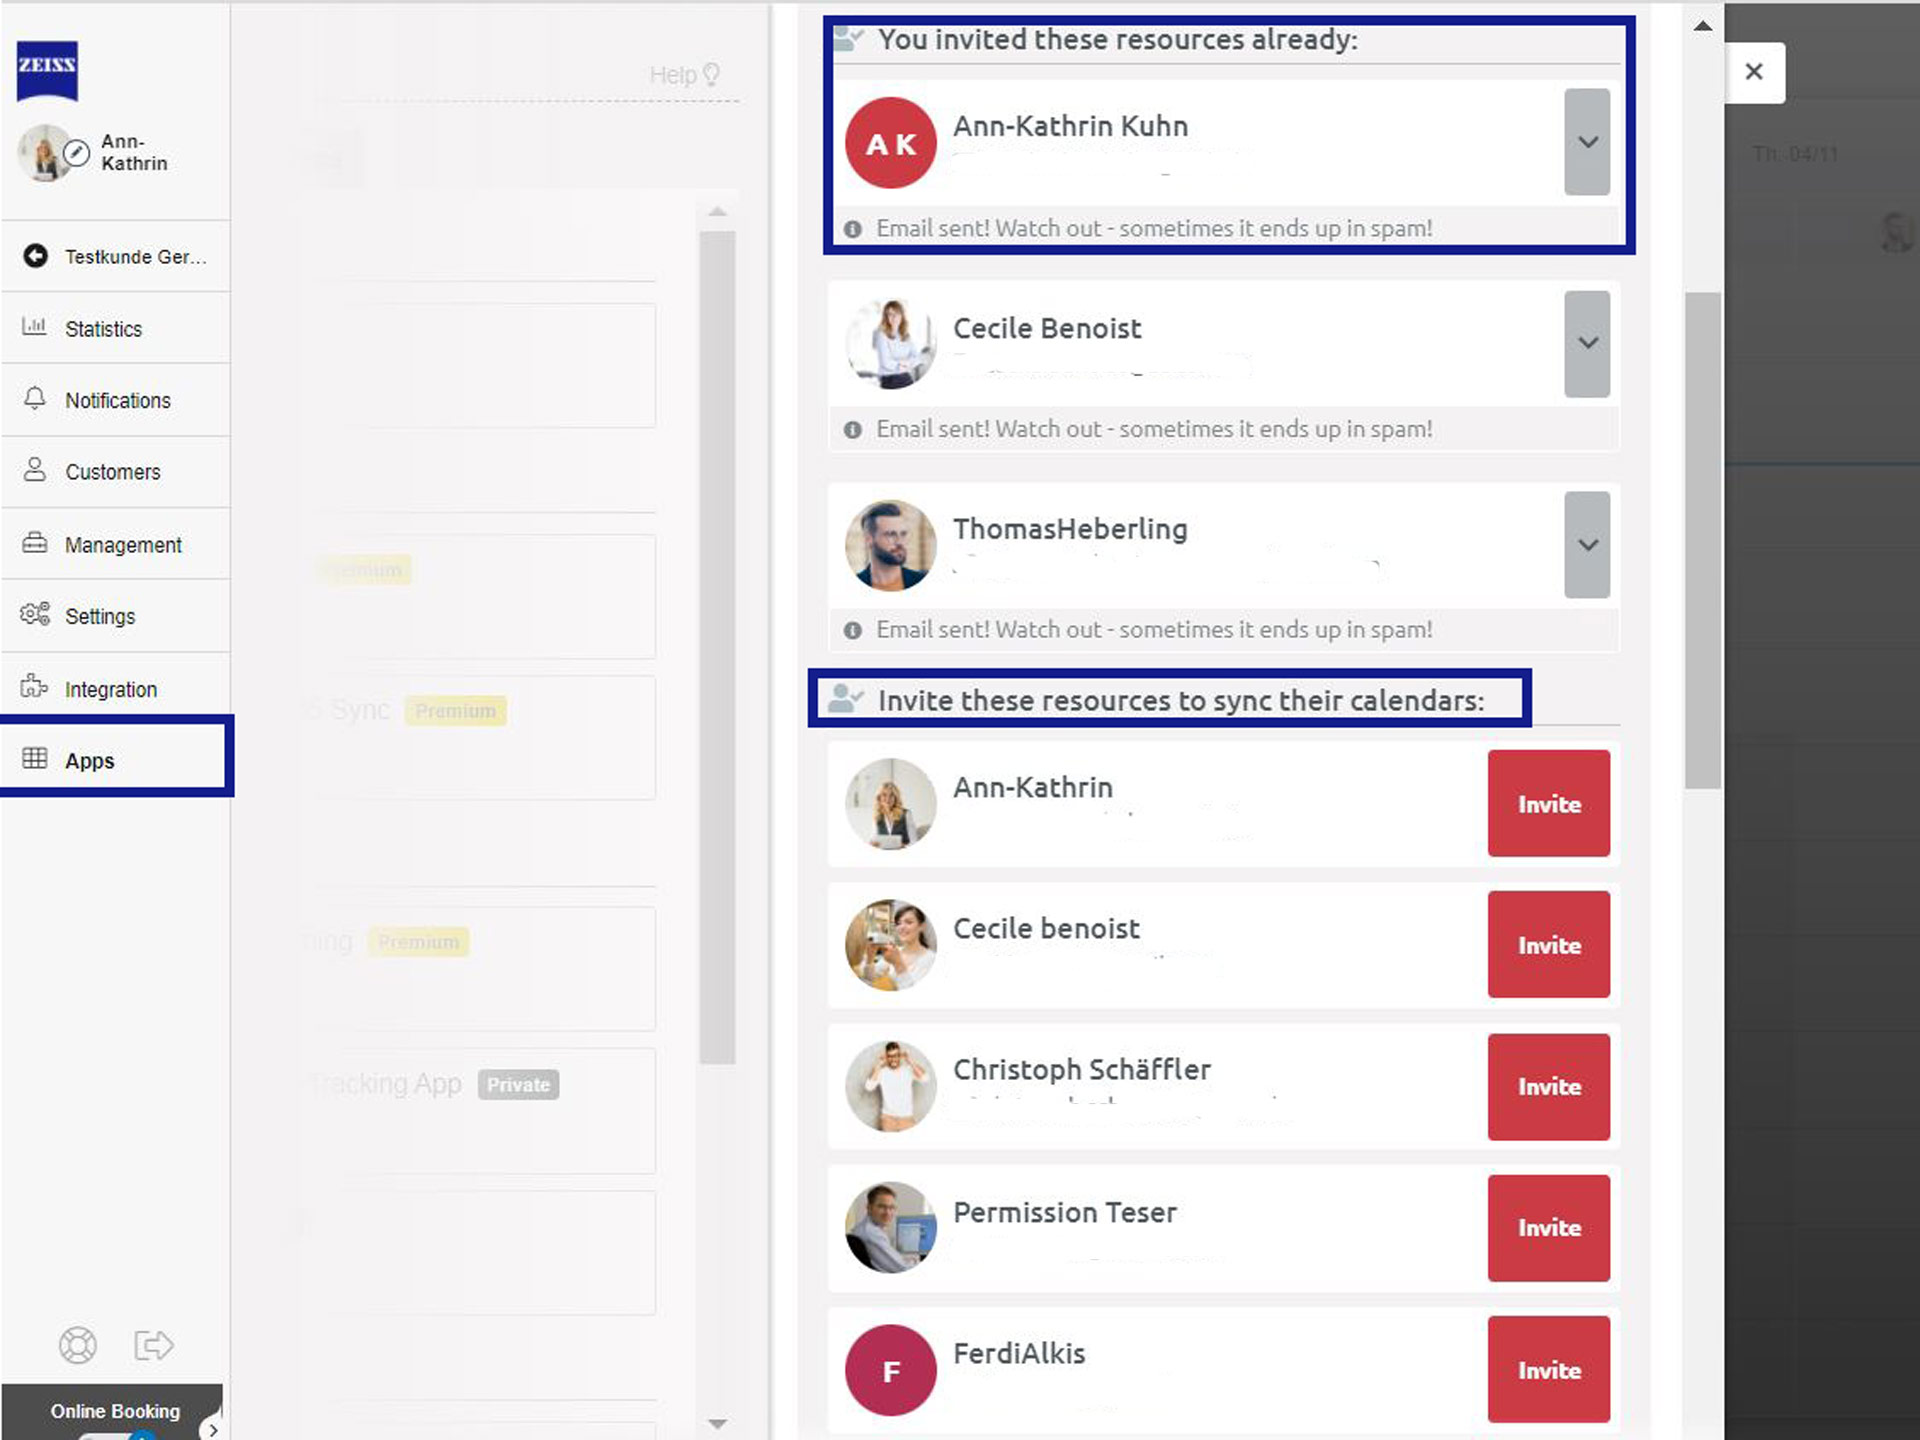

3. How to invite a resource to sync their calendar
In the overview tab, a list of resources appears with whom you share your calendar – including you. Simply invite the resource(s) you want to sync to the ZEISS A.R.M. Platform. The red box status will change from "Invite" to "Awaiting confirmation".
The next steps are for the resource:
You should receive an email from Google, with a link to start the Google sync.
NOTE: sometimes this goes to the junk or spam mail folder!
Open the link: you will be asked by Google if you wish to grant ZEISS A.R.M. Platform access, and then select which of your Google Calendars you want to sync. Select the Google Calendar you wish to sync, and click connect. You should receive an email confirmation, saying that your calendar has been successfully synced.
Depending on how much data there is to sync, the import process can take anywhere from a matter of minutes to a number of hours (this is likely if you have a vast amount of bookings). The resource will appear like this when the sync is complete:
4. How to manage individual resource settings and deactivate a sync
Go to your overview tab. Click on the drop-down next to the resource whose settings you want to manage. You can manage sync directions, and specify what data should be included in the sync. You can also view their sync log – this will display any sync conflicts.
The last option is to disable the resource sync.
Watch out for sync alerts!
Once you’ve completed your calendar sync, both calendars stay in constant communication with each other, pushing updates to the other calendar.
Occasionally, Google fails to send "refresh tokens": this means your ZEISS A.R.M. Platform Calendar may stop getting updates from your Google Calendar. As soon as we detect that Google failed to supply a refresh token, we’ll send you an alert, which will display in your "Sync conflicts" tab.
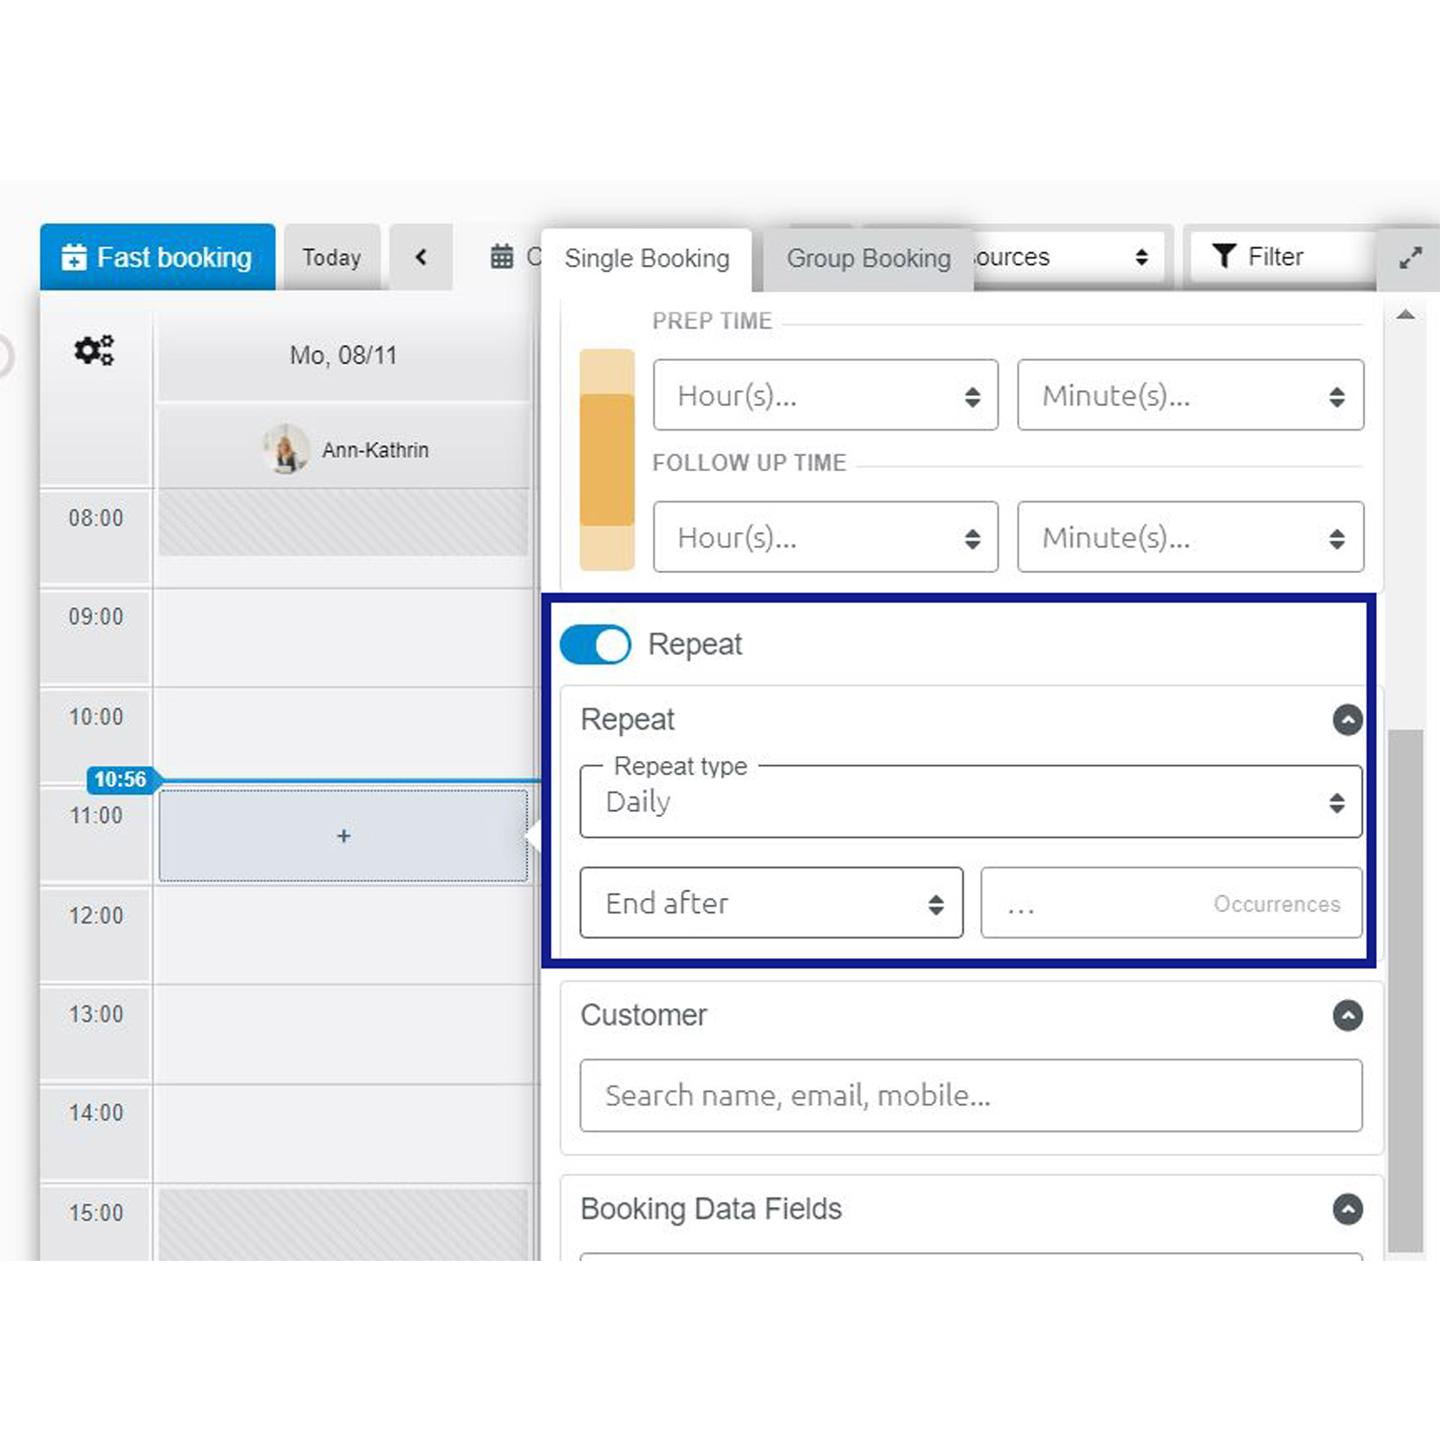

How to create series, preparation and follow up times for appointments
If you want to create a series of appointments, enable the repeat function and choose the frequency. Before you do this, make sure you activated the functionalities in the "Calendar and Booking form settings". You will find this on your home screen.
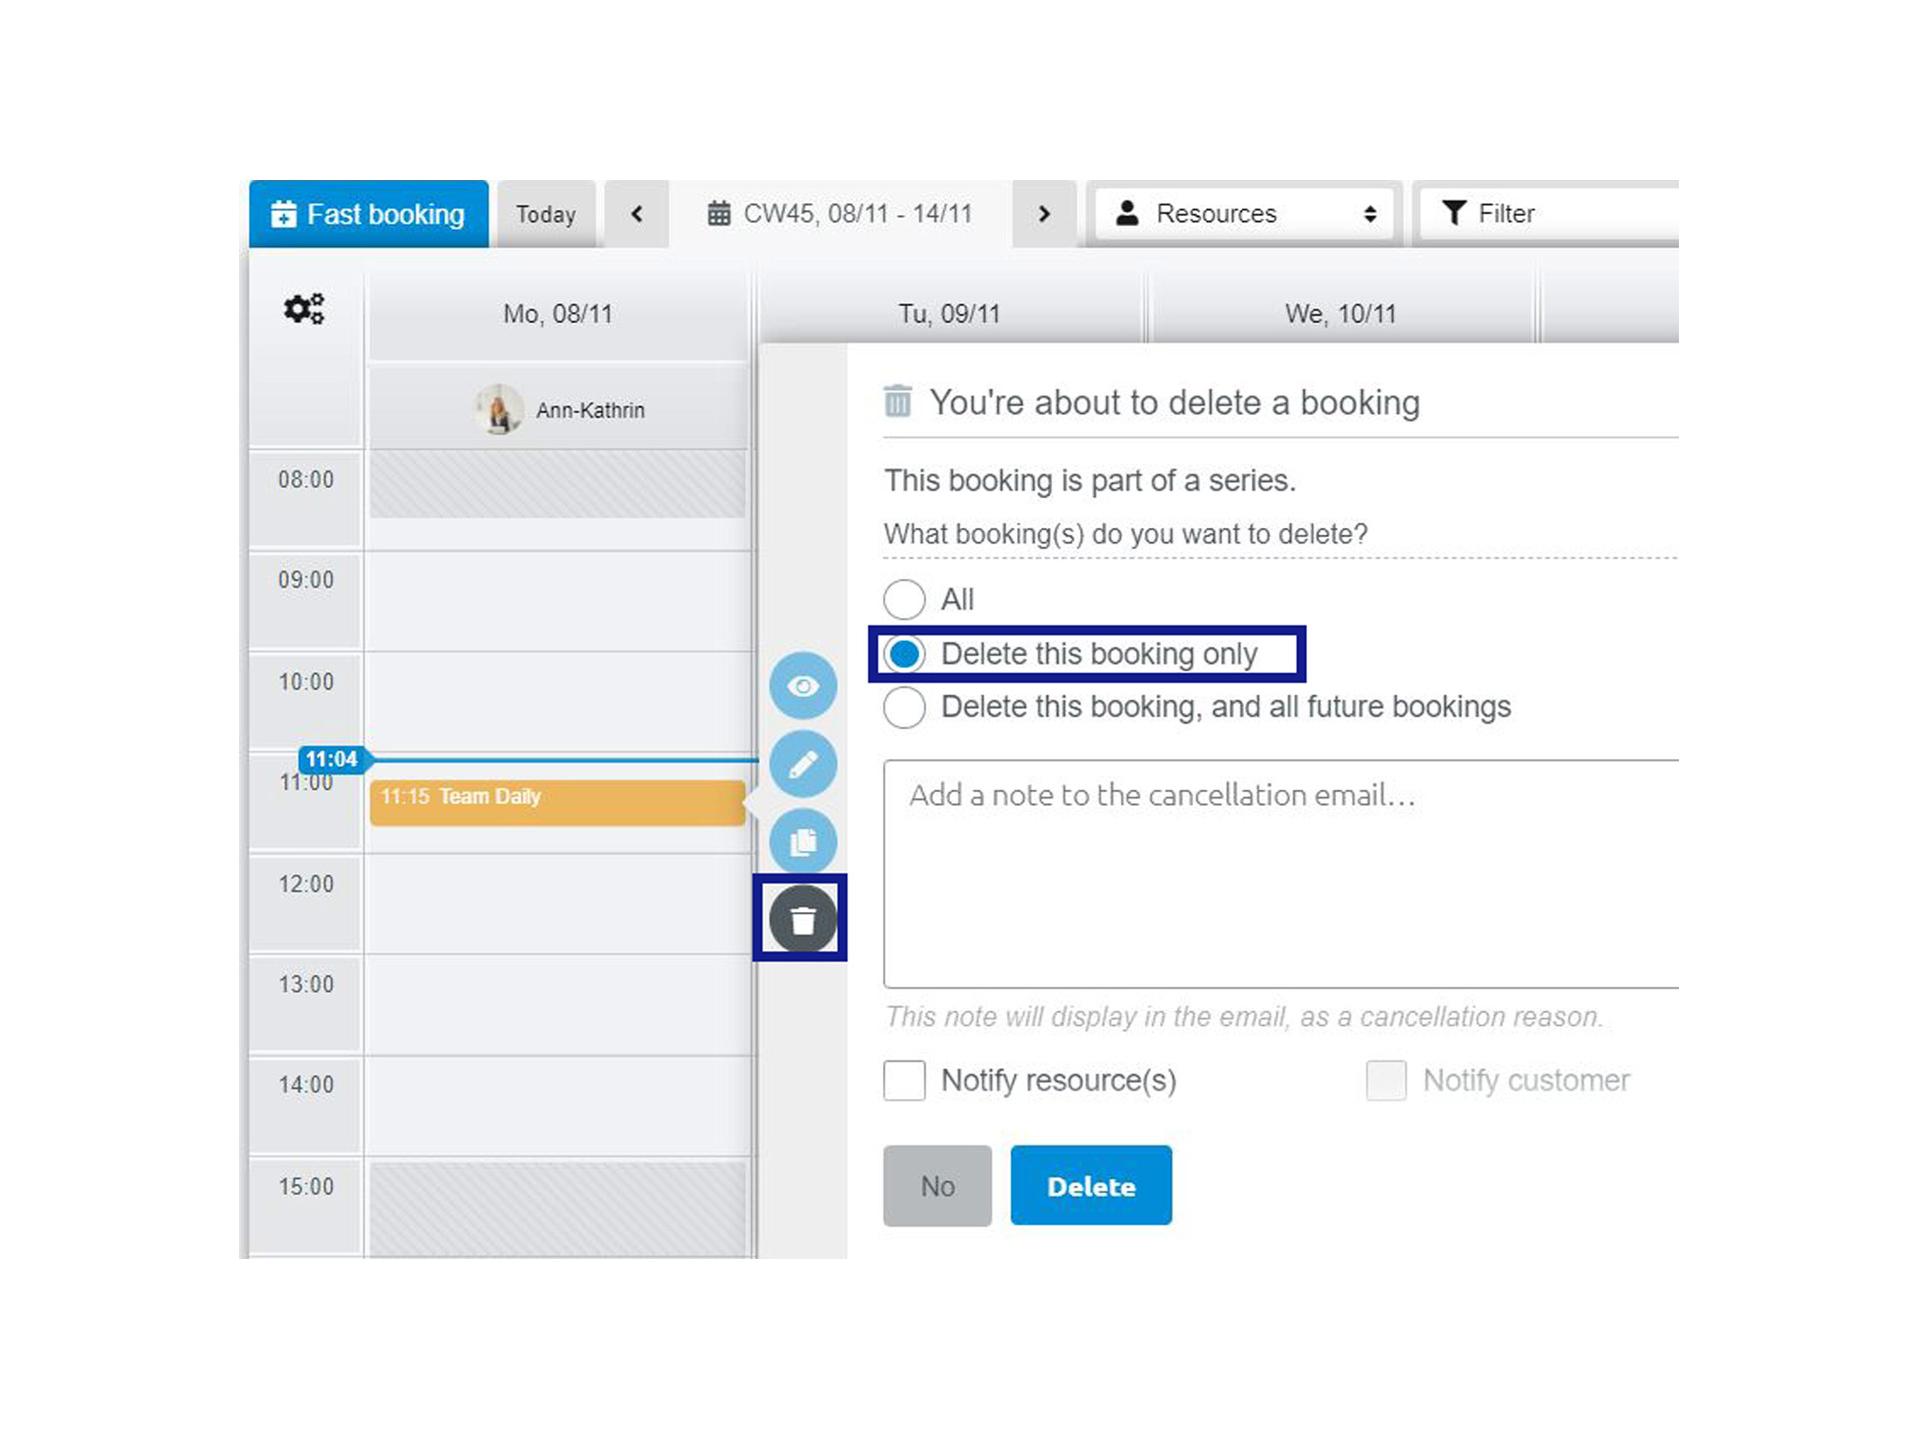

Delete entire series or individual appointments from a series.
If you want to delete one or more appointments from an existing series, you can click on this appointment and click on the bin button. You will now be asked if you want to delete the entire series, only this one event or all future events from this series. Select the appropriate action and confirm the deletion.
Preparation and follow-up times
- The prep and follow-up time feature allows you to create services with predefined buffers. These buffers are automatically calculated in the duration of the service and displayed as a lighter coloured area before or after the appointment block. Make sure you activated the functionalities in the "Calendar and booking form settings". You will find this on your home screen.
- Your customer will only see the actual duration of the service (without the buffer).
- The assigned resource, however, will be not available for other bookings during preparation or follow-up times.
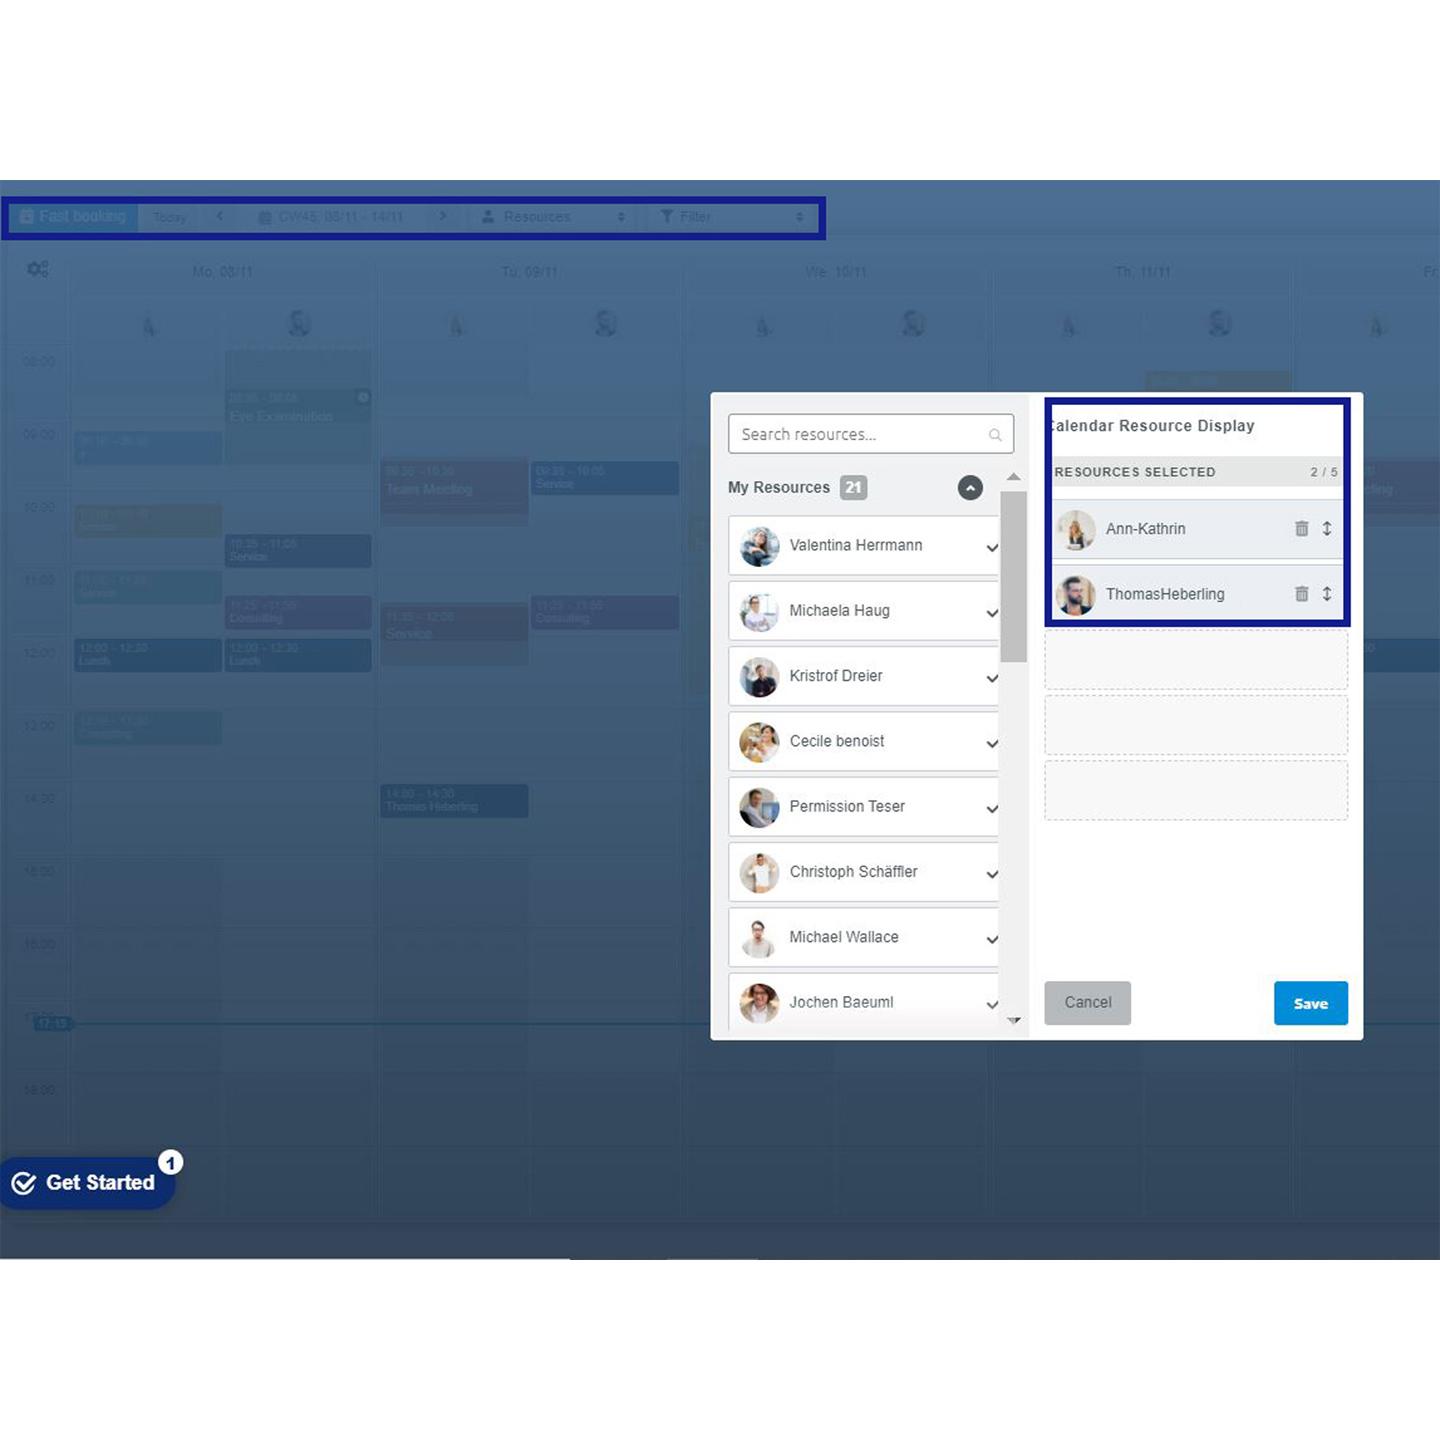

How can I see my team members’ calendars?
- Your ZEISS A.R.M calendar gives you the possibility to have a clear overview of the workload of your employees and resources such as rooms, equipment, etc.
- Click on the drop-down menu at the top and select the resources you want to display in your calendar.


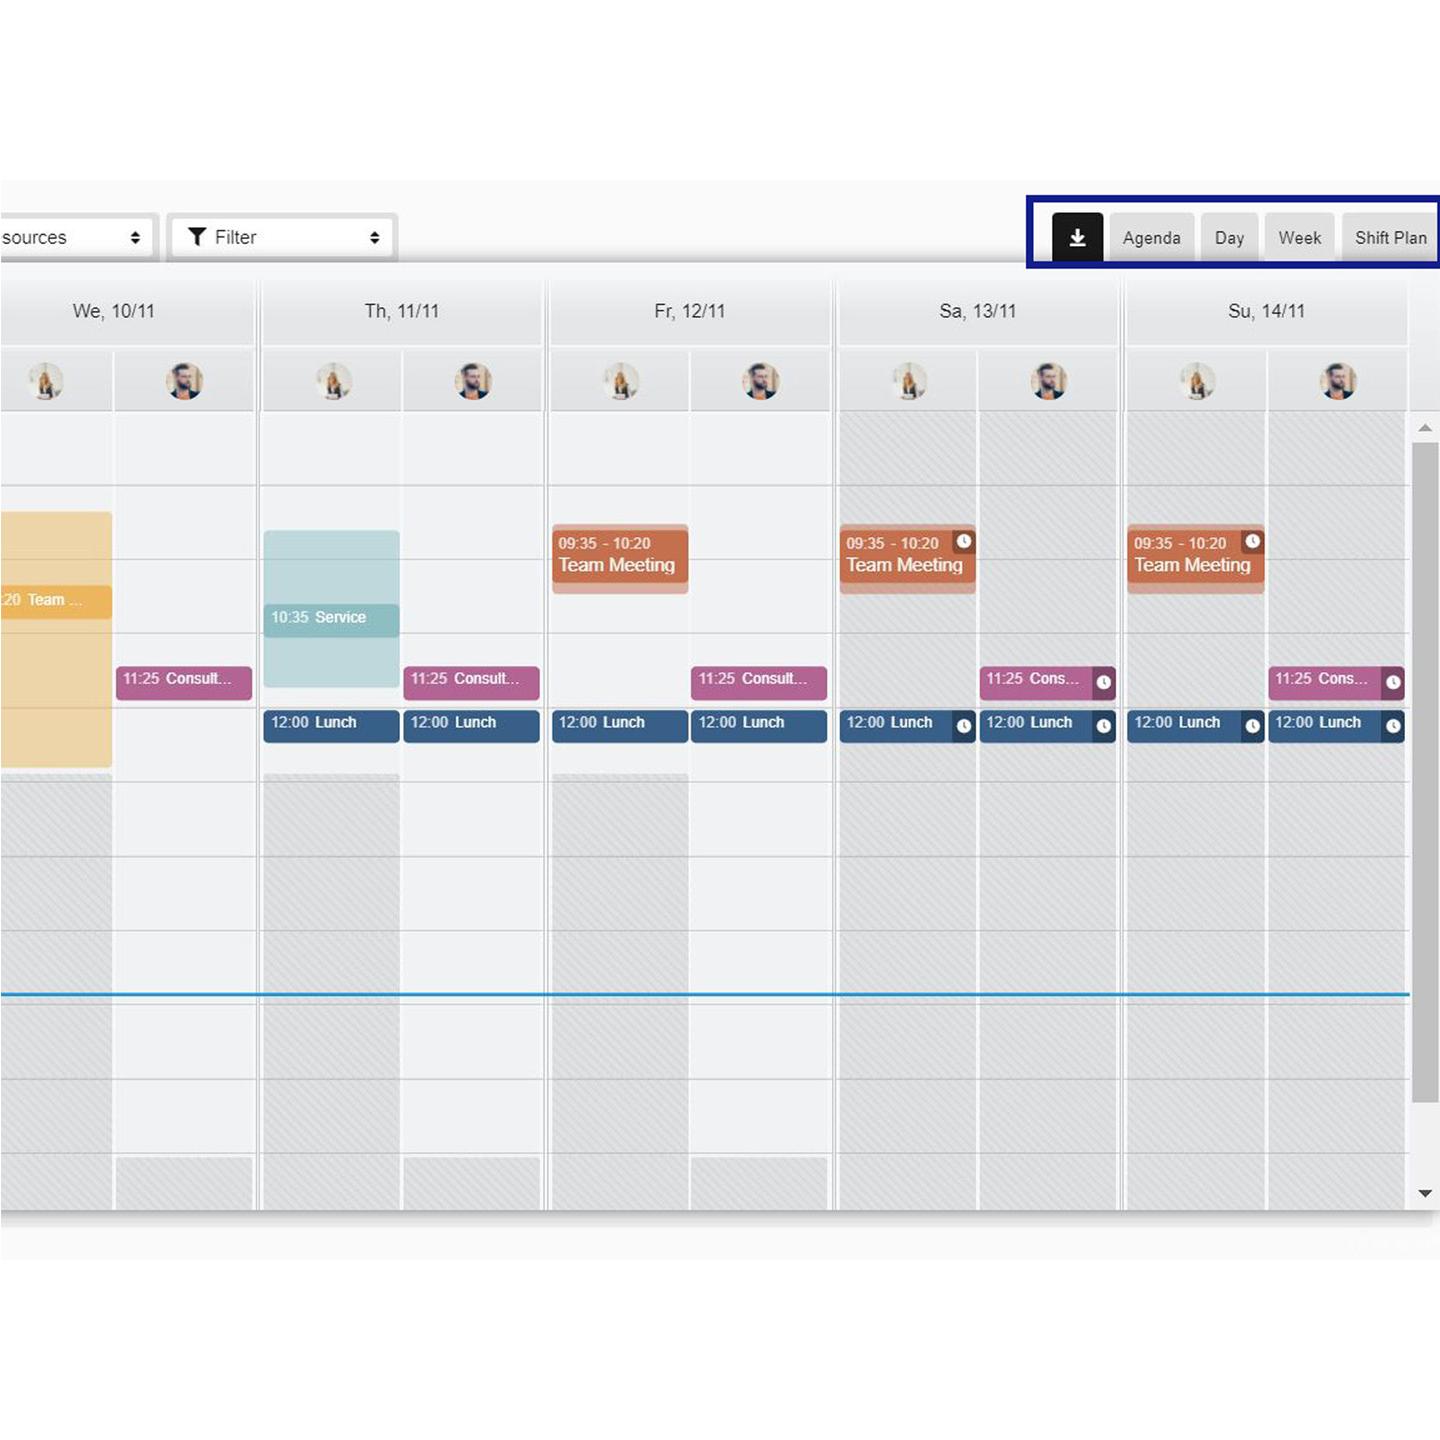
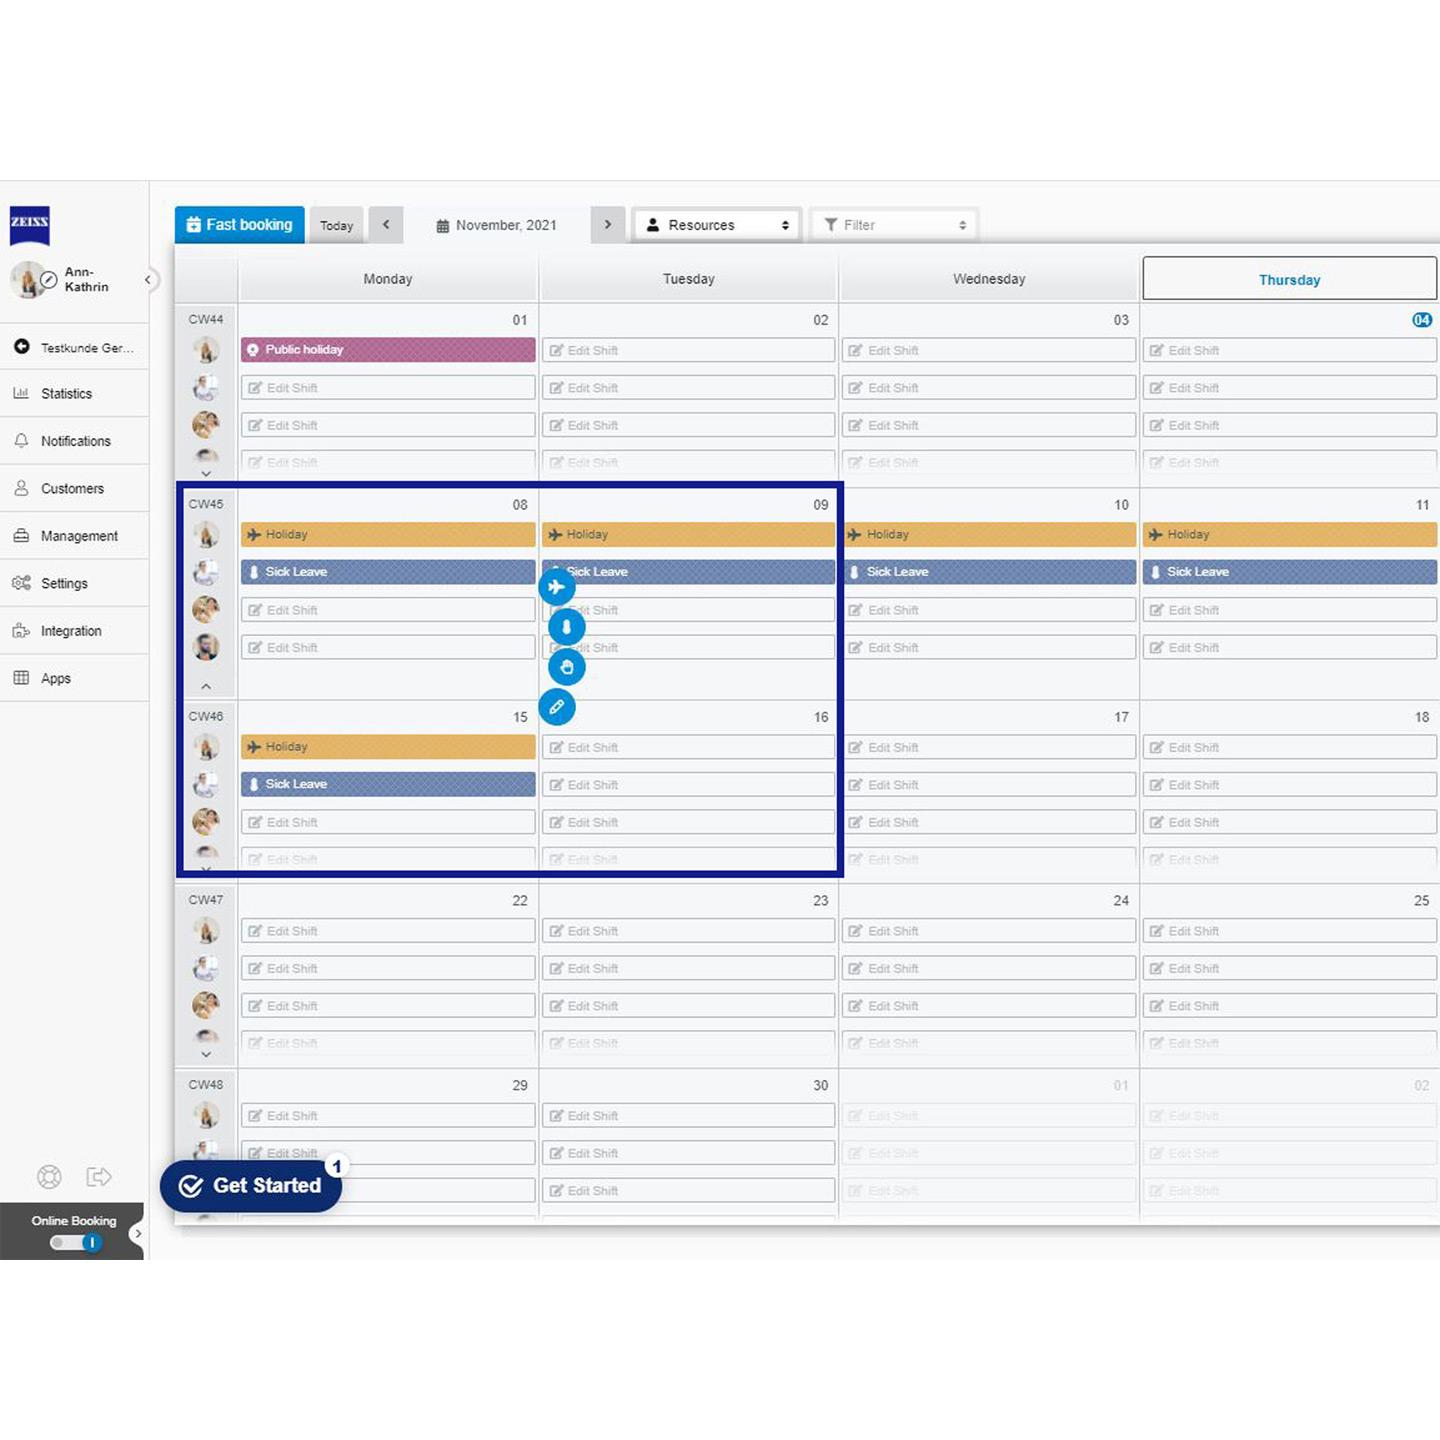
What is the shift plan?
- You'll find the shift plan at the top right of your calendar.
- For a new entry in the shift plan, first select all resources you want to include in the overview. You can add an unlimited number of resources to the shift plan and display them all using the arrow below the profile pictures or via a click on the filtering of resources (on the top in the filter tab).
- To add a new blocker to the shift plan, click on the "edit button" of the desired employee. The different options will appear. Select whether the employee is on vacation on this day or has a sick day. You can also specify a general day blocker that does not define what type of blocker it is, but it will disable the online booking. Using the pen button, you can adjust the working and booking times of an employee or resource for a certain period. You also have the option to add intervals.

How to manage vacations and sick leave with the ZEISS A.R.M. Platform
Vacation
- Go to the shift plan, click on "Edit shift" and choose "Add vacations". Select the resource to be set as absent and complete the time frame of absence. The calendar's grid for an employee on vacation will appear in yellow both in the "Shift plan" and in the agenda.
Sick leave
- The ZEISS A.R.M Platform allows you to use the "Shift plan" feature to manage the sick days of each employee and deactivate them for online booking during their absence.
- First open the shift plan by clicking on "Shift plan" in the top right corner of the calendar.
- Here you can now click "Edit shift" for the relevant employee and day and select the thermometer button.
- Next you can decide whether a sick day blocker should be created only for the selected day or for a longer period.
- Save to create the sick day.
- It will now be displayed as a blue area in the calendar. For the duration of this blocker, your customers will not be offered appointments to book online.
- Keep an overview of the sick days, holidays, etc. in the statistics tab.

How to display public holidays in your calendar
Find our how to display public holidays for any given region and how to manage whether resources can get booked on public holidays.

1. How to display public holidays for any given region
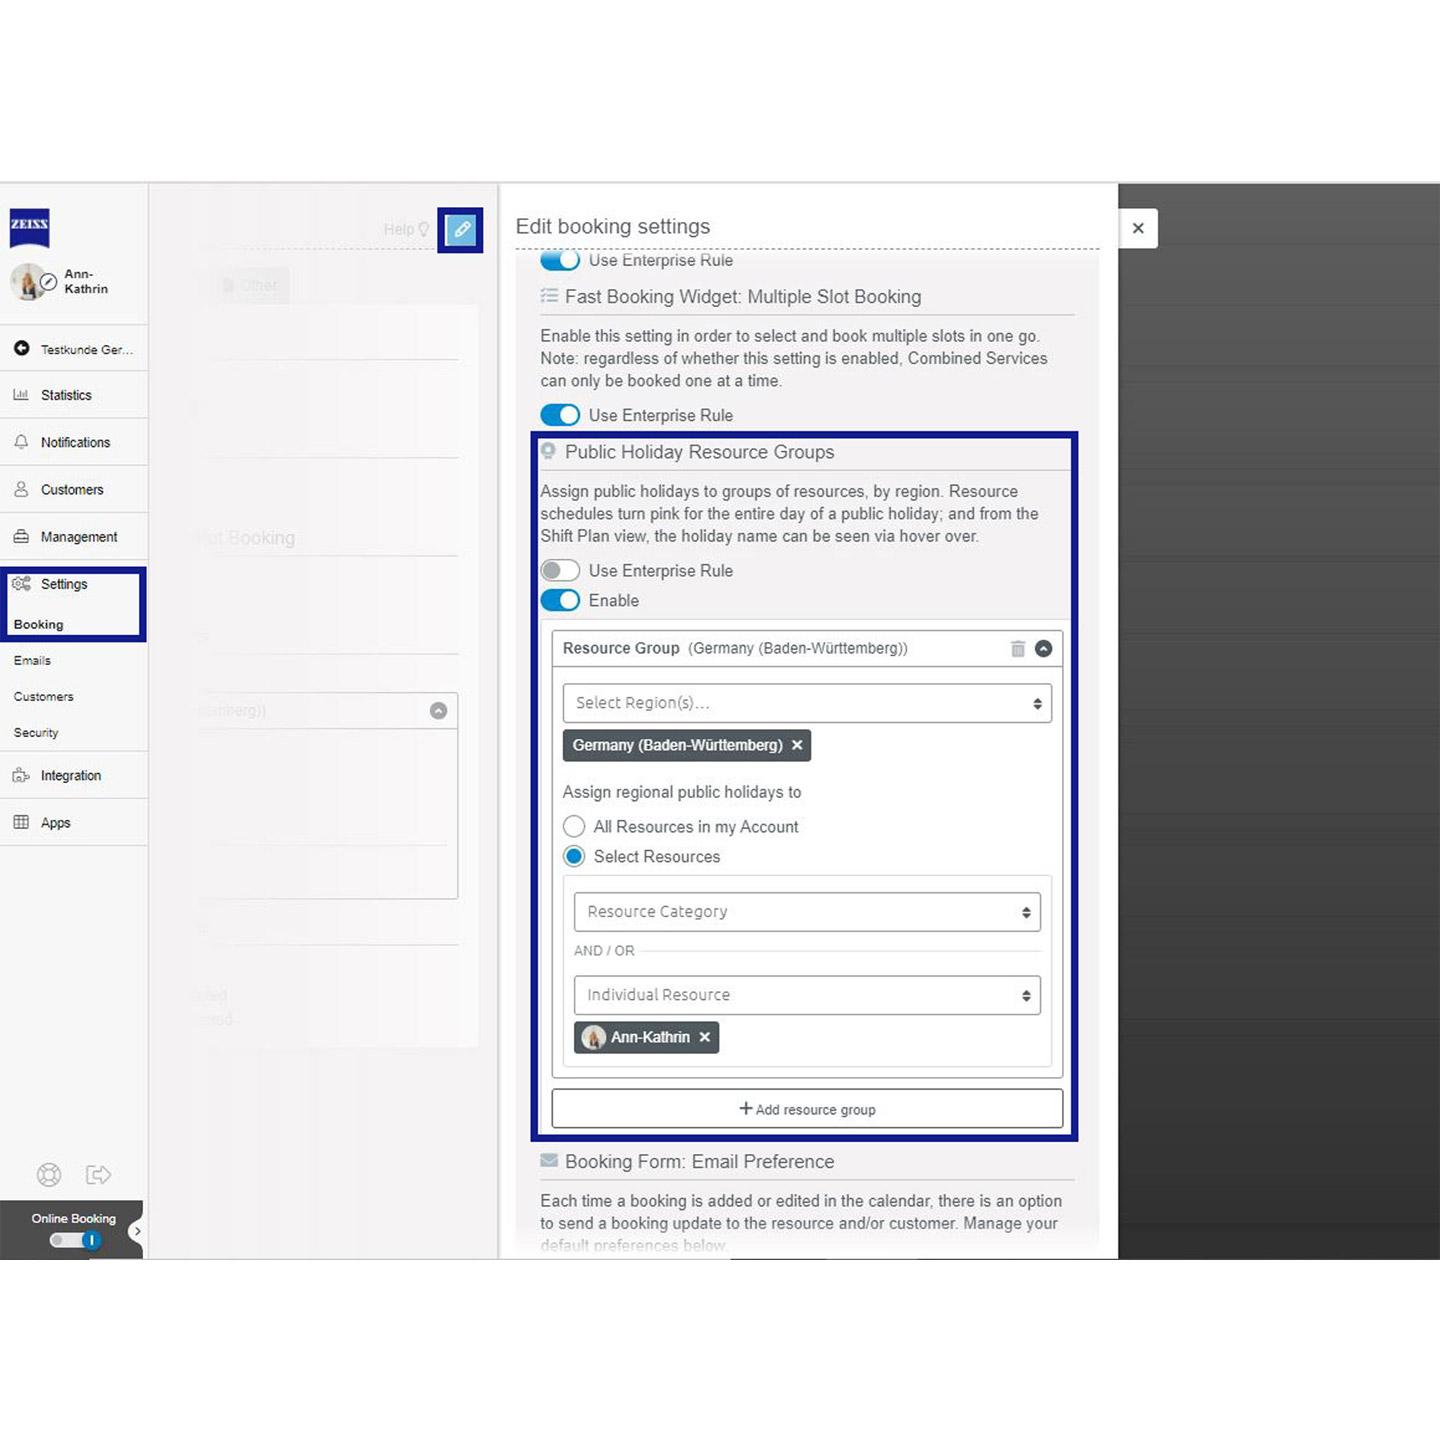
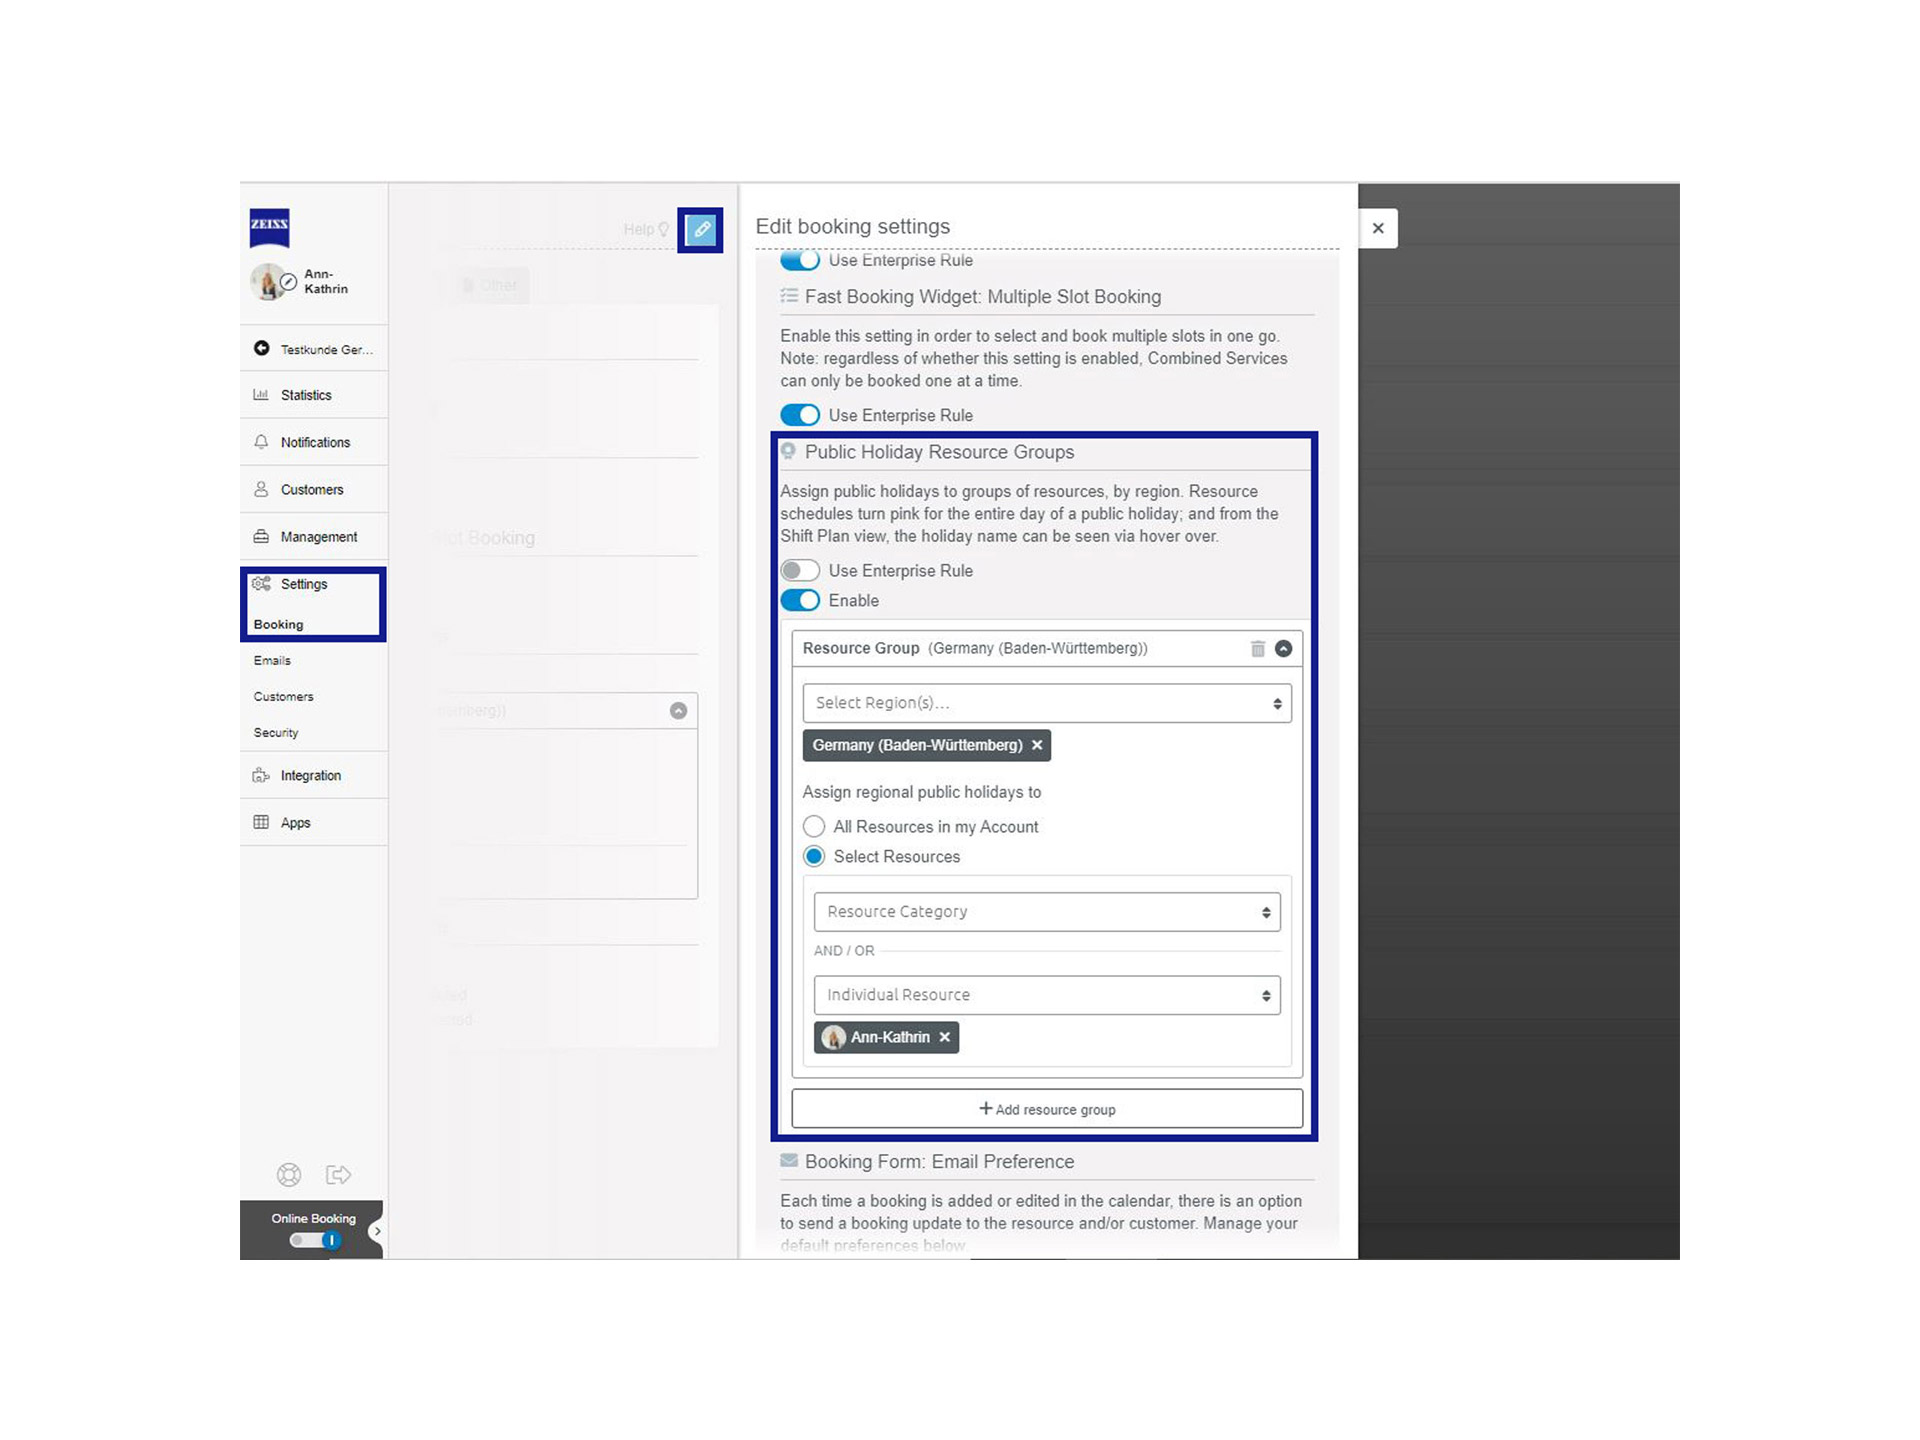
Step 1: From your navigation, go to "Settings" >> "Bookings" and select the calendar tab. To access the public holiday resource groups setting, click on the pen button.
Step 2: Enable the setting: "Public holiday resource group", select a region(s) via the drop-down that you want holidays to display for; and for which resource. We selected e.g., "England" as the region and assigned the resource group e.g., "London team". You can create multiple resource groups, add entire resource categories and/or individual resources. All independent resources are available from the resource list.
- You can add multiple resource groups. When you're done, hit save and return to your settings preview.
- In your calendar and shift plan, the resource day view will appear pink; and if you hover over the resource in the shift plan view, the public holiday name will display, as well as the resource's availability to work that day.
- You can see which holidays display in each resource’s calendar, and whether they are bookable on public holidays.


2. How to manage whether resources can get booked on public holidays
You can manage this in two ways:
- For all resources: from your navigation, go to "Settings">> "Bookings" >> "Booking tab". Click on the pen button and scroll down to the "Resource absence": Scheduling rule setting. Here you can select whether resources may or may not be assigned bookings outside their working and online booking times, including holidays.
- For an individual resource: Go to "Management" >> "Resource" then click on the resource whose file you wish to edit. Scroll down to the "Resource availability": Scheduling rule and apply your preferred rule.

How to block slots and days to avoid bookings?
- With ZEISS A.R.M. Platform you can add any "blocker" during your booking hours to your calendar and block single hours or days to exclude them from the online booking.
- To create a blocker that is shorter than a day, simply click in the calendar in the desired time window and create a title booking.
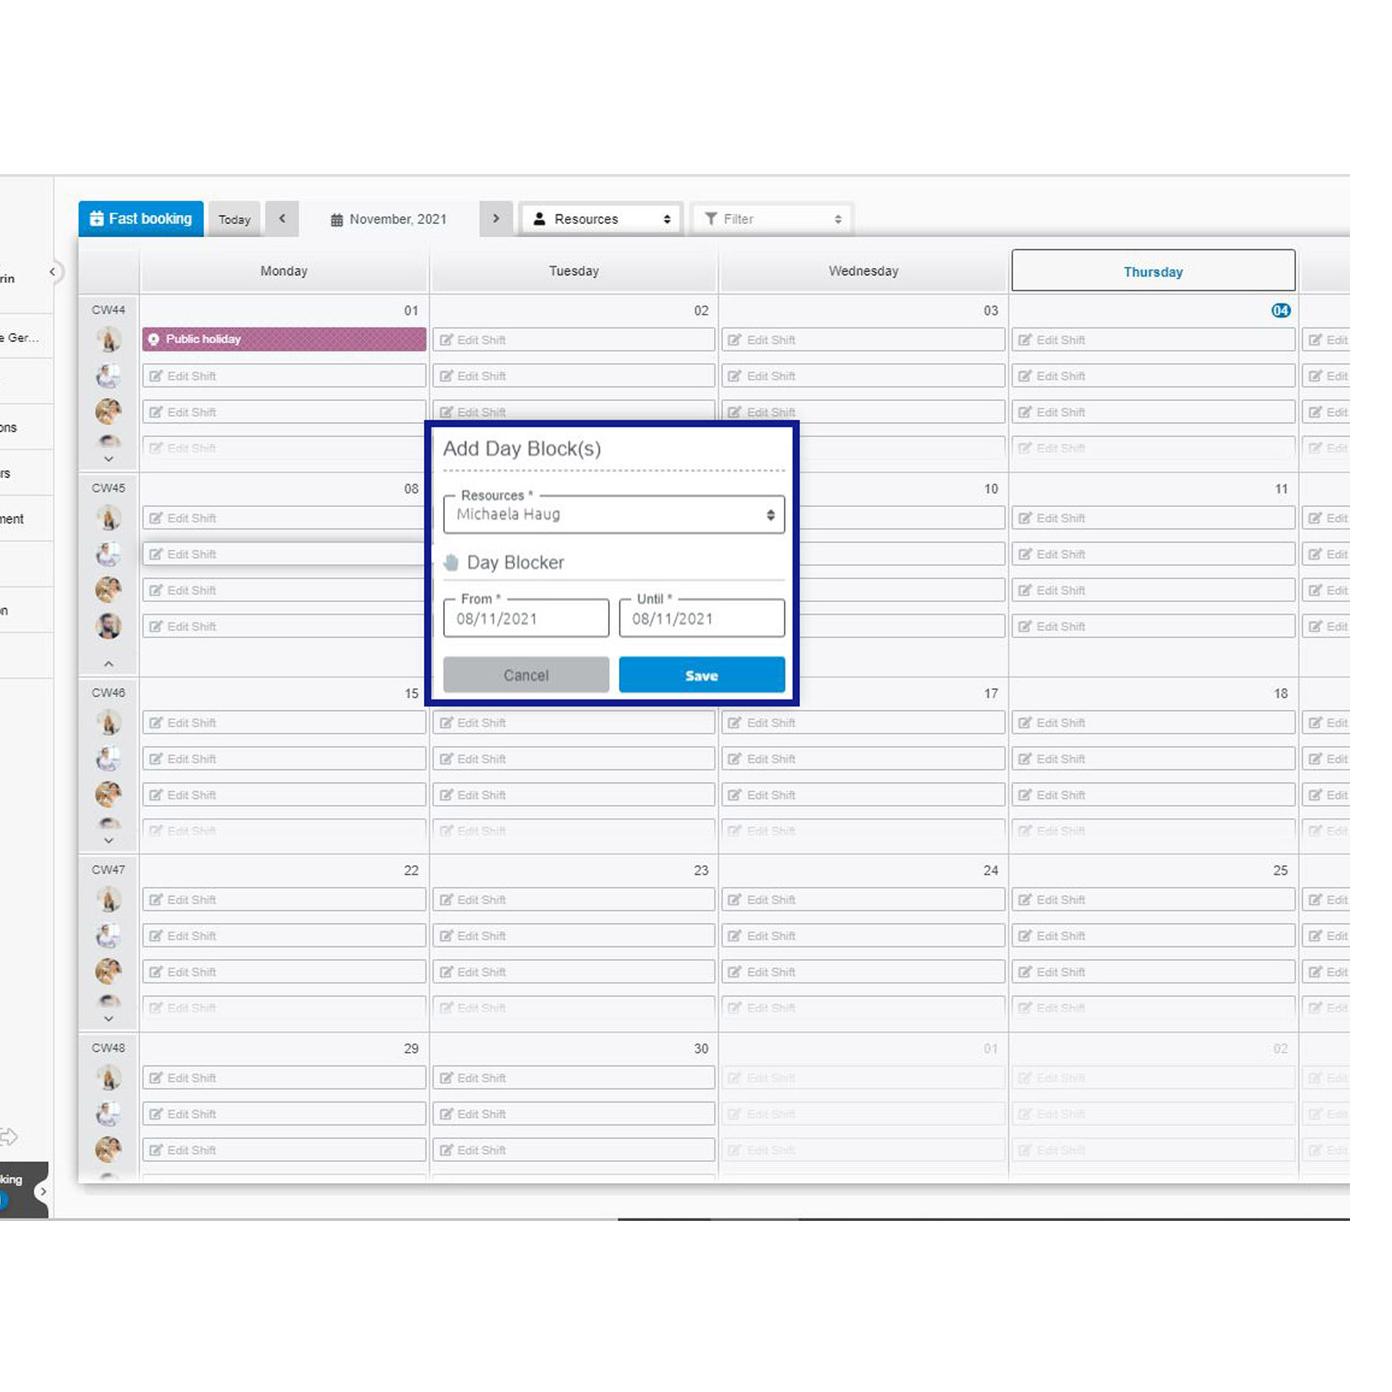
- If you want to exclude one or more days from the online booking, we recommend the day blocker function from your shift plan, which you can open by clicking on the "Shift Plan" button in the upper right corner of the calendar.
- In the shift plan you will find the day blocker (hand button) with which you can exclude one or more days from online booking with just a few clicks.

Notification centre - activity log & email status
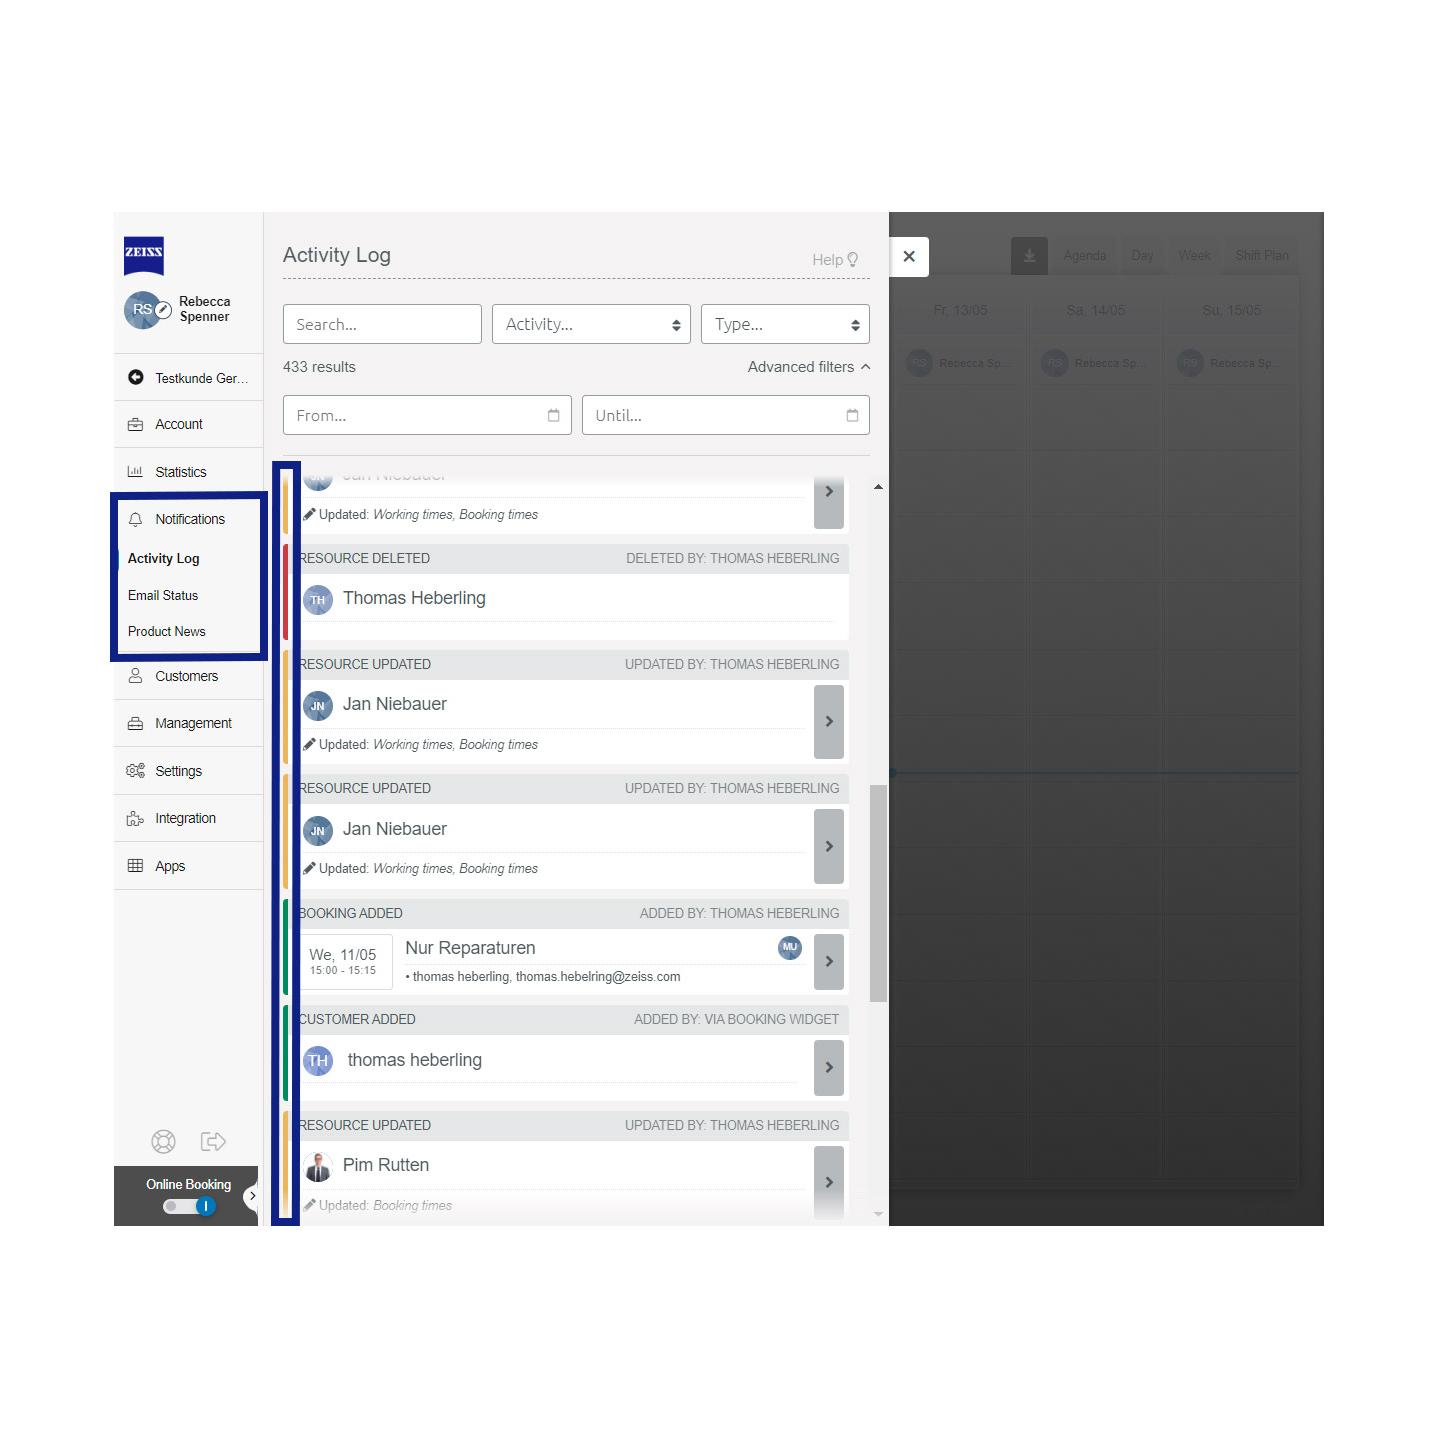
In the menu bar, under the "Notifications" tab, you will find an overview of all your ongoing activities in your online calendar, as well as an overview of all emails sent automatically by the system or platform news.
Activities in the online calendar: For each activity e.g. New service created or customer data updated, you can view the change at any time. The colour coding and the filter options allow you to search for the relevant activities.
Email notifications status:
The provider guarantees a 100% delivery rate – as long as the customer email exists. Check this in your calendar. The platform distinguishes between five different categories:
- Processed: Email is prepared for dispatch by the service provider.
- Delivered: Email was successfully delivered. Delivery does not mean that the email will appear in the customer´s mailbox. It is possible that the email ended up in the junk/spam folder.
- Sent: The provider has tried to deliver the email. The platform is waiting for an update.
- Hard bounce: This is a delivery error caused by specifying an incorrect, non-existent email address.
- Opened: The email was successfully transmitted to the destination server and the recipient opened it.